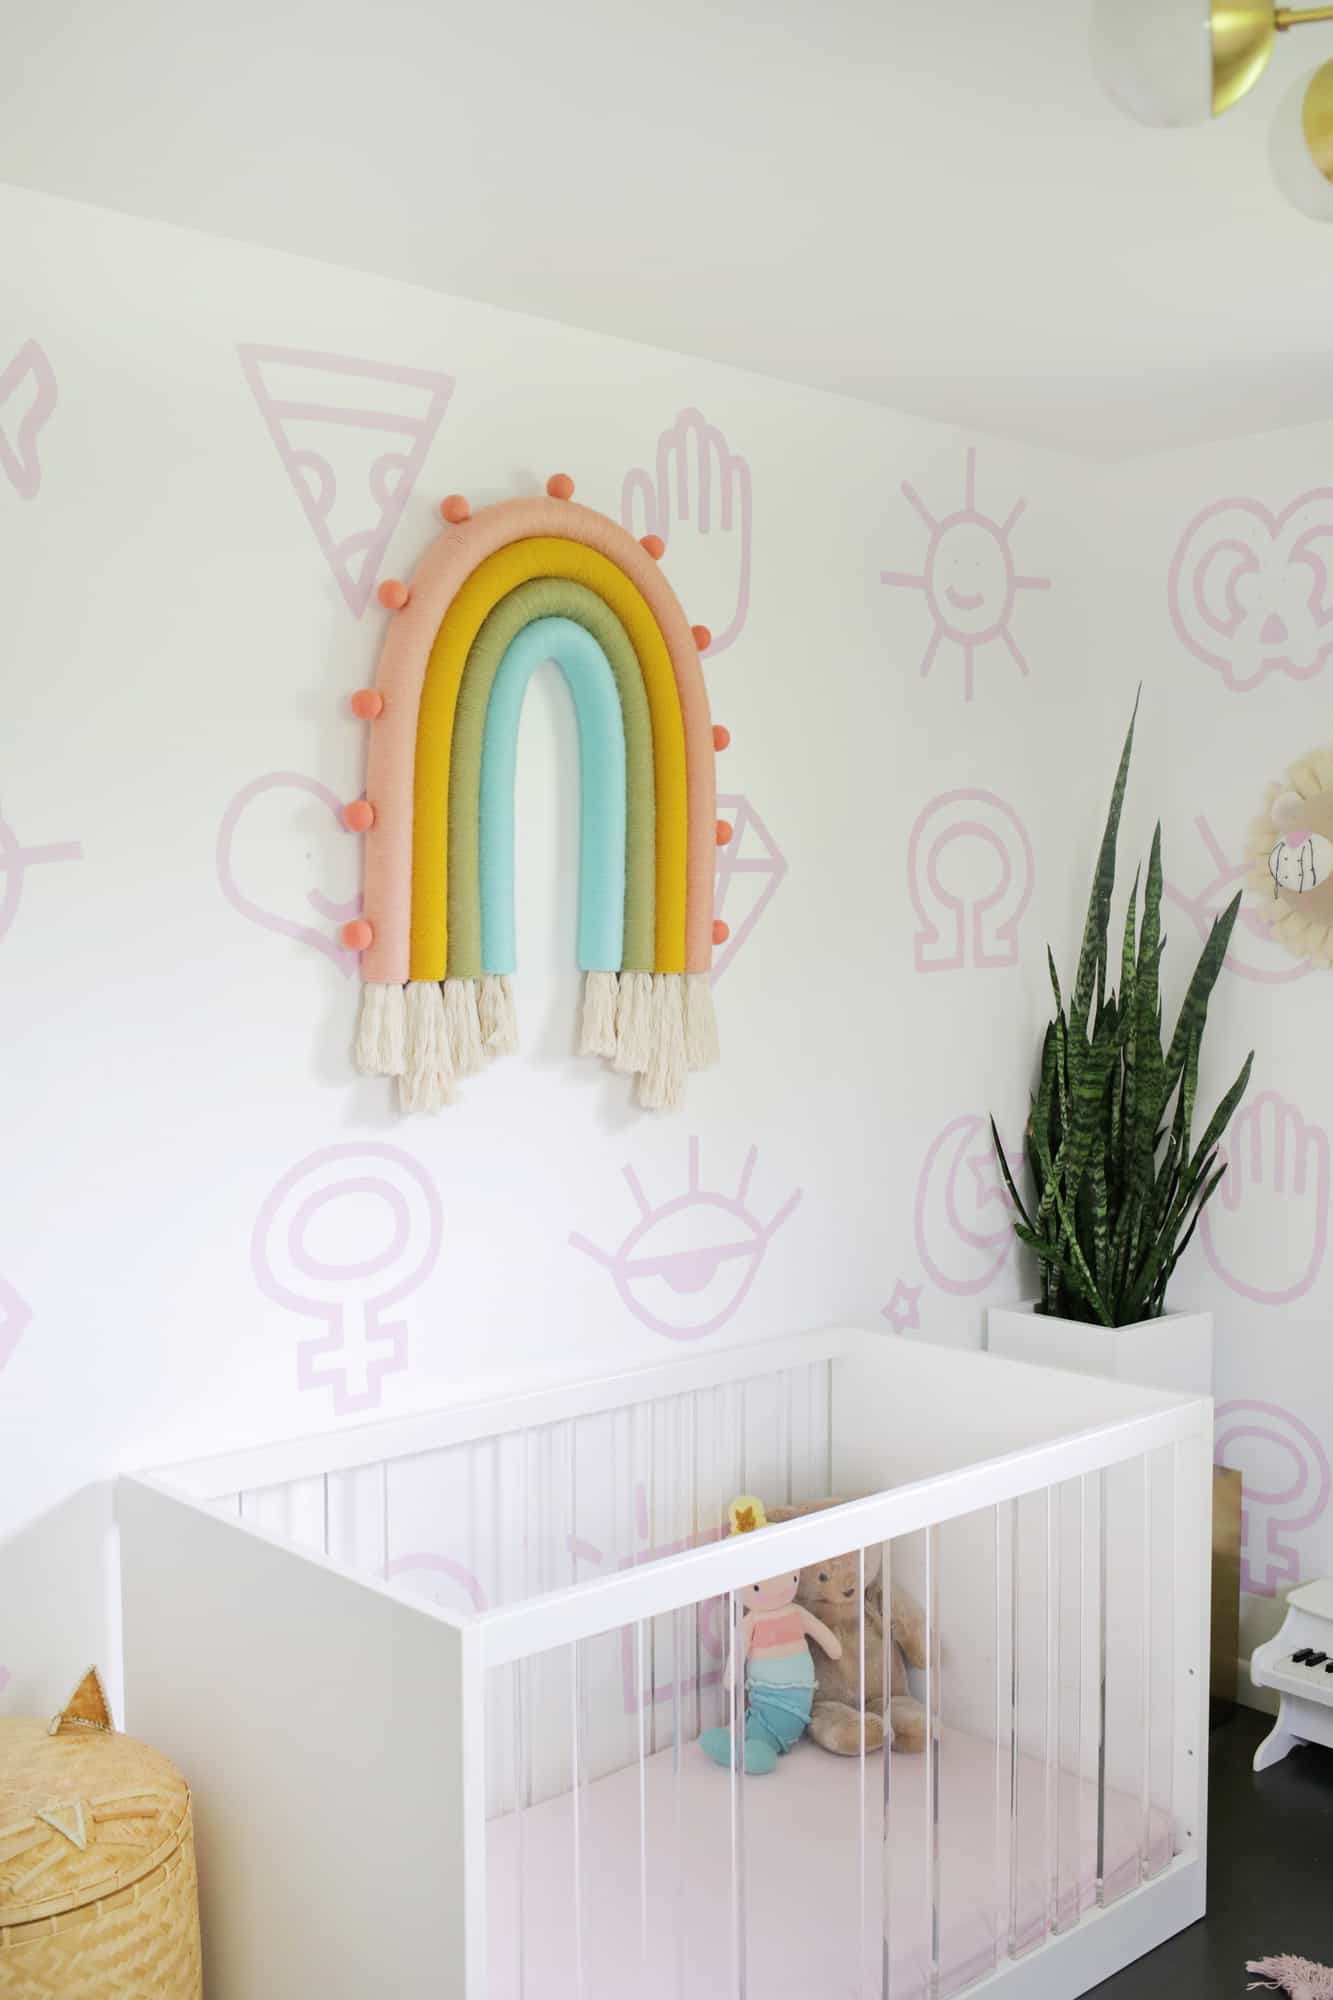
I am so excited to share this super fun and amazingly cute rainbow wall hanging DIY with you today!
I love all the little kid rainbows that have been making the rounds lately whether that be on clothing, plush items, or wall decor, and I extra love the little rope rainbow trend.
Related: Rainbow Corner Accent Wall DIY and Easy Yarn Wall Art DIY, Weaving for Beginners
I tend to take everything that’s fun and make it oversized, and I was pretty positive that a rope rainbow would be amazing on a large scale, and it turns out I was right!!
Can you guess what I used as a base to make this oversized rainbow wall hanging? I’ll give you a hint … splish, splash!
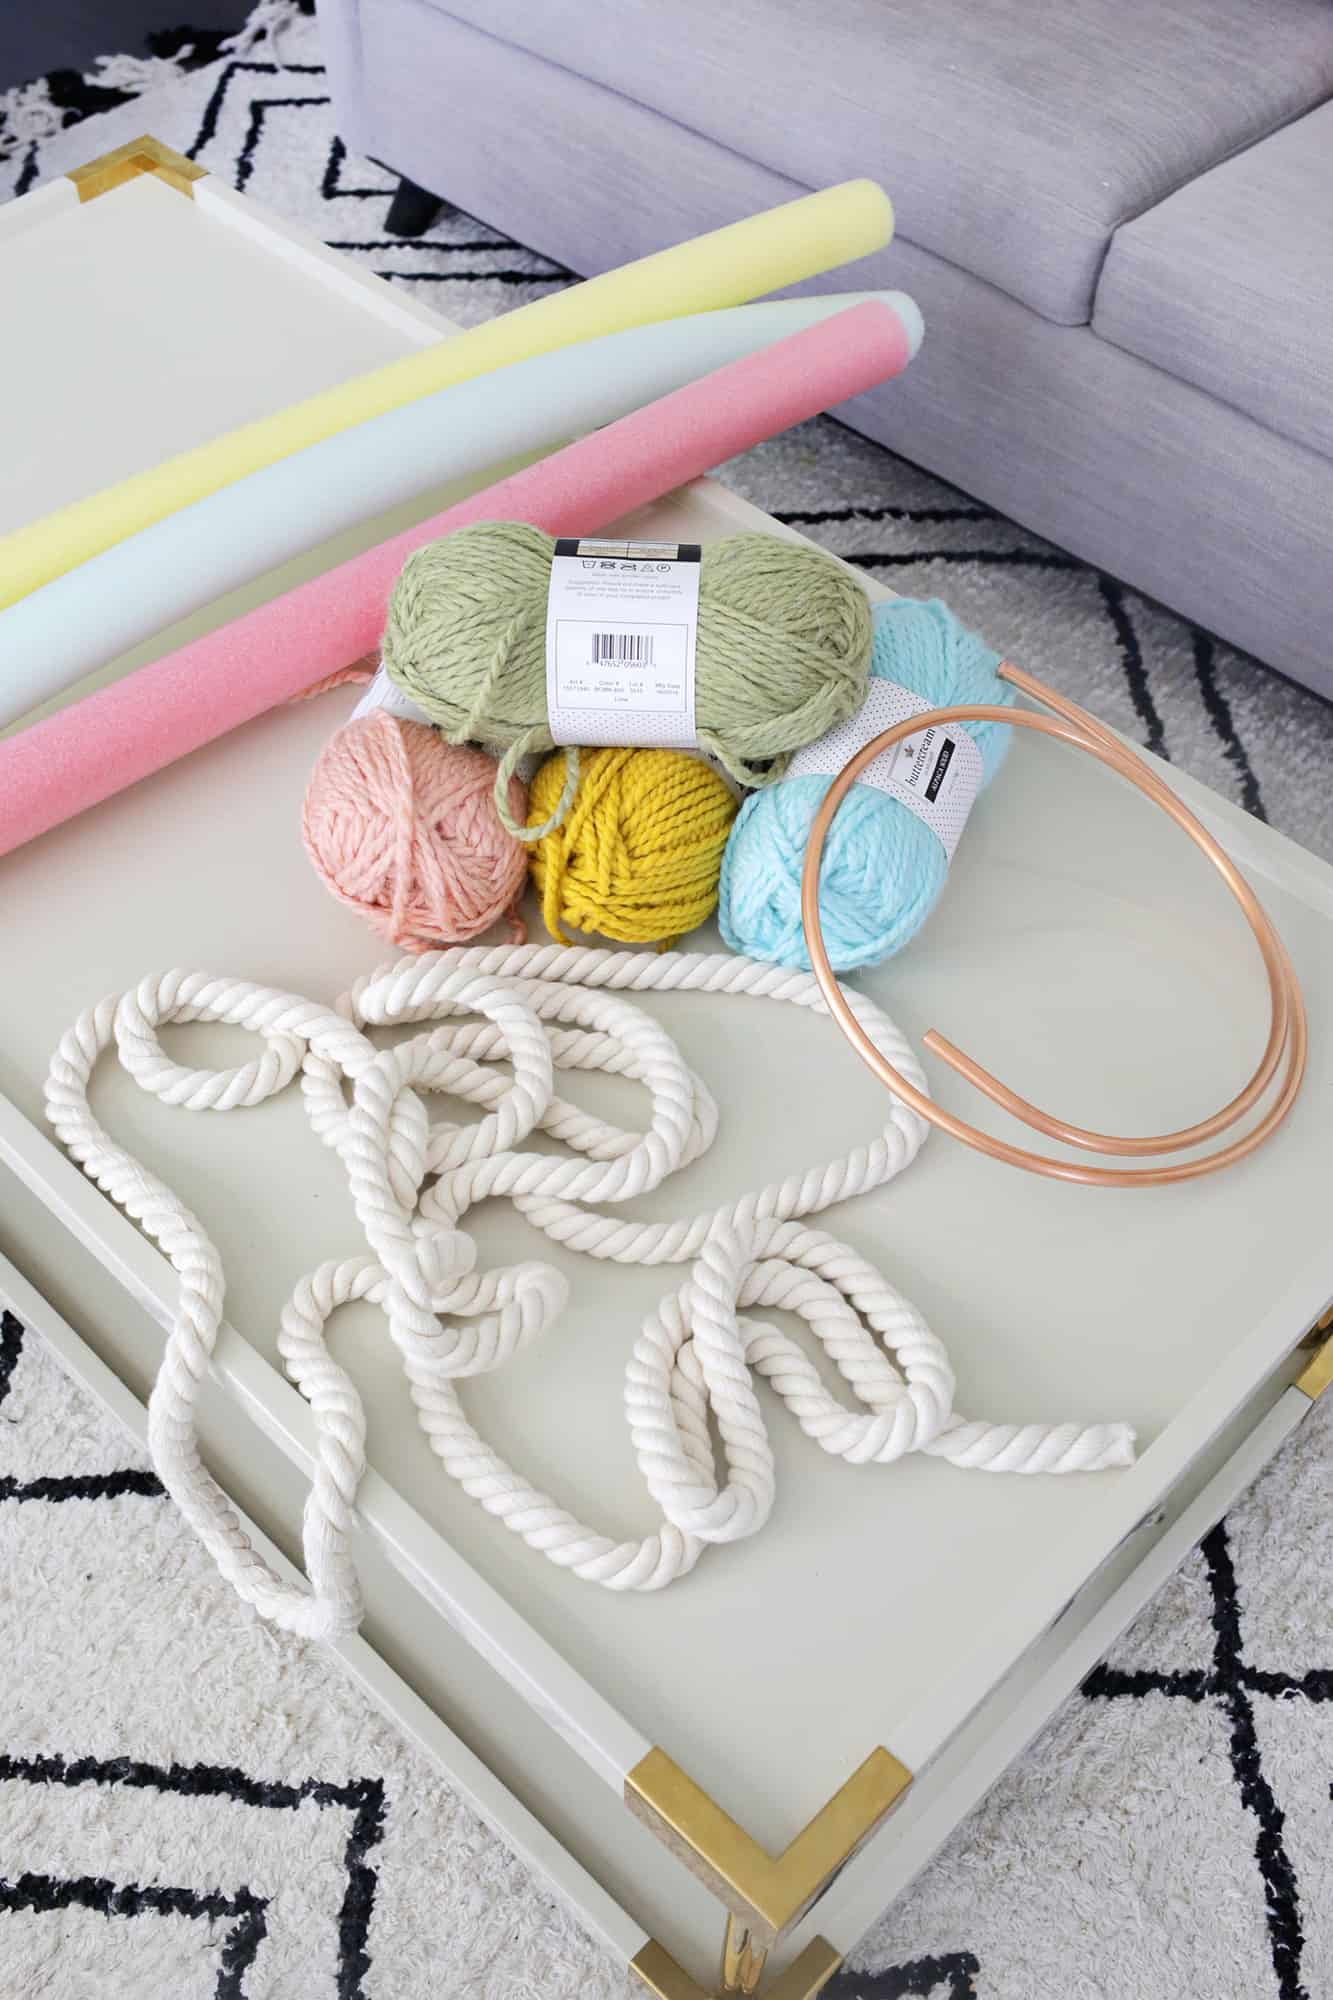
Supplies:
–5 pool noodles (did you guess it?)
–thick cotton rope (try the trim section of your craft/fabric store)
–thick yarn in preferred colors (I didn’t use more than the yarn you see above, so one large yarn should be enough for my size)
–hot glue gun
–X-Acto knife and scissors
–10′ of 3/8″ copper coil tubing
–mini pipe cutter
–4cm wool felt balls
–cat brush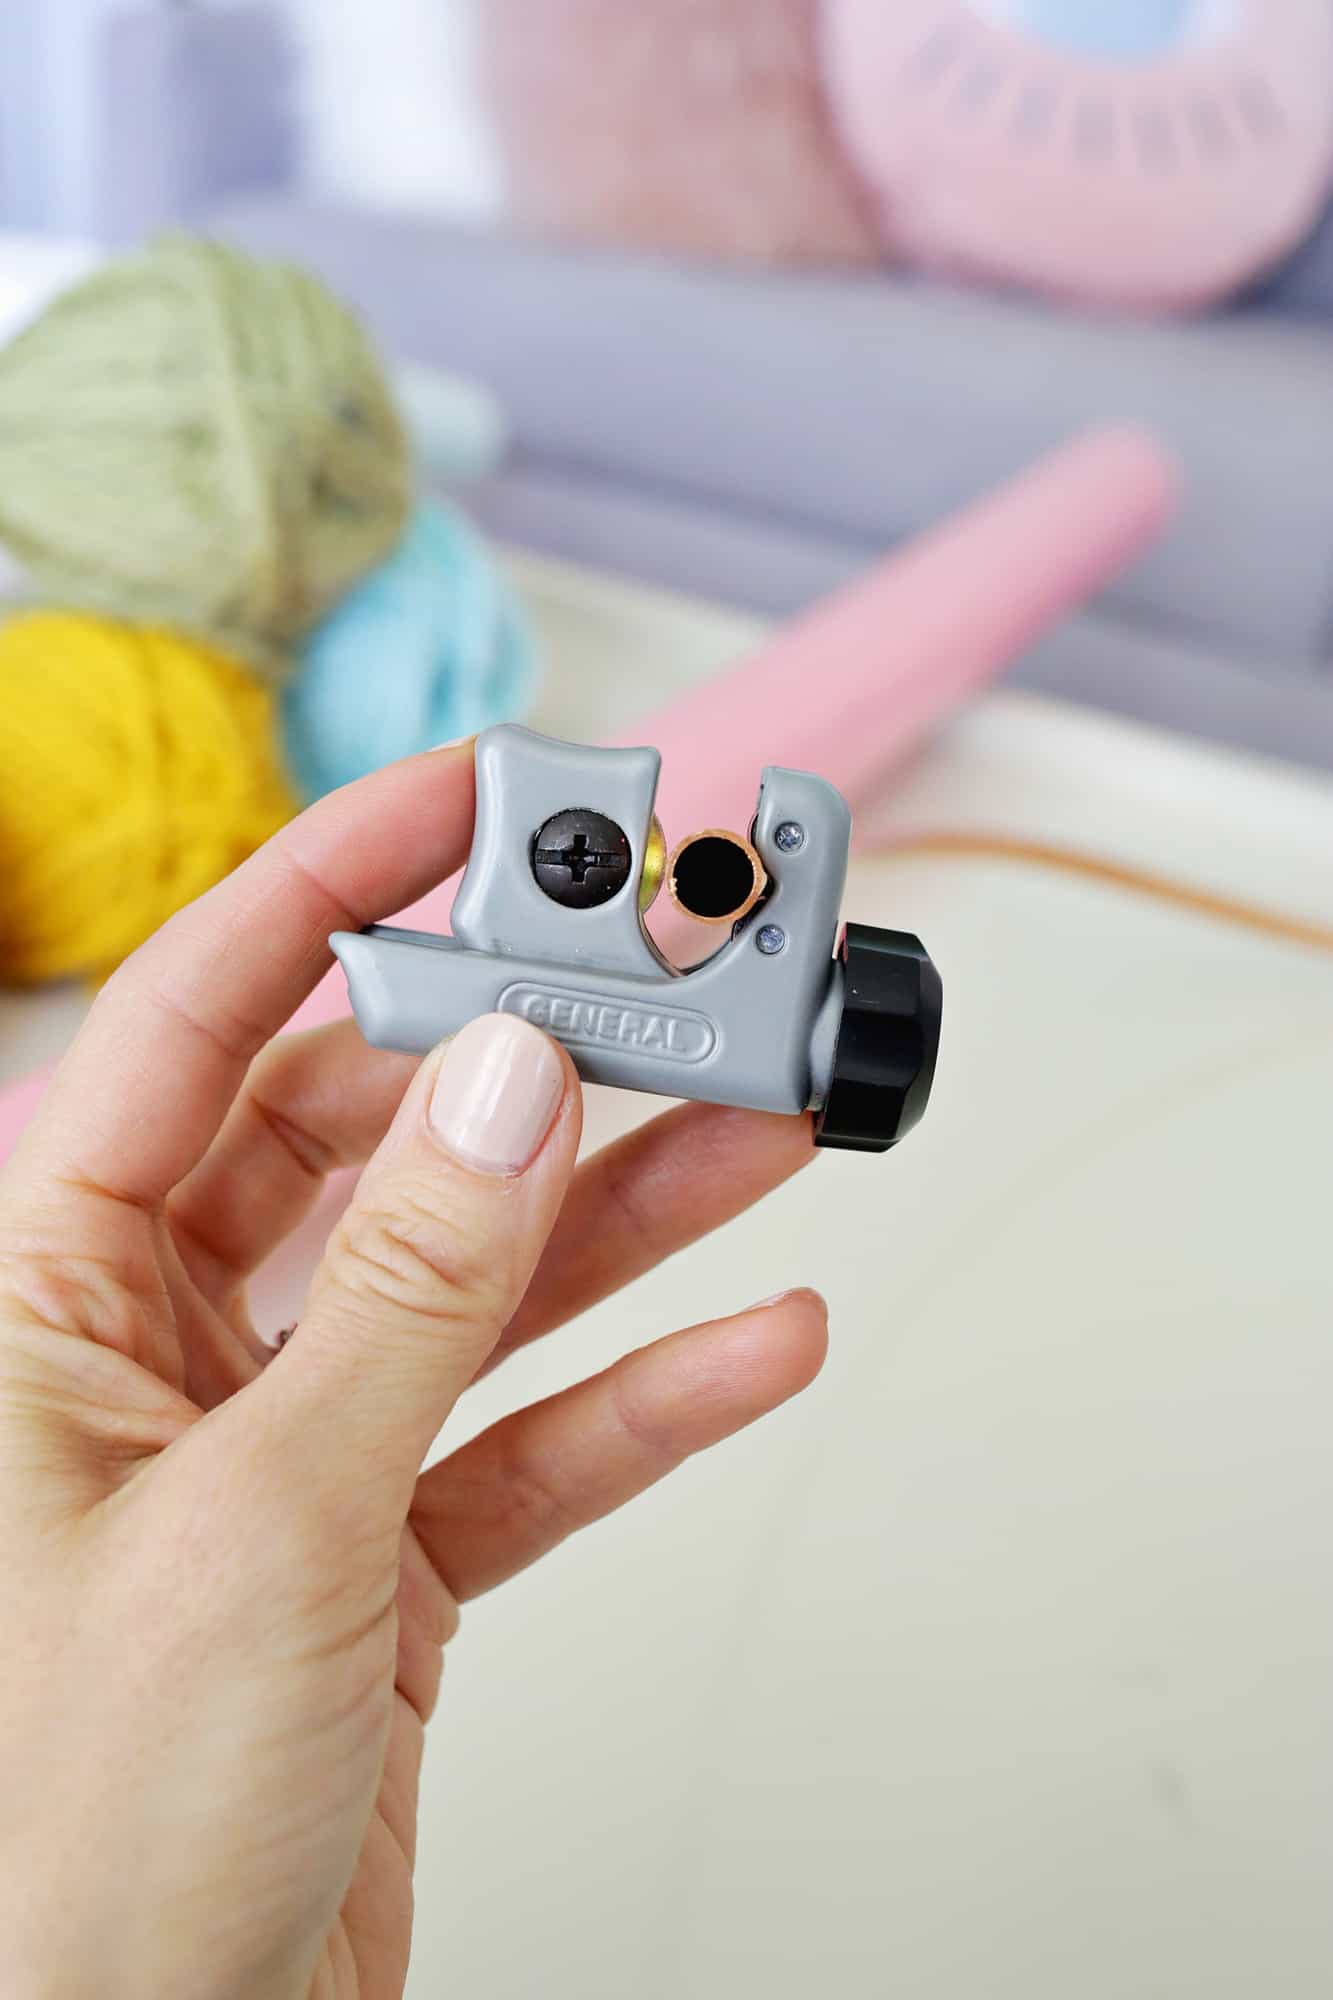 First, you are going to decide how long you want your outer rainbow color to be, which will determine the overall size of your rainbow—since it’s the outer layer.
I wanted my outer layer to be longer than my pool noodles were, so I cut off 8″ of another noodle and hot glued that section onto the end of another full length one to give me an extra long noodle to work with.
Then, I used my pipe cutter to cut a piece of copper coil that was about 2″ shorter than my noodle, so it wouldn’t stick out the ends once I threaded it through my noodle.
It took me a bit to figure out what to use as the backbone of the rainbow, as I needed something that would be bendable and yet strong enough to keep its shape once bent.
I remember seeing those copper coils in the hardware store and I thought they might be worth a shot, and they were perfect! If you do a much larger rainbow than this, you may need to try the coil in the next size up.
It will be harder to bend into place, but also stronger as well once bent into shape.
 Once your pipe is cut, make sure it’s the right length for your noodle.
Then, use an X-Acto knife to carve out some of the inner portion of the last 1″ or so of each noodle end so you have a larger space to add your rope fringe at the end. Pool noodles are super easy to cut into, so this part shouldn’t be too hard.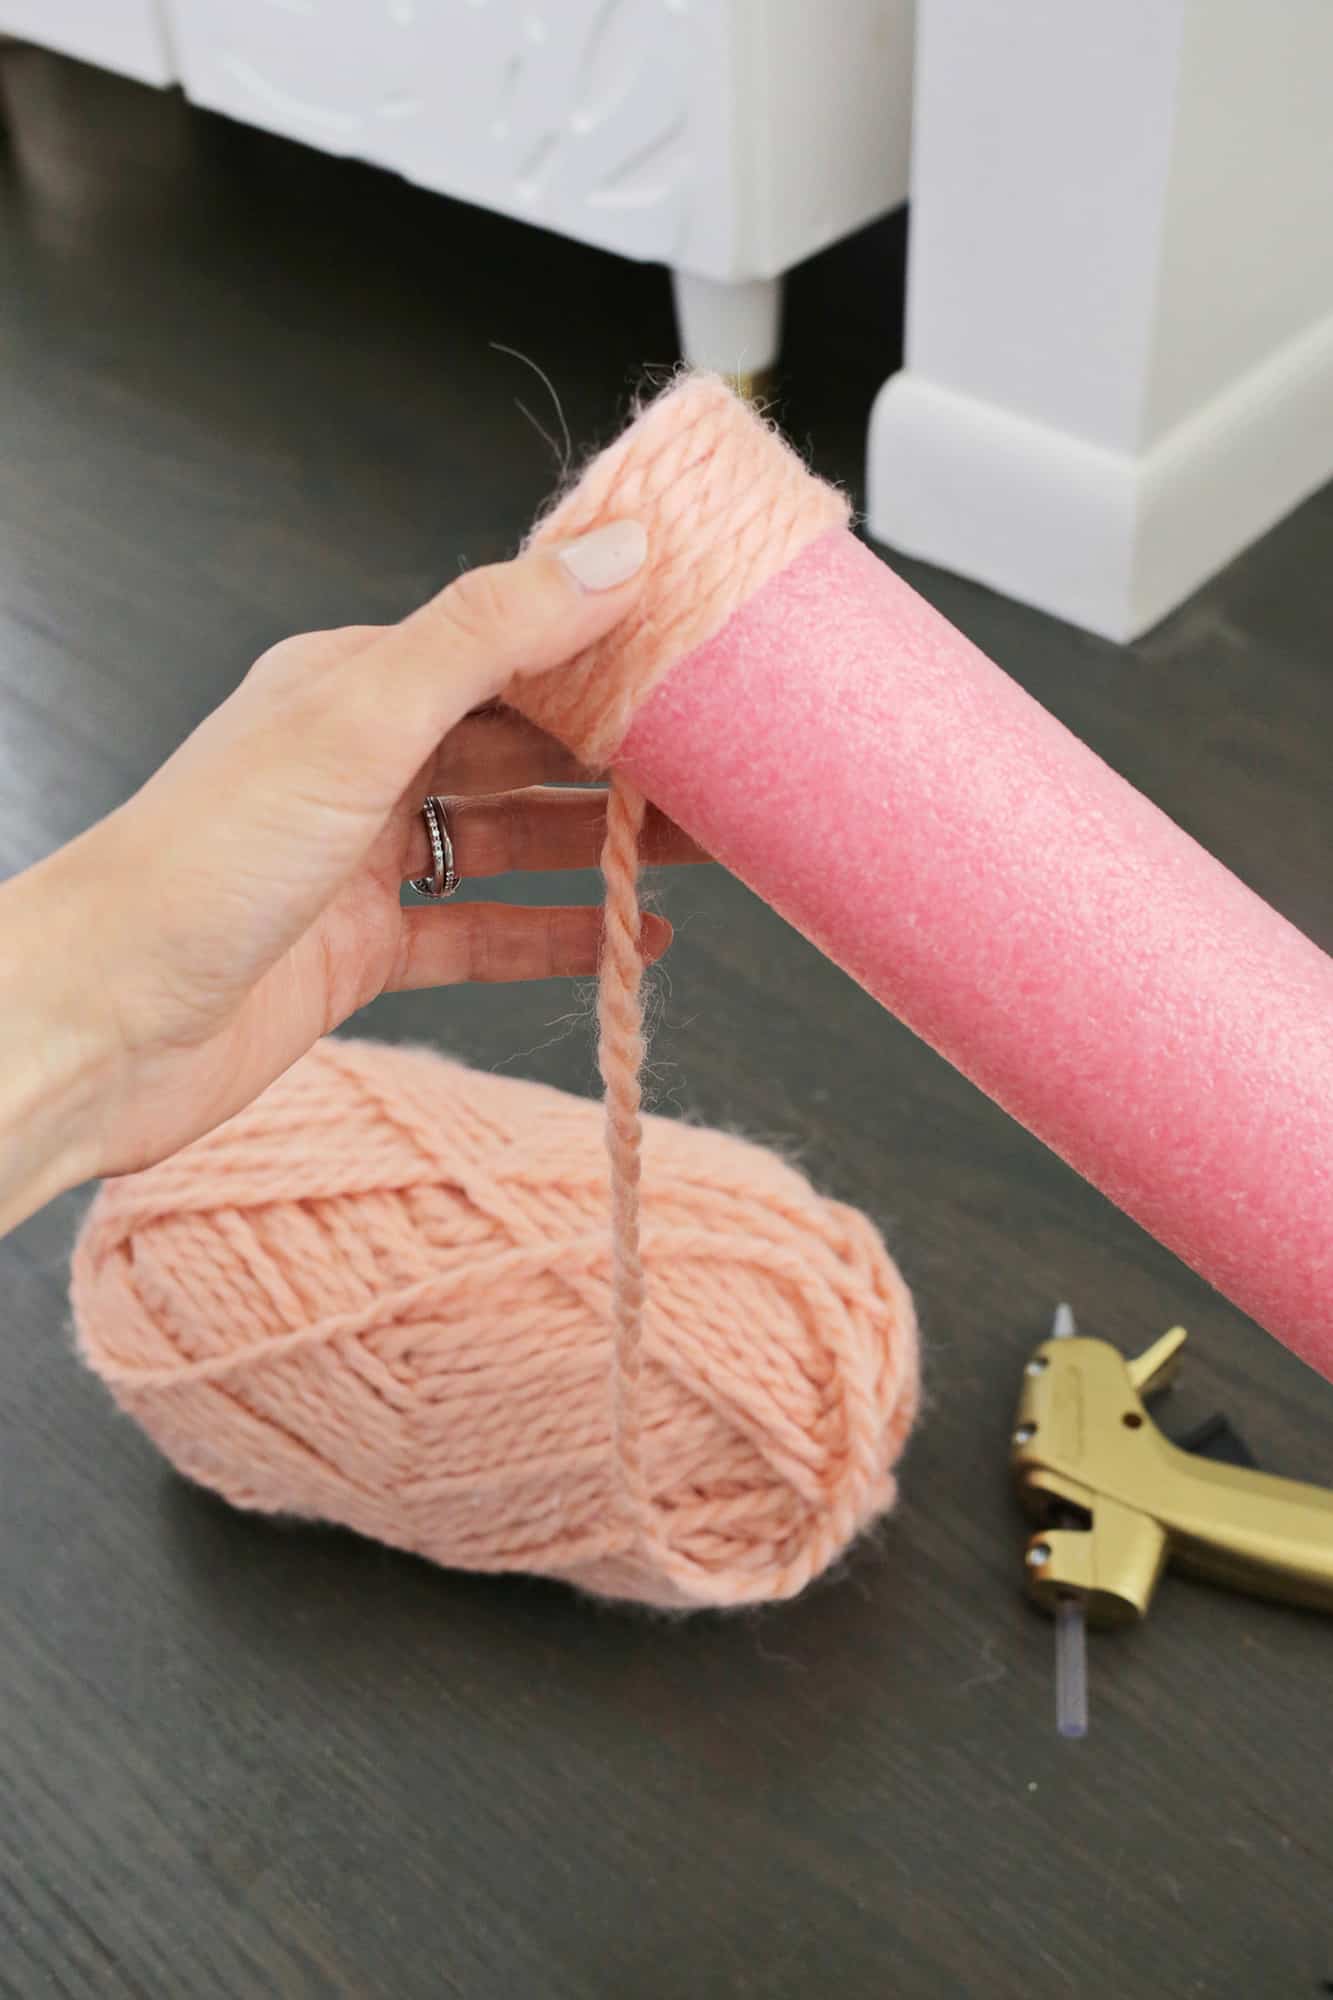 Then, hot glue your yarn end to one end of your noodle and start to (are you ready for this?) twist the noodle to wrap the yarn around the noodle.
It is still time consuming but it is waaaay easier to twist the noodle than wrap the yarn around the noodle. Keep the yarn holding hand in place and use the other hand to twist the noodle body as you go.
I glued my yarn to the right end of the noodle and twisted the noodle away from me, but if you are left handed, you may want to start on the left side and twist if that is more comfortable.
Keep twisting and twisting until you have about 3″ of yarn-covered noodle and then push all the yarn downwards towards the end you started from to condense the yarn.
Make sure it’s super tightly packed with no pool noodle underneath in sight—it will also help keep the noodle covered when you bend it into a rainbow shape as well if it’s tightly packed yarn.
 Keep twisting and pushing down every 3″ of yarn until you reach the end. I used more glue to secure the yarn to the noodle on the last 1″ of the noodle and then tucked the end into the noodle opening and glued it in place.
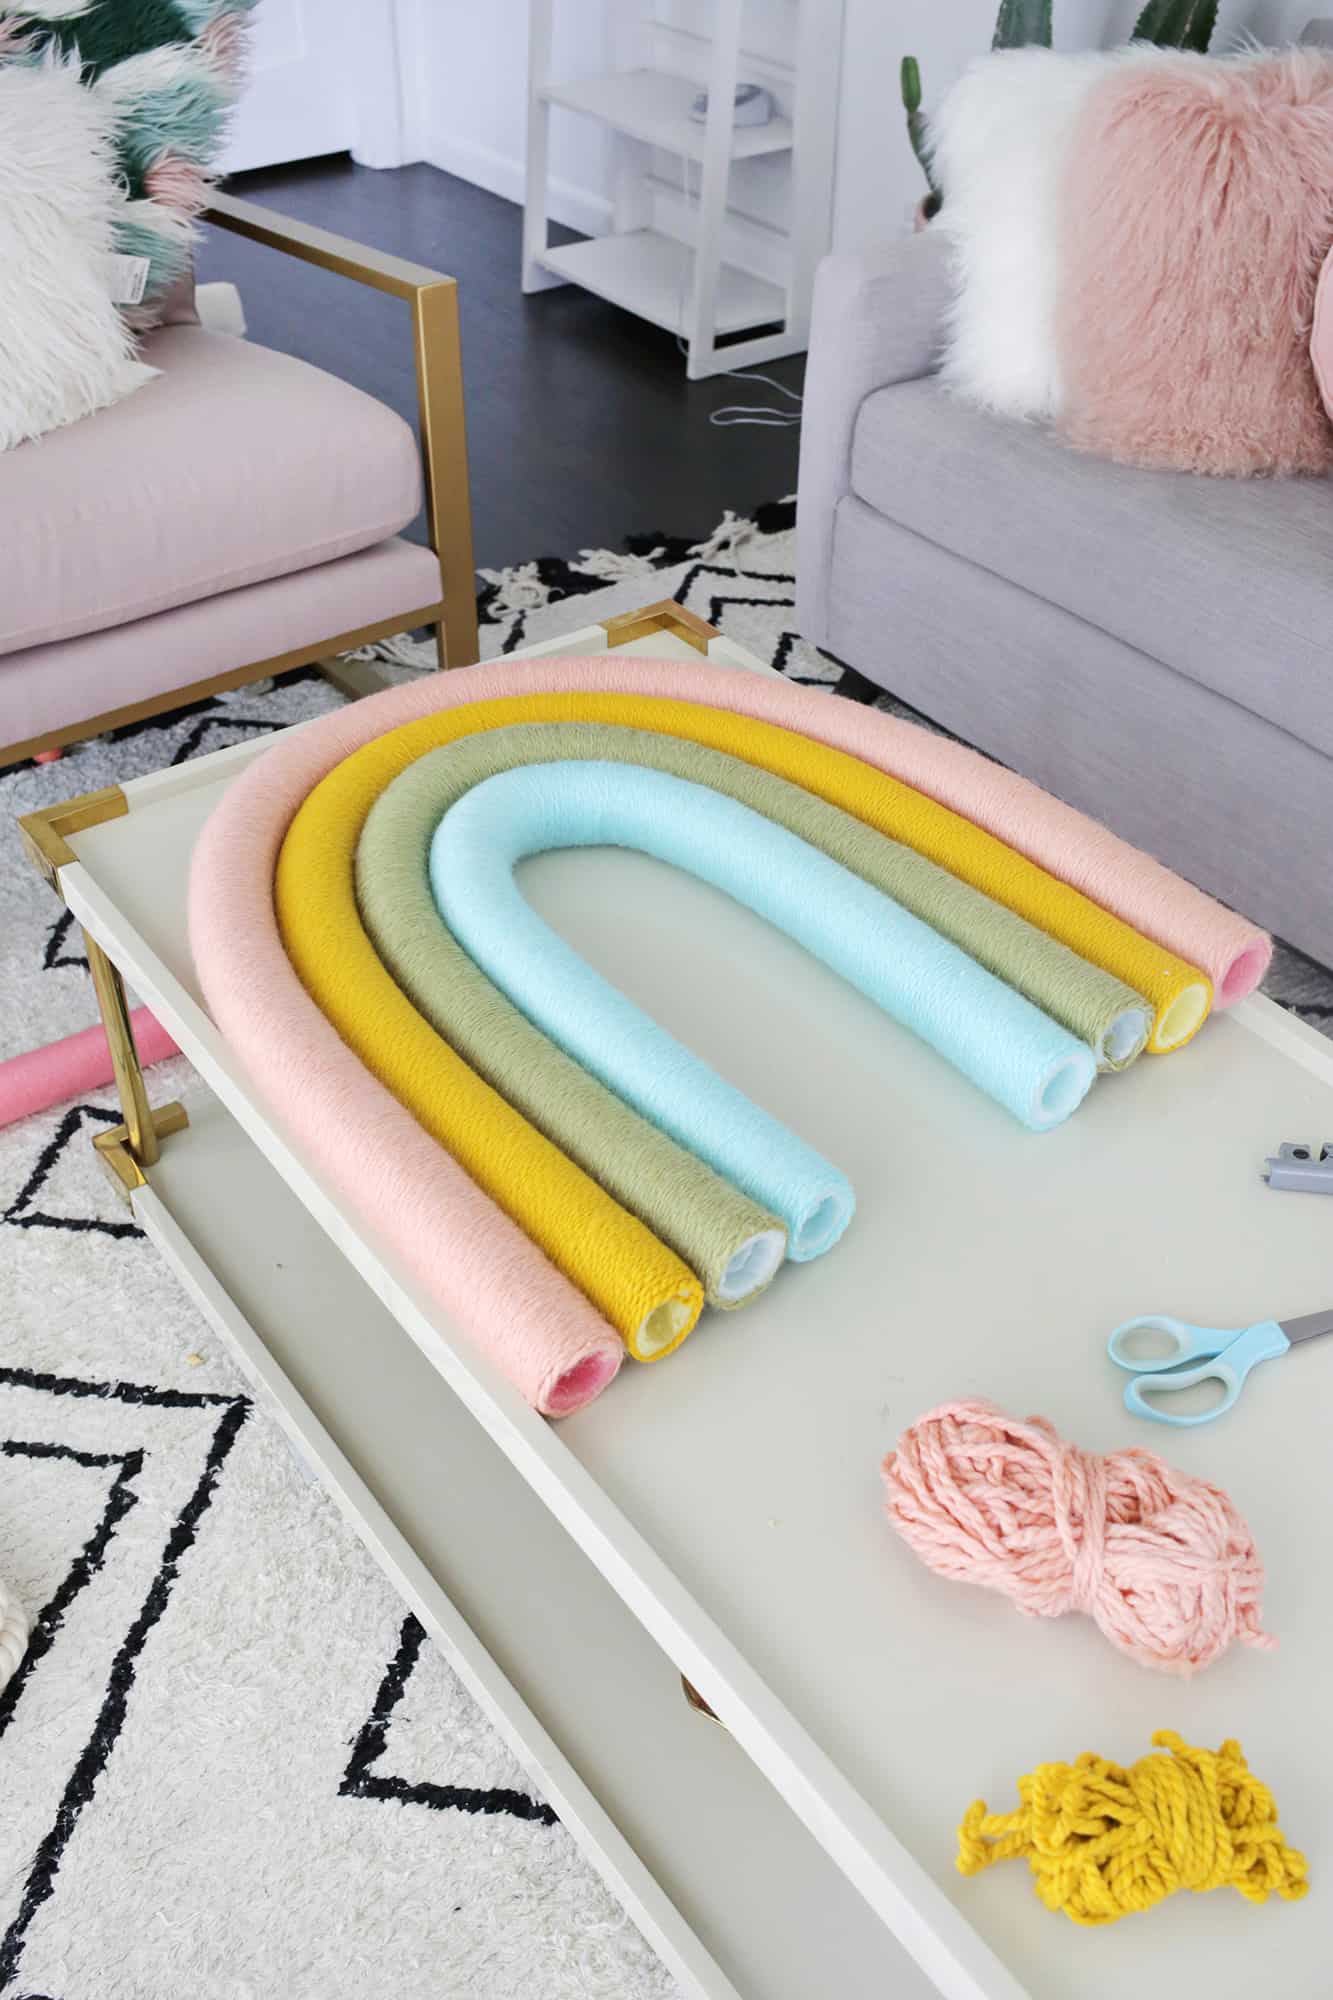 With your outer noodle now wrapped, slide in your copper pipe that you cut to fit and then bend it into your rainbow shape. I made mine a bit of a taller/skinnier rainbow, but you could do a shorter/wider one as well if you like.
Once it’s bent into place, make sure your next noodle is long enough to fit within that shape and start to wrap that noodle with the next color yarn.
When you are almost done wrapping that noodle, place it back inside the outer noodle to check the fit. Usually adding the yarn changes exactly how much noodle length you need, so you’ll just want to keep checking the length before cutting the noodle and finishing the end with yarn.
Repeat with each color for each noodle until you have four layers! Since you’ll have leftover copper pipe after adding it to your outside noodle, use the rest inside one of the inner layers of noodles and that will help it keep its shape even better.
This is also a good time to take a piece of yarn the color of your third layer in and tie it around your pool noodle so you have a hanger on the backside to hang your rainbow from.
Basically, if the top of the rainbow is at the 12:00 position on a clock, tie one end of a piece of yarn at the 1:00 position and the other to the 11:00 position with the knots on the backside so you don’t see them and you can use the yarn that connects the two points as a hanger.
Much easier to do it now before you glue things together!
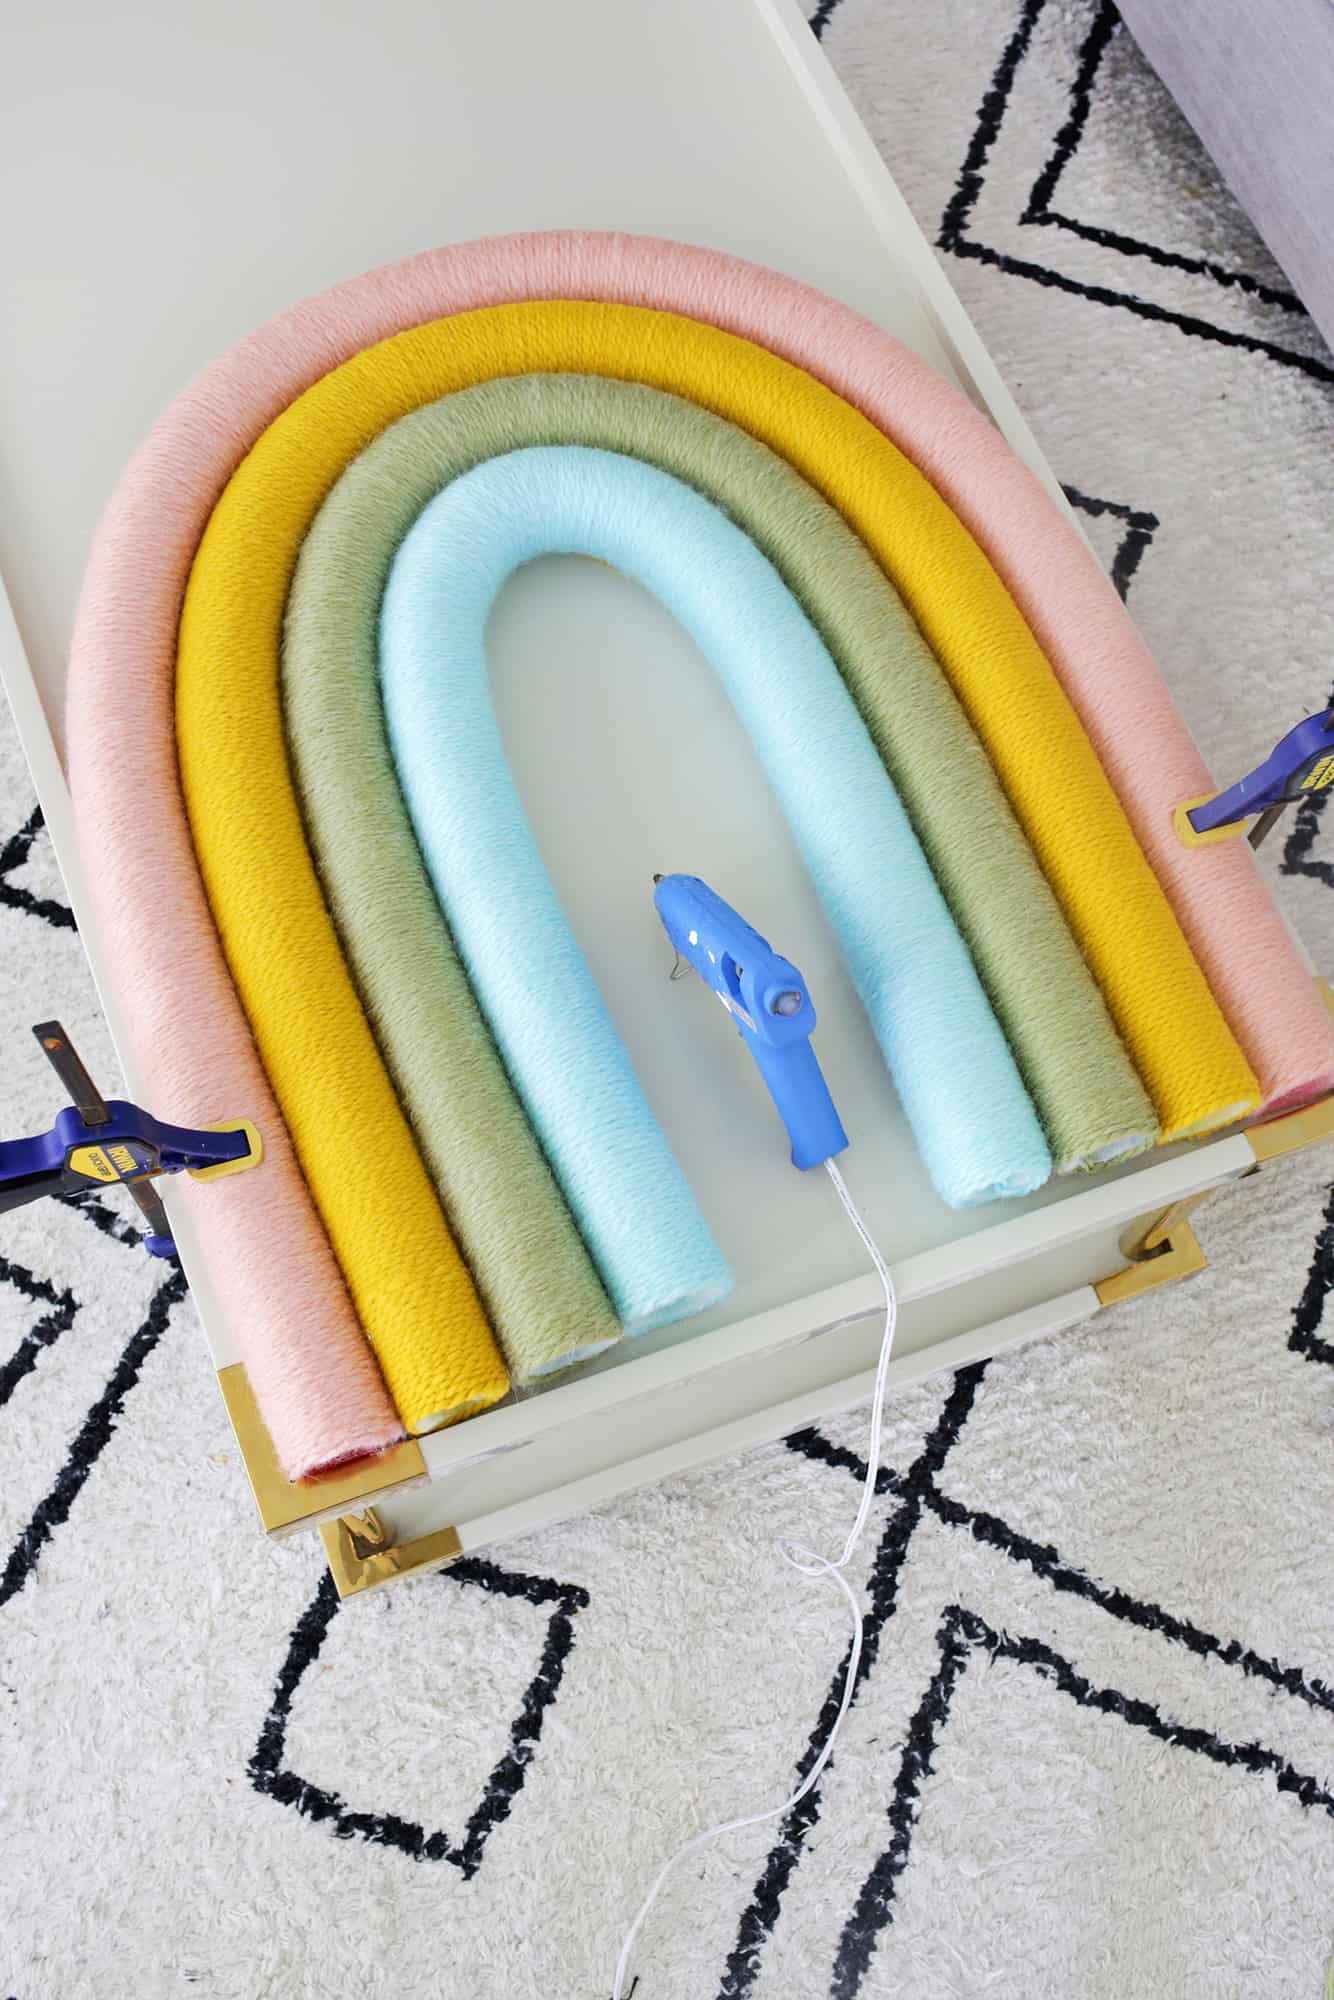 Now it’s time to glue our rainbow together! I clamped my outer layer to a coffee table so it wouldn’t move from that position, but you could also just place boxes or heavy books at the sides and top/bottom to keep in place while you glue as well.
Put a generous amount of glue at the sides where each noodle touches the next and add one layer at a time until you have all your layers complete.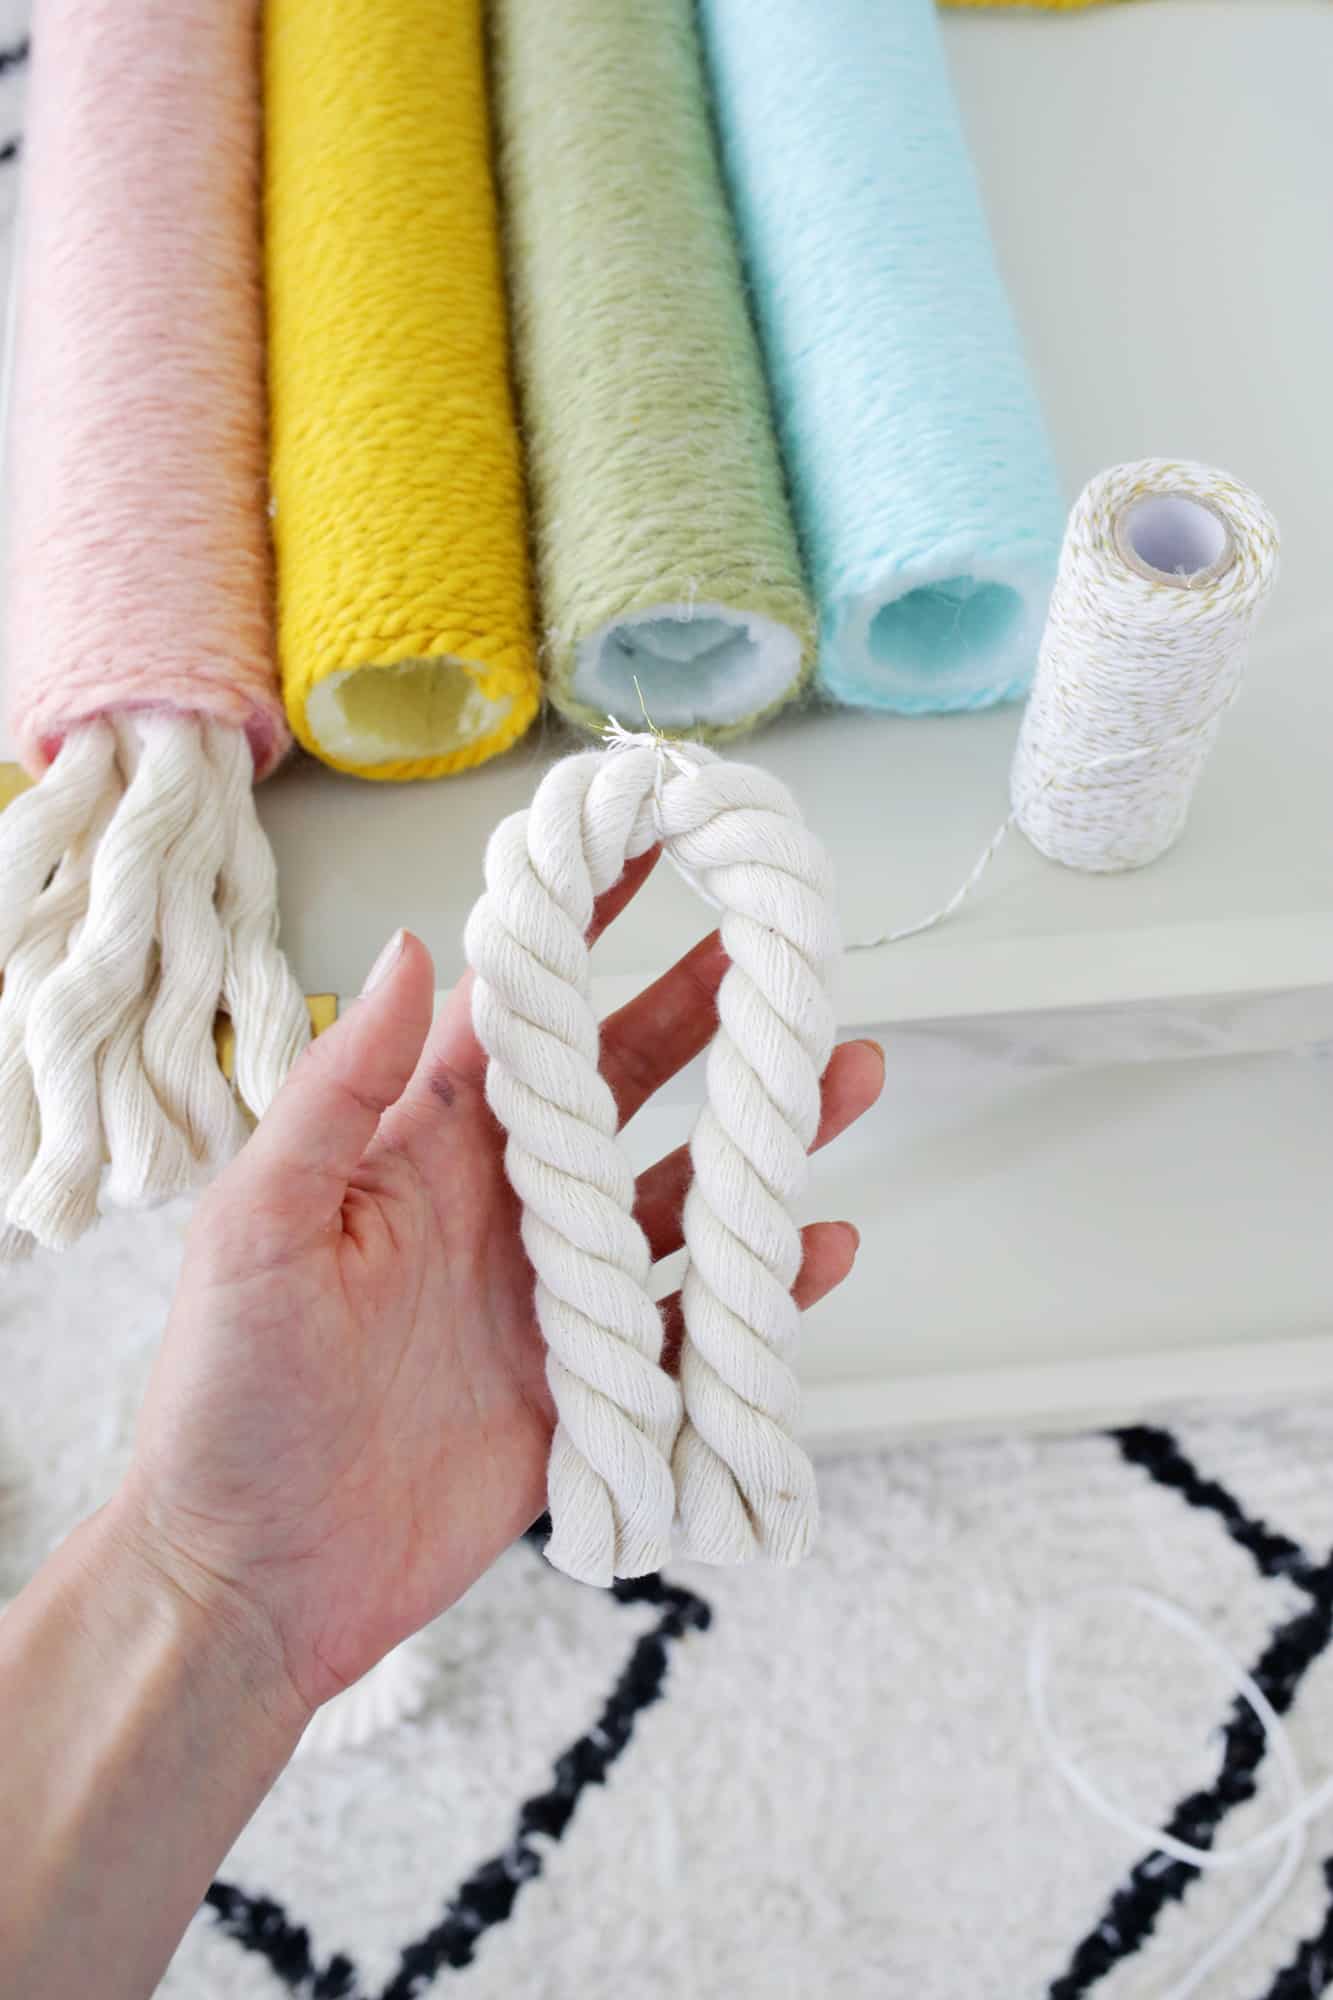 Now that your noodles are attached, take your thick rope, cut it double the length you want your tassel to be, and then tie some twine at the middle of the rope to keep the tassel together.
If you can’t find super thick cotton rope, you can also cut three or four strands double your tassel length and just tie them all together in the middle for the same effect.
Add some hot glue into the opening of the noodle and stick in the middle fold of your rope so it sticks to the glue.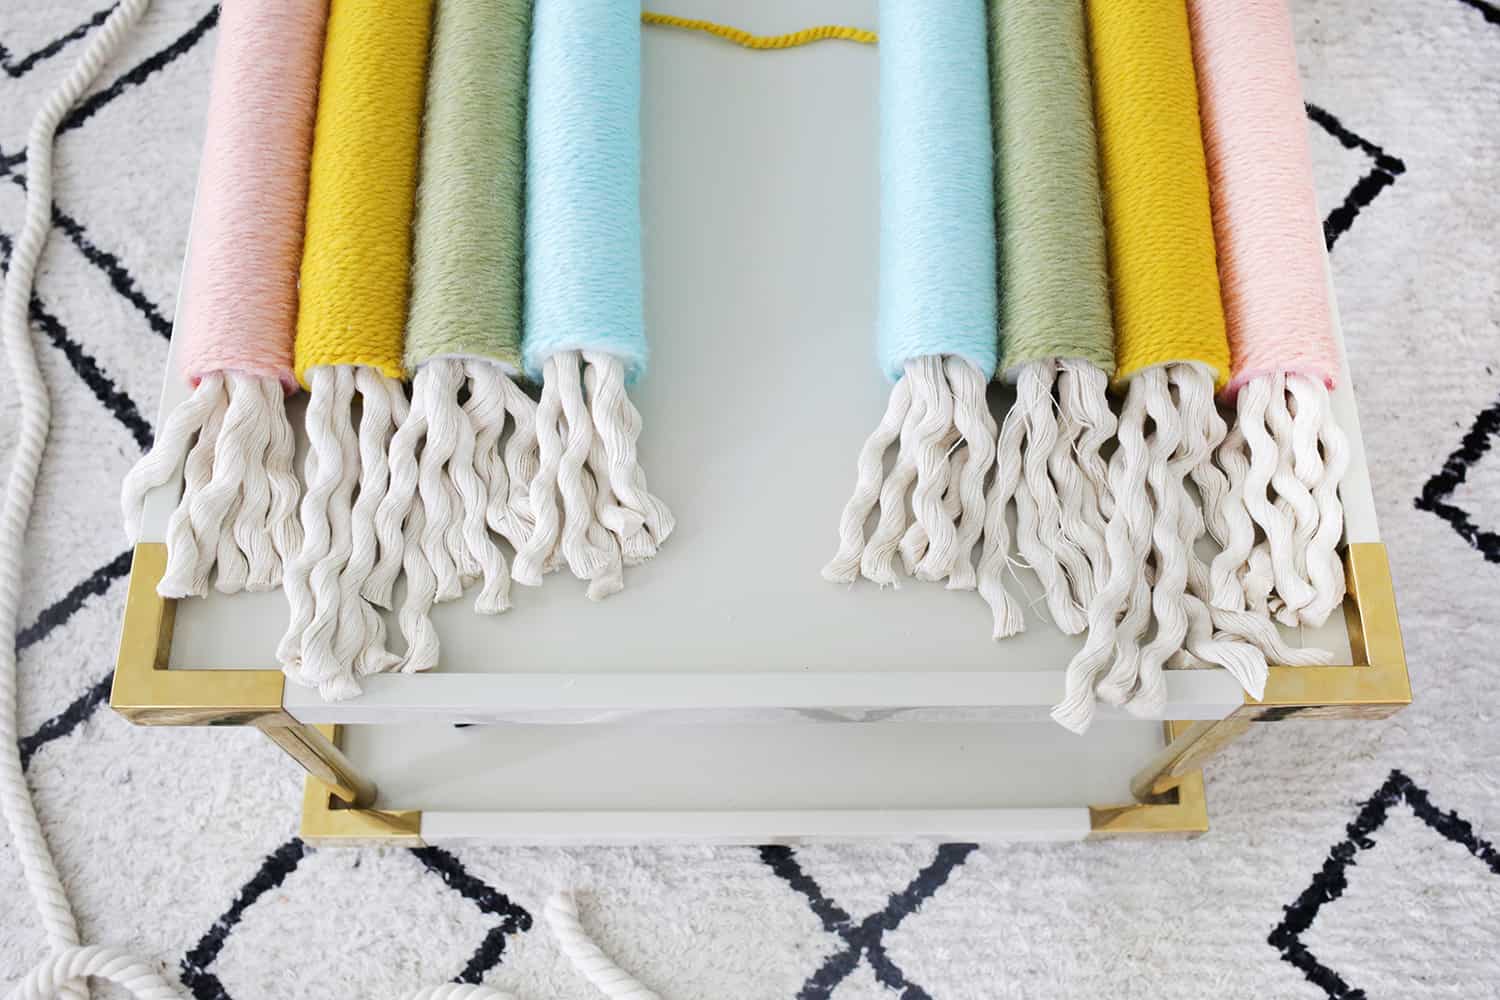 I did varying lengths for each noodle, but you can do them all the same too. Now if you like that curly look once you unwind the rope, you can leave it that way, or you can use a pet brush to brush out the rope into one larger tassel.

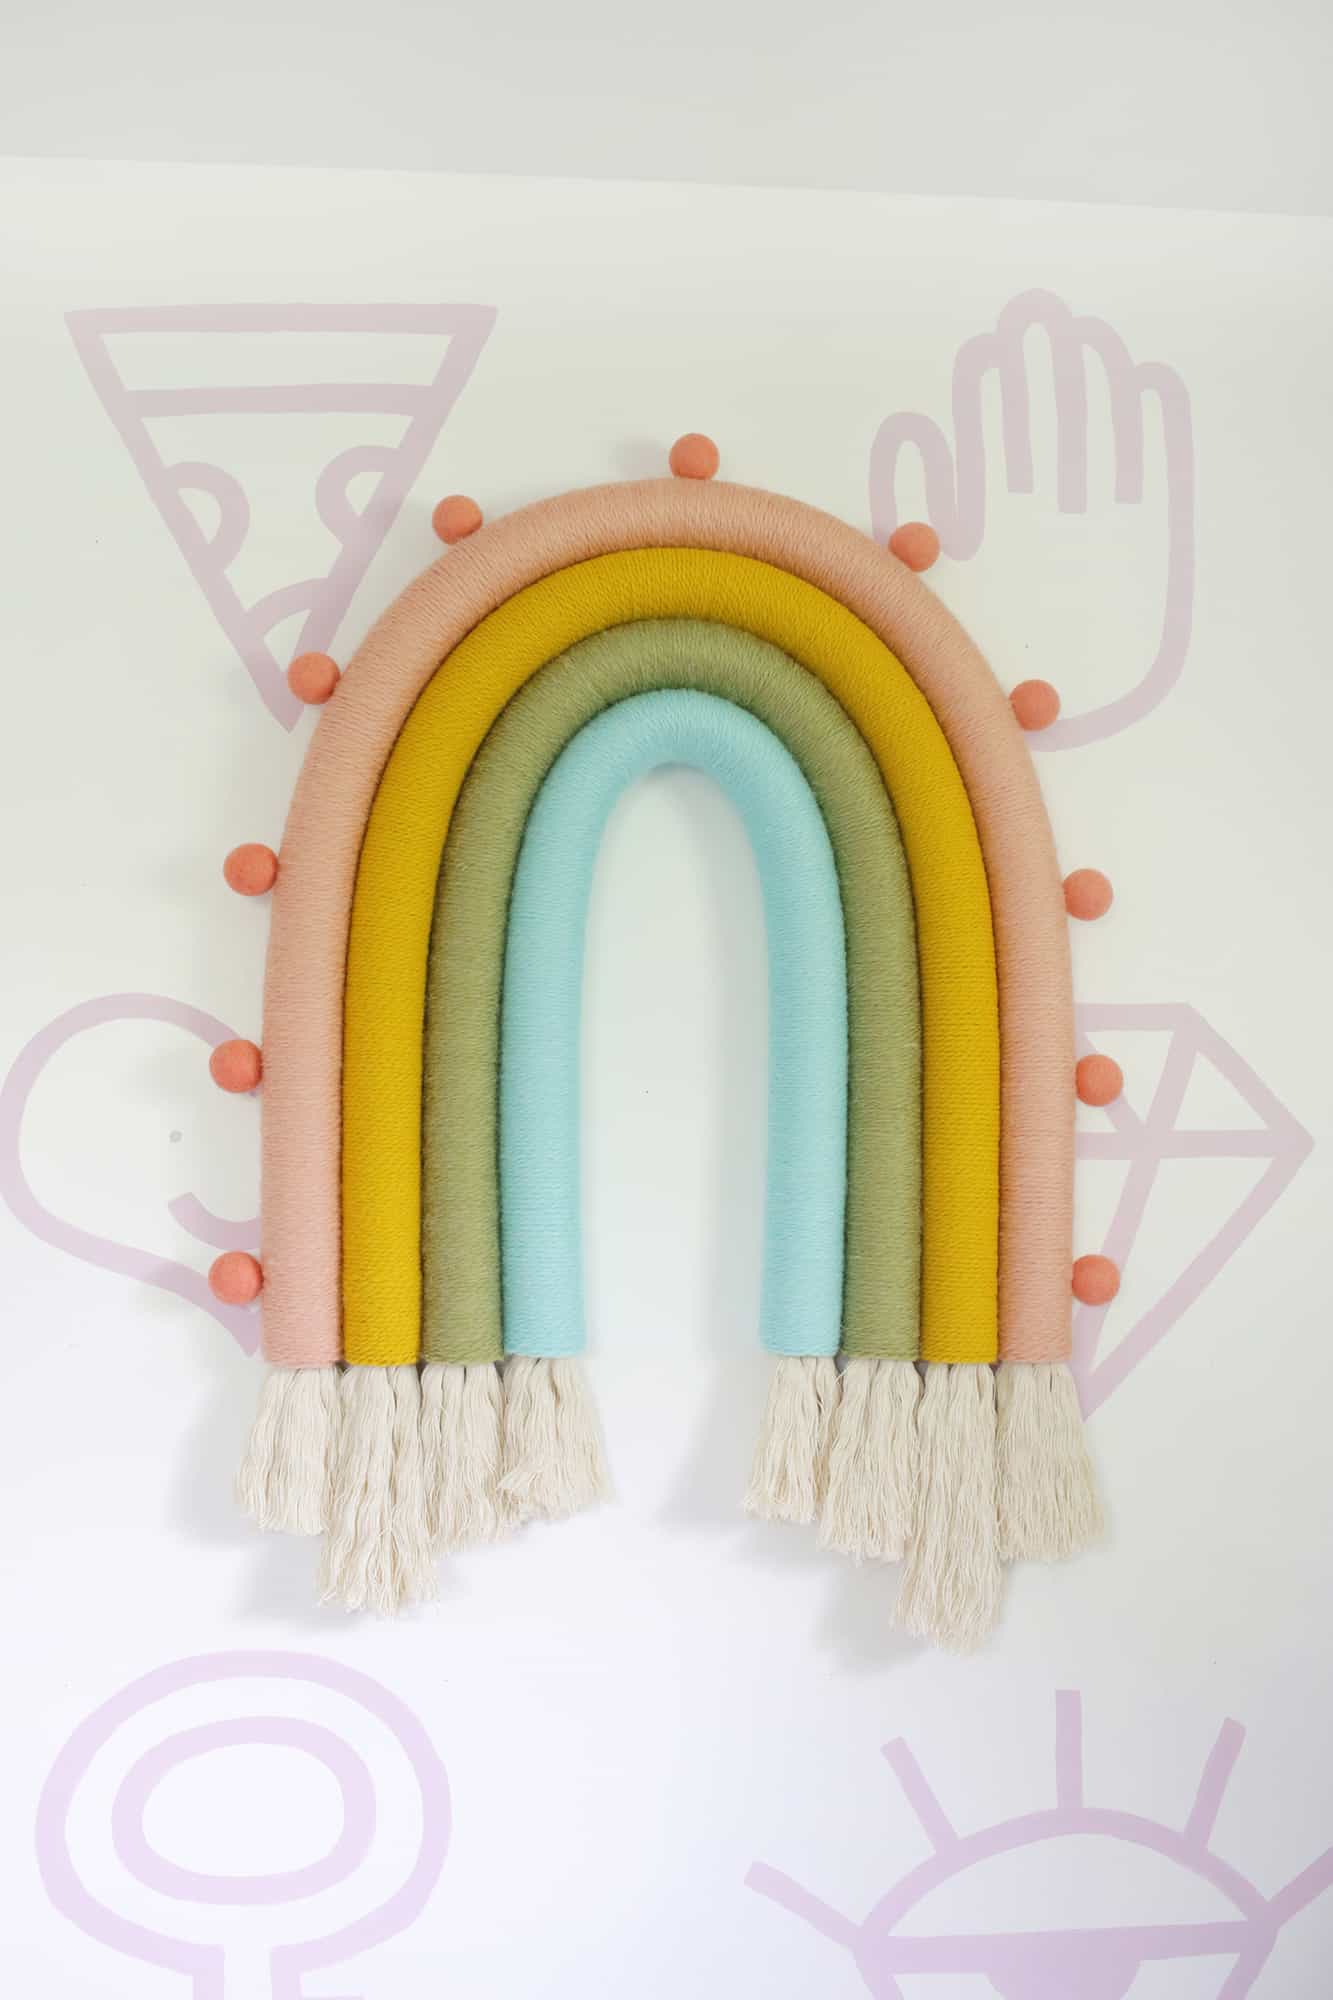
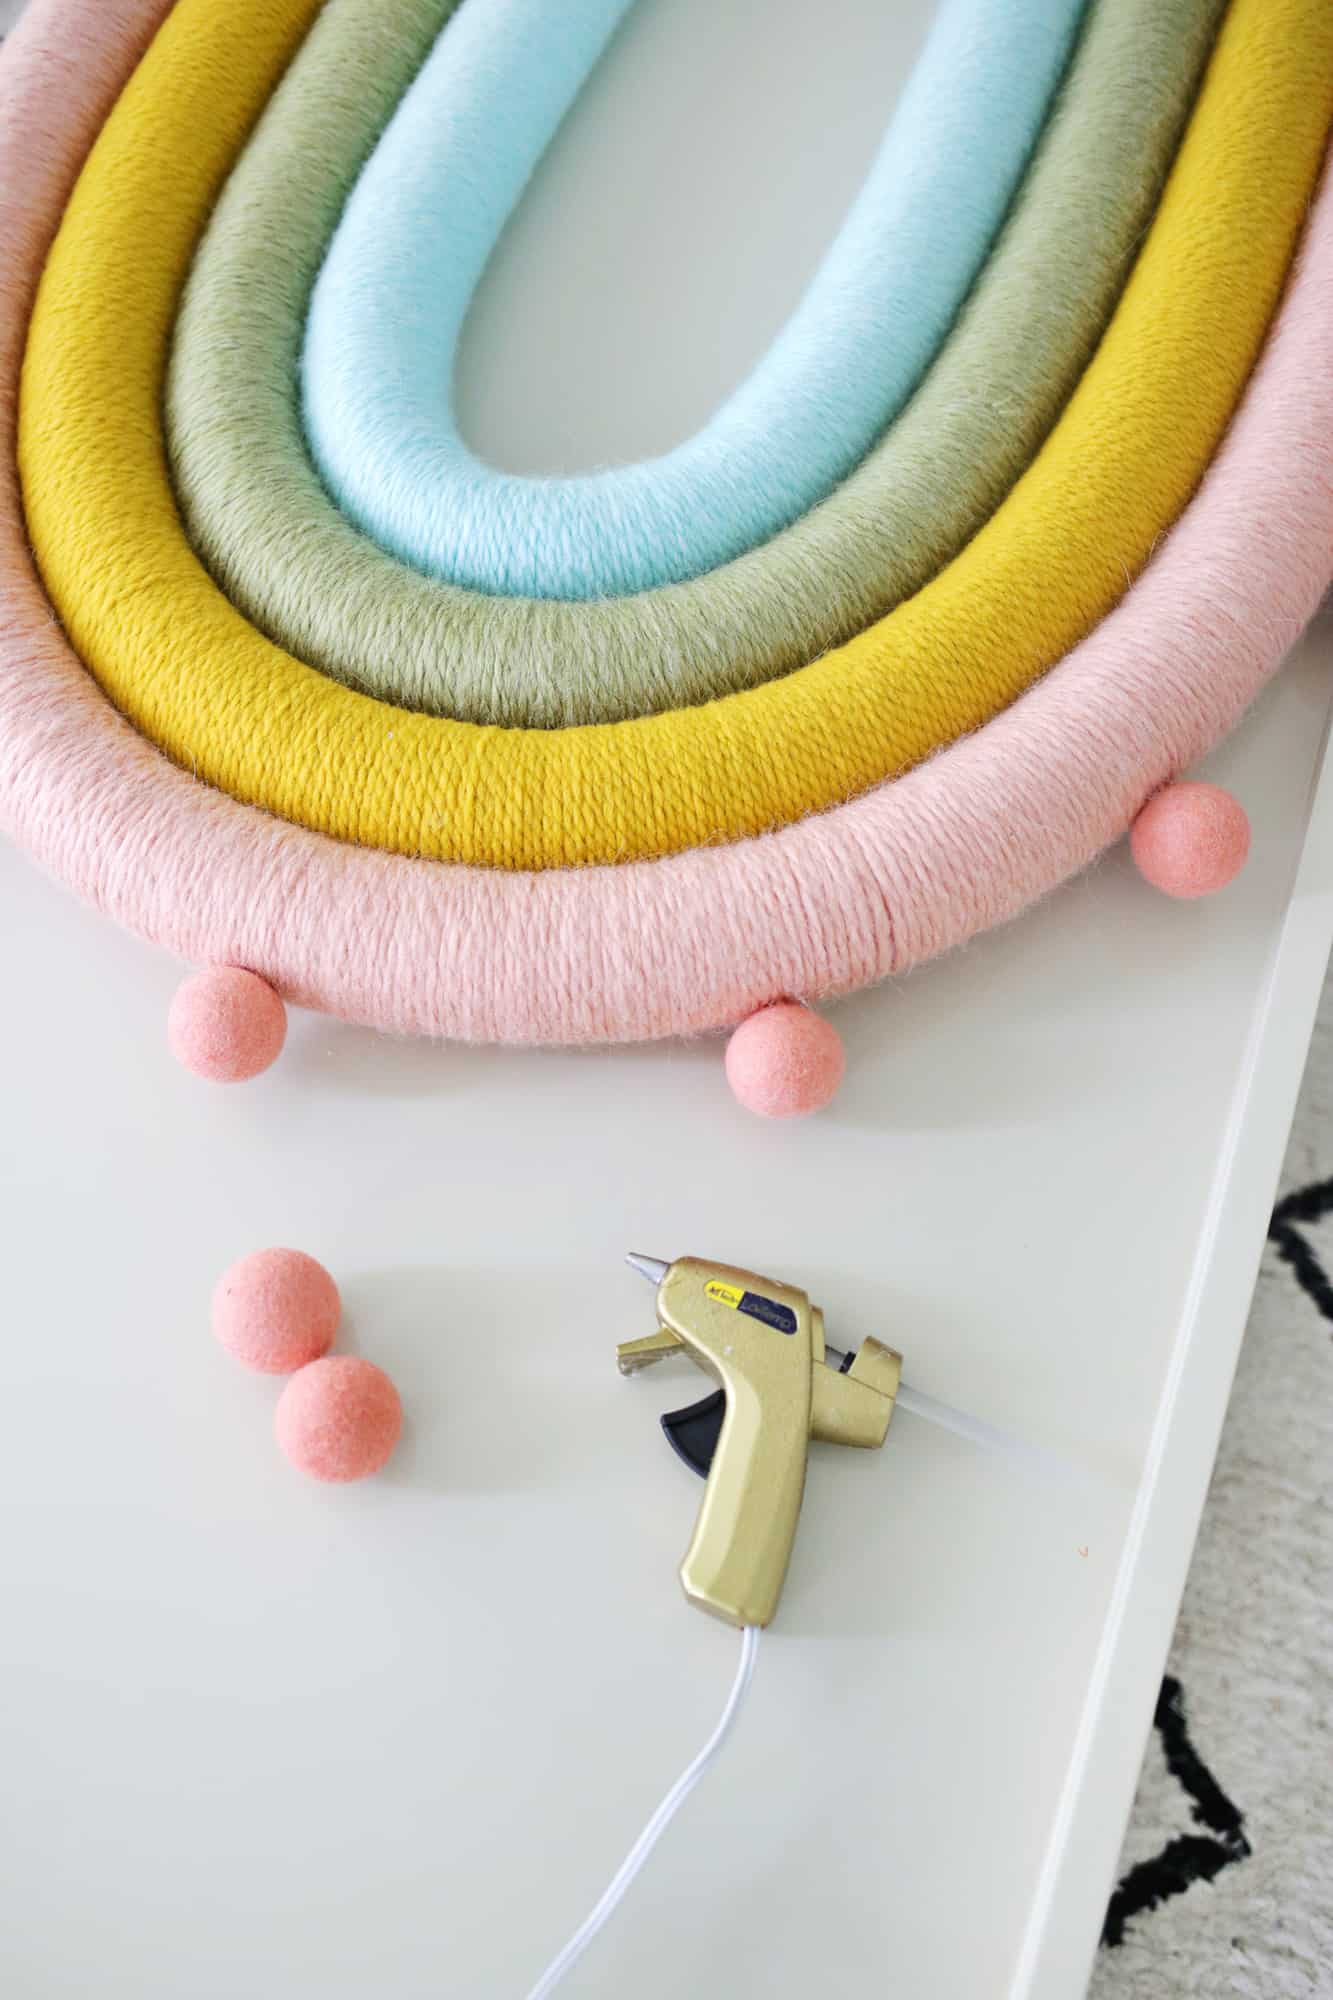 As the finishing touch, glue some large felt balls around the perimeter of the rainbow and your sweet little project is ready to hang!
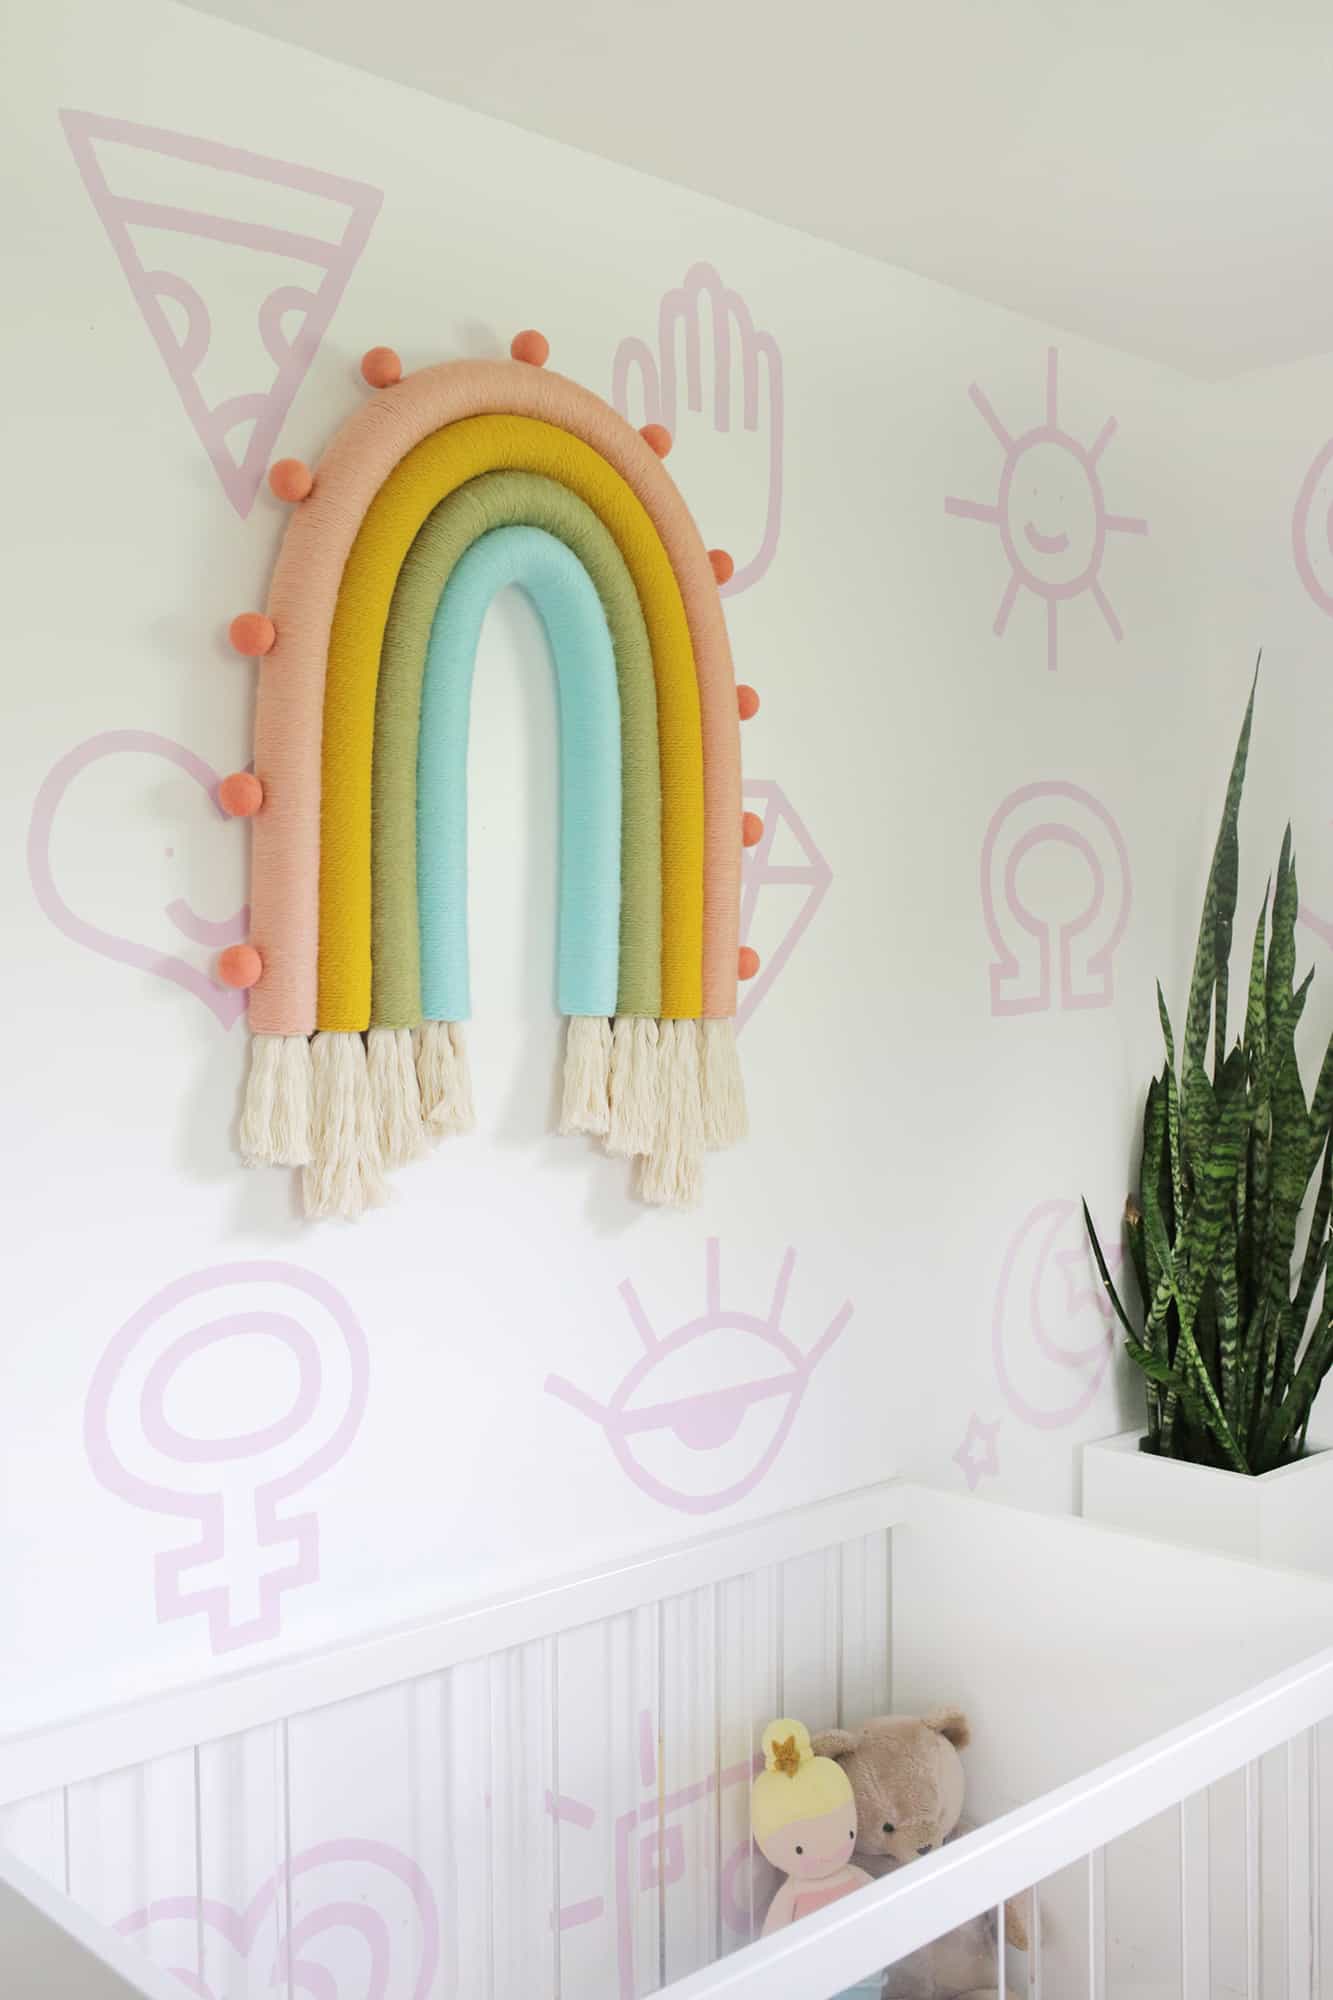
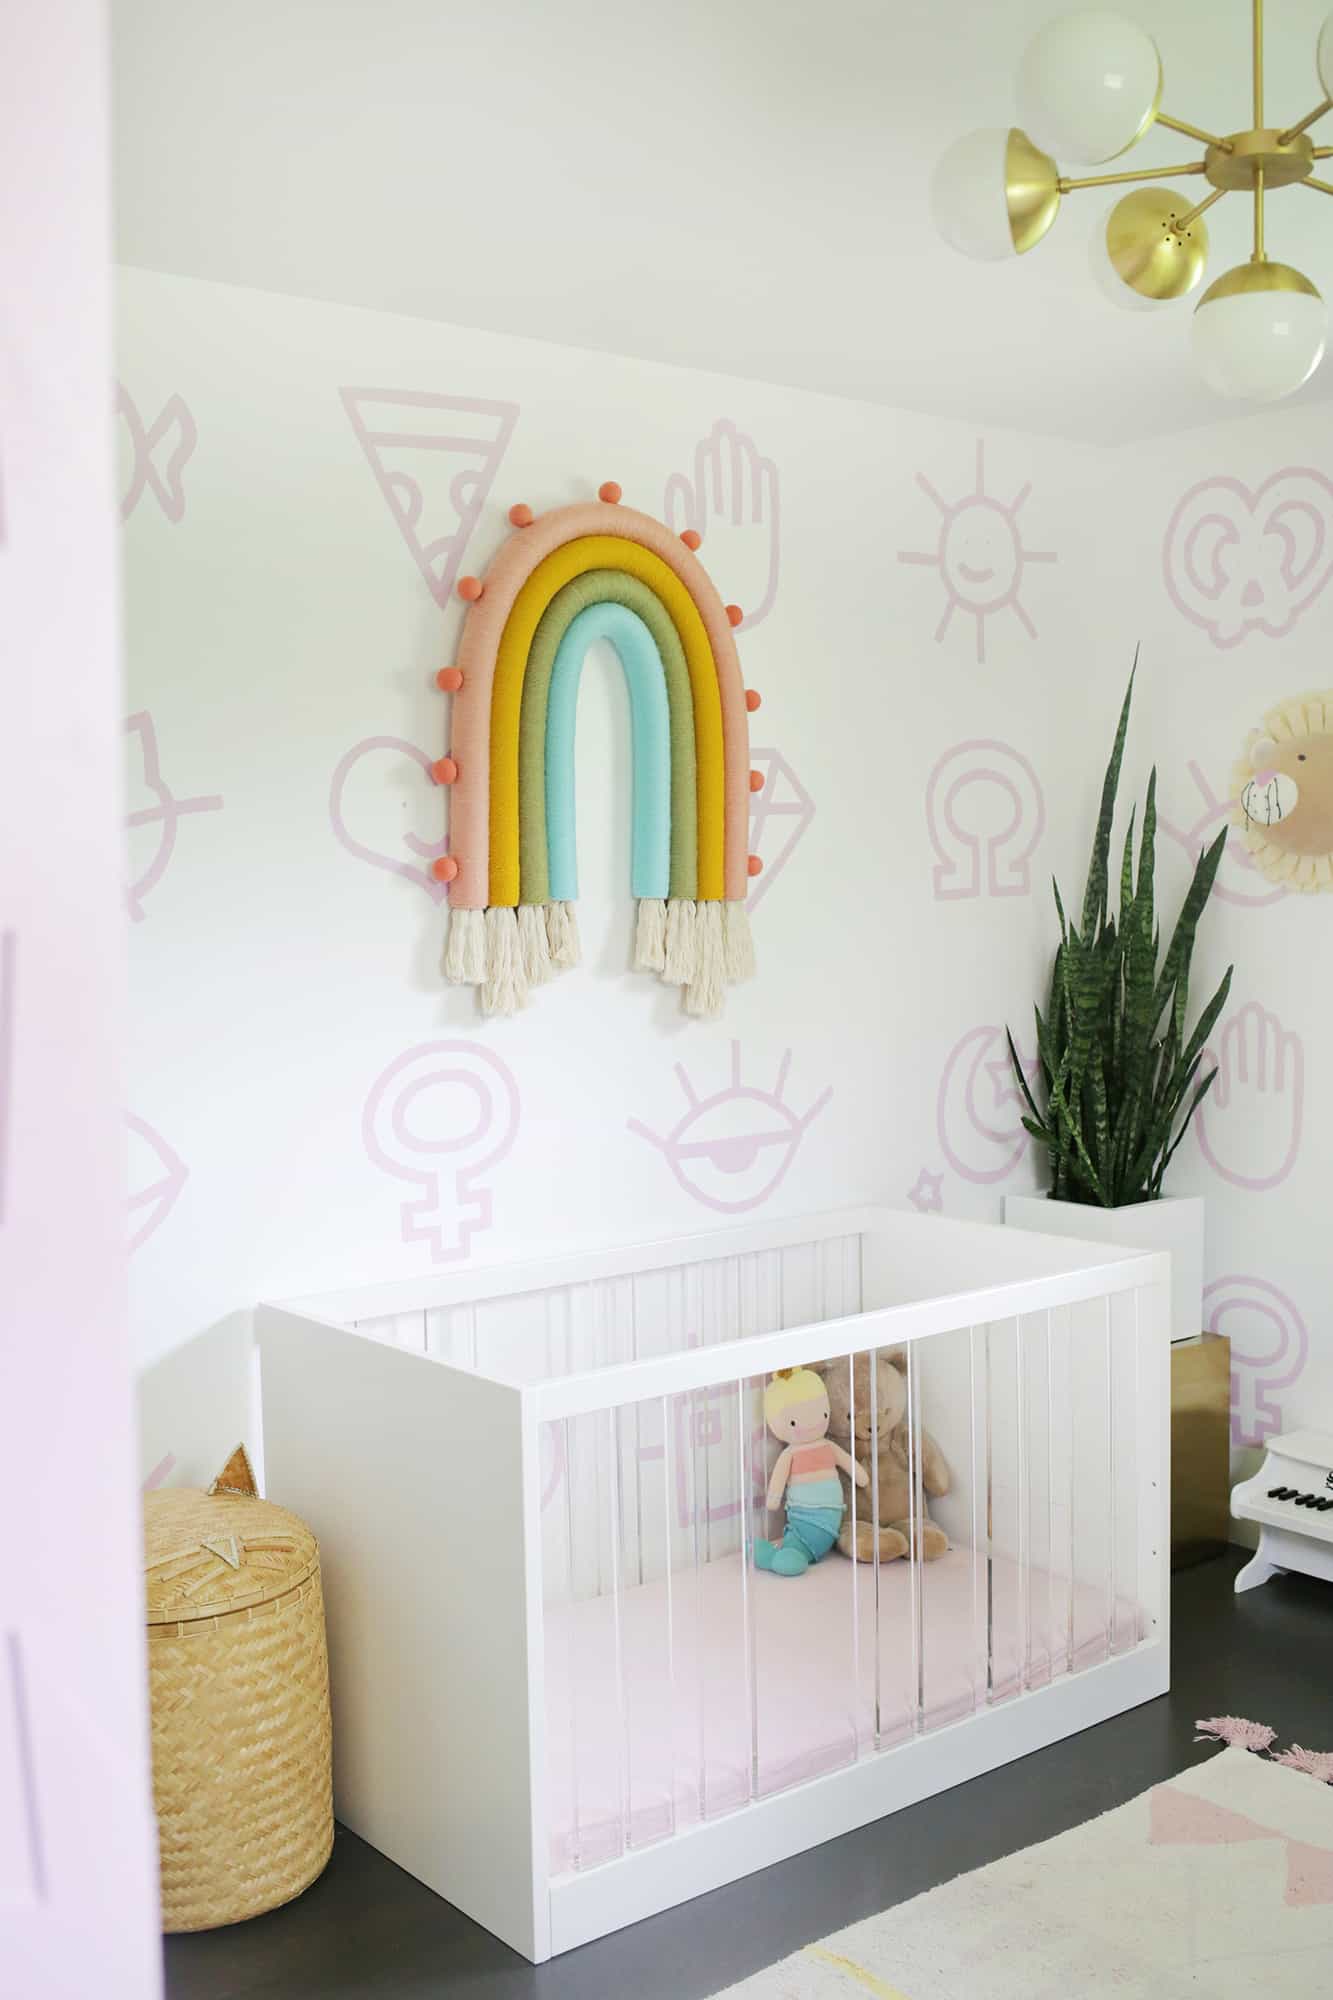 Seriously though, how amazing is that!?! I couldn’t be more pleased with how this turned out, and I’ve even been going in her room just to look at it randomly during the day. It makes me so happy!
Just a quick safety note: I’m not worried about Lola reaching this from a safety standpoint. She actually plays with those felt balls normally (and they aren’t a choking hazard size for her since they are larger) and the rest of this is just yarn and pool noodles.
But, if you make this on a smaller scale or just small felt balls, be careful it doesn’t fall into baby’s hands if there are items attached you would worry about them having.
This is totally an item that I would also hang in any other room in the house, so don’t feel like this is limited to a kid’s room if you aren’t in that zone yet! xo. Laura
Room Sources: DIY Wallpaper / Chandelier / Similar Crib / Washable Rug
Love this post? Sign up for our newsletter for more ideas!

Get creative ideas for recipes, crafts, decor, and more in your inbox!
 Get the How-To

Supplies
- 5 pool noodles
- thick cotton rope (try the trim section of your craft/fabric store)
- thick yarn in preferred colors (I didn’t use more than the yarn you see above, so one large yarn should be enough for my size)
- 10′ of 3/8″ copper coil tubing
- 4cm wool felt balls (I used the coral color)
- cat brush
Equipment
- hot glue gun
- X-acto knife
- -scissors
- mini pipe cutter
Instructions
- OK! So, first you are going to decide how long you want your outer rainbow color to be, which will determine the overall size of your rainbow—since it’s the outer layer. I wanted my outer layer to be longer than my pool noodles were, so I just cut off 8″ of another noodle and hot glued that section onto the end of another full length one to give me an extra long noodle to work with. Then I used my pipe cutter to cut a piece of copper coil that was about 2″ shorter than my noodle so it wouldn’t stick out the ends once I threaded it through my noodle. It took me a bit to figure out what to use as the backbone of the rainbow as I needed something that would be bendable and yet strong enough to keep its shape once bent.I remember always seeing those copper coils in the hardware store and I thought they might be worth a shot and they were perfect! If you do a much larger rainbow than this, you may need to try the coil in the next size up. It will be harder to bend into place, but also stronger as well once bent into shape.
- Once your pipe is cut, make sure it’s the right length for your noodle and then use an X-Acto knife to carve out some of the inner portion of the last 1″ or so of each noodle end so you have a larger space to add your rope fringe at the end. Pool noodles are super easy to cut into, so this part shouldn’t be too hard.
- Then, hot glue your yarn end to one end of your noodle and start to (are you ready for this?) twist the noodle to wrap the yarn around the noodle. It is still time consuming but it is waaaay easier to twist the noodle than wrap the yarn around the noodle. Keep the yarn holding hand in place and use the other hand to twist the noodle body as you go. I glued my yarn to the right end of the noodle and twisted the noodle away from me, but if you are left handed you may want to start on the left side and twist if that is more comfortable. Keep twisting and twisting until you have about 3″ of yarn-covered noodle and then push all the yarn downwards towards the end you started from to condense the yarn and make sure it’s super tightly packed with no pool noodle underneath in sight (it will also help keep the noodle covered when you bend it into a rainbow shape as well if it’s tightly packed yarn).
- Keep twisting and pushing down every 3″ of yarn until you reach the end. I used more glue to secure the yarn to the noodle on the last 1″ of the noodle and then tucked the end into the noodle opening and glued it in place.
- With your outer noodle now wrapped, slide in your copper pipe that you cut to fit and then bend it into your rainbow shape. I made mine a bit of a taller/skinnier rainbow, but you could do a shorter/wider one as well if you like. Once it’s bent into place, make sure your next noodle is long enough to fit within that shape and start to wrap that noodle with the next color yarn. When you are almost done wrapping that noodle, place it back inside the outer noodle to check the fit.Usually adding the yarn changes exactly how much noodle length you need, so you’ll just want to keep checking the length before cutting the noodle and finishing the end with yarn.
- Repeat with each color for each noodle until you have four layers! Since you’ll have leftover copper pipe after adding it to your outside noodle, use the rest inside one of the inner layers of noodles and that will help it keep its shape even better.
- This is also a good time to take a piece of yarn the color of your third layer in and tie it around your pool noodle so you have a hanger on the backside to hang your rainbow from. Basically, if the top of the rainbow is at the 12:00 position on a clock, tie one end of a piece of yarn at the 1:00 position and the other to the 11:00 position with the knots on the backside so you don’t see them and you can use the yarn that connects the two points as a hanger. Much easier to do it now before you glue things together!
- Now it’s time to glue our rainbow together! I clamped my outer layer to a coffee table so it wouldn’t move from that position, but you could also just place boxes or heavy books at the sides and top/bottom to keep in place while you glue as well. Just put a generous amount of glue at the sides where each noodle touches the next and add one layer at a time until you have all your layers complete.
- Now that your noodles are attached, take your thick rope, cut it double the length you want your tassel to be, and then tie some twine at the middle of the rope to keep the tassel together. If you can’t find super thick cotton rope, you can also cut three or four strands double your tassel length and just tie them all together in the middle for the same effect. … you can use a pet brush to brush out the rope into one larger tassel.
- As the finishing touch, glue some large felt balls around the perimeter of the rainbow and your sweet little project is ready to hang!
I love this and can’t wait to make it for my new classroom! Is there anything that could be used in place of the copper coil tubing?
This is amazing! Now I want to make one for my basement playroom – those walls have been begging me for a big statement piece. Thanks for the amazing tutorial!!
Hi! Was googling how to diy rainbow macrame for my daughter’s 13th bday. and voila it led me here:)
Can you please tell me what the overall dimensions of your rainbow is. Thank you so much
I would say mine is about 3′ tall and 2.5′ wide but you can cut the noodles to whatever size you like (or tape two together to make longer) the size is really up to you!\
Laura
Can you please tell me what the overall dimensions of your rainbow is. I love it and think I’m going to give it a try!
Made this and I love it… but now I’m stumped on how to hang. Can you let a sister know? Thanks!
I threaded a yarn string through some of the yarn on the back and tied a loop for hanging!
Laura
I really love this! Such a good idea, never thought to use pool noodles. But I also really love that wall design in the final product picture!? Was that also crafted by the same person??
I looove this!!! I’m going to make one for my daughters room.
Can you please let us know how you applied the rope to the bottom 🙂 I can see 2 other people have also asked
Thank you 🙂 keep the great ideas coming
Hi! Just add some hot glue into the opening of the noodle and stick in the middle fold of your rope so it sticks to the glue! Hope that helps!
Laura
What yarn brand and specific colors did you use?? Hoping to make this for a birthday party next month and having trouble figuring out the colors online.
I’d love to know and am surprised a diy blog wouldn’t mention this or answer the other comments asking this.
Thanks in advance!
Hi! We used the brand Buttercream (available at JOANN here: https://tinyurl.com/y9qda4t5)
Sorry, we didn’t take note of the colors we used but hopefully you’ll be able to find the bright/pastel shades within that product line that work for your space. ?
I made this for a friend’s daughter and she loved it! Every step was simple enough and I basically did it just as it’s laid out in the instructions. The only differences were that I did not add the balls (I couldn’t find any that could arrive in time), and I used 1/4” copper tubing instead of 3/8” (that’s all they had) and it worked just fine!
So Cute!!! Also, I am in love with that cat hamper in the photos, my girls would love it. Where did you find it?!
This is amazing! Can I ask where is that chandelier from?
Where did you find the pool noodles? Love the colors of them
So cool! Can we talk about the wall paper ????… where did you find that?
Hi Kellie! It’s a DIY 🙂 https://abeautifulmess.com/2017/05/painted-nursery-wallpaper-diy.html
LOVE this! Def doing this over a chilly weekend. Could you tell me where you got the wallpaper or decals? Thanks!
How much does this DIY cost roughly?! 🙂 So perfect!
Hi! Loooove this idea So creative
Is the that wall paper or decals on the wall? If so who makes them
OMG Laura this has to be one of my absolute fave things you’ve made!! Although that’s tough competition because there are so many cool things.
What kind of yarn did you use?
This looks amazing! With the four pool noodles, how wide is the rainbow from the L to the R?
How did you attach the rope inside the pool noodle? This is such a cute wall hanging as well as project to do! May have to make for my gbaby room. Thanks for sharing!
Would also like to know how the white rope gets attached at the ends!
Love this and am planning to do one for my daughters room. I would also love some info in attaching white rope, overall size, and yarn used. Thanks so much!