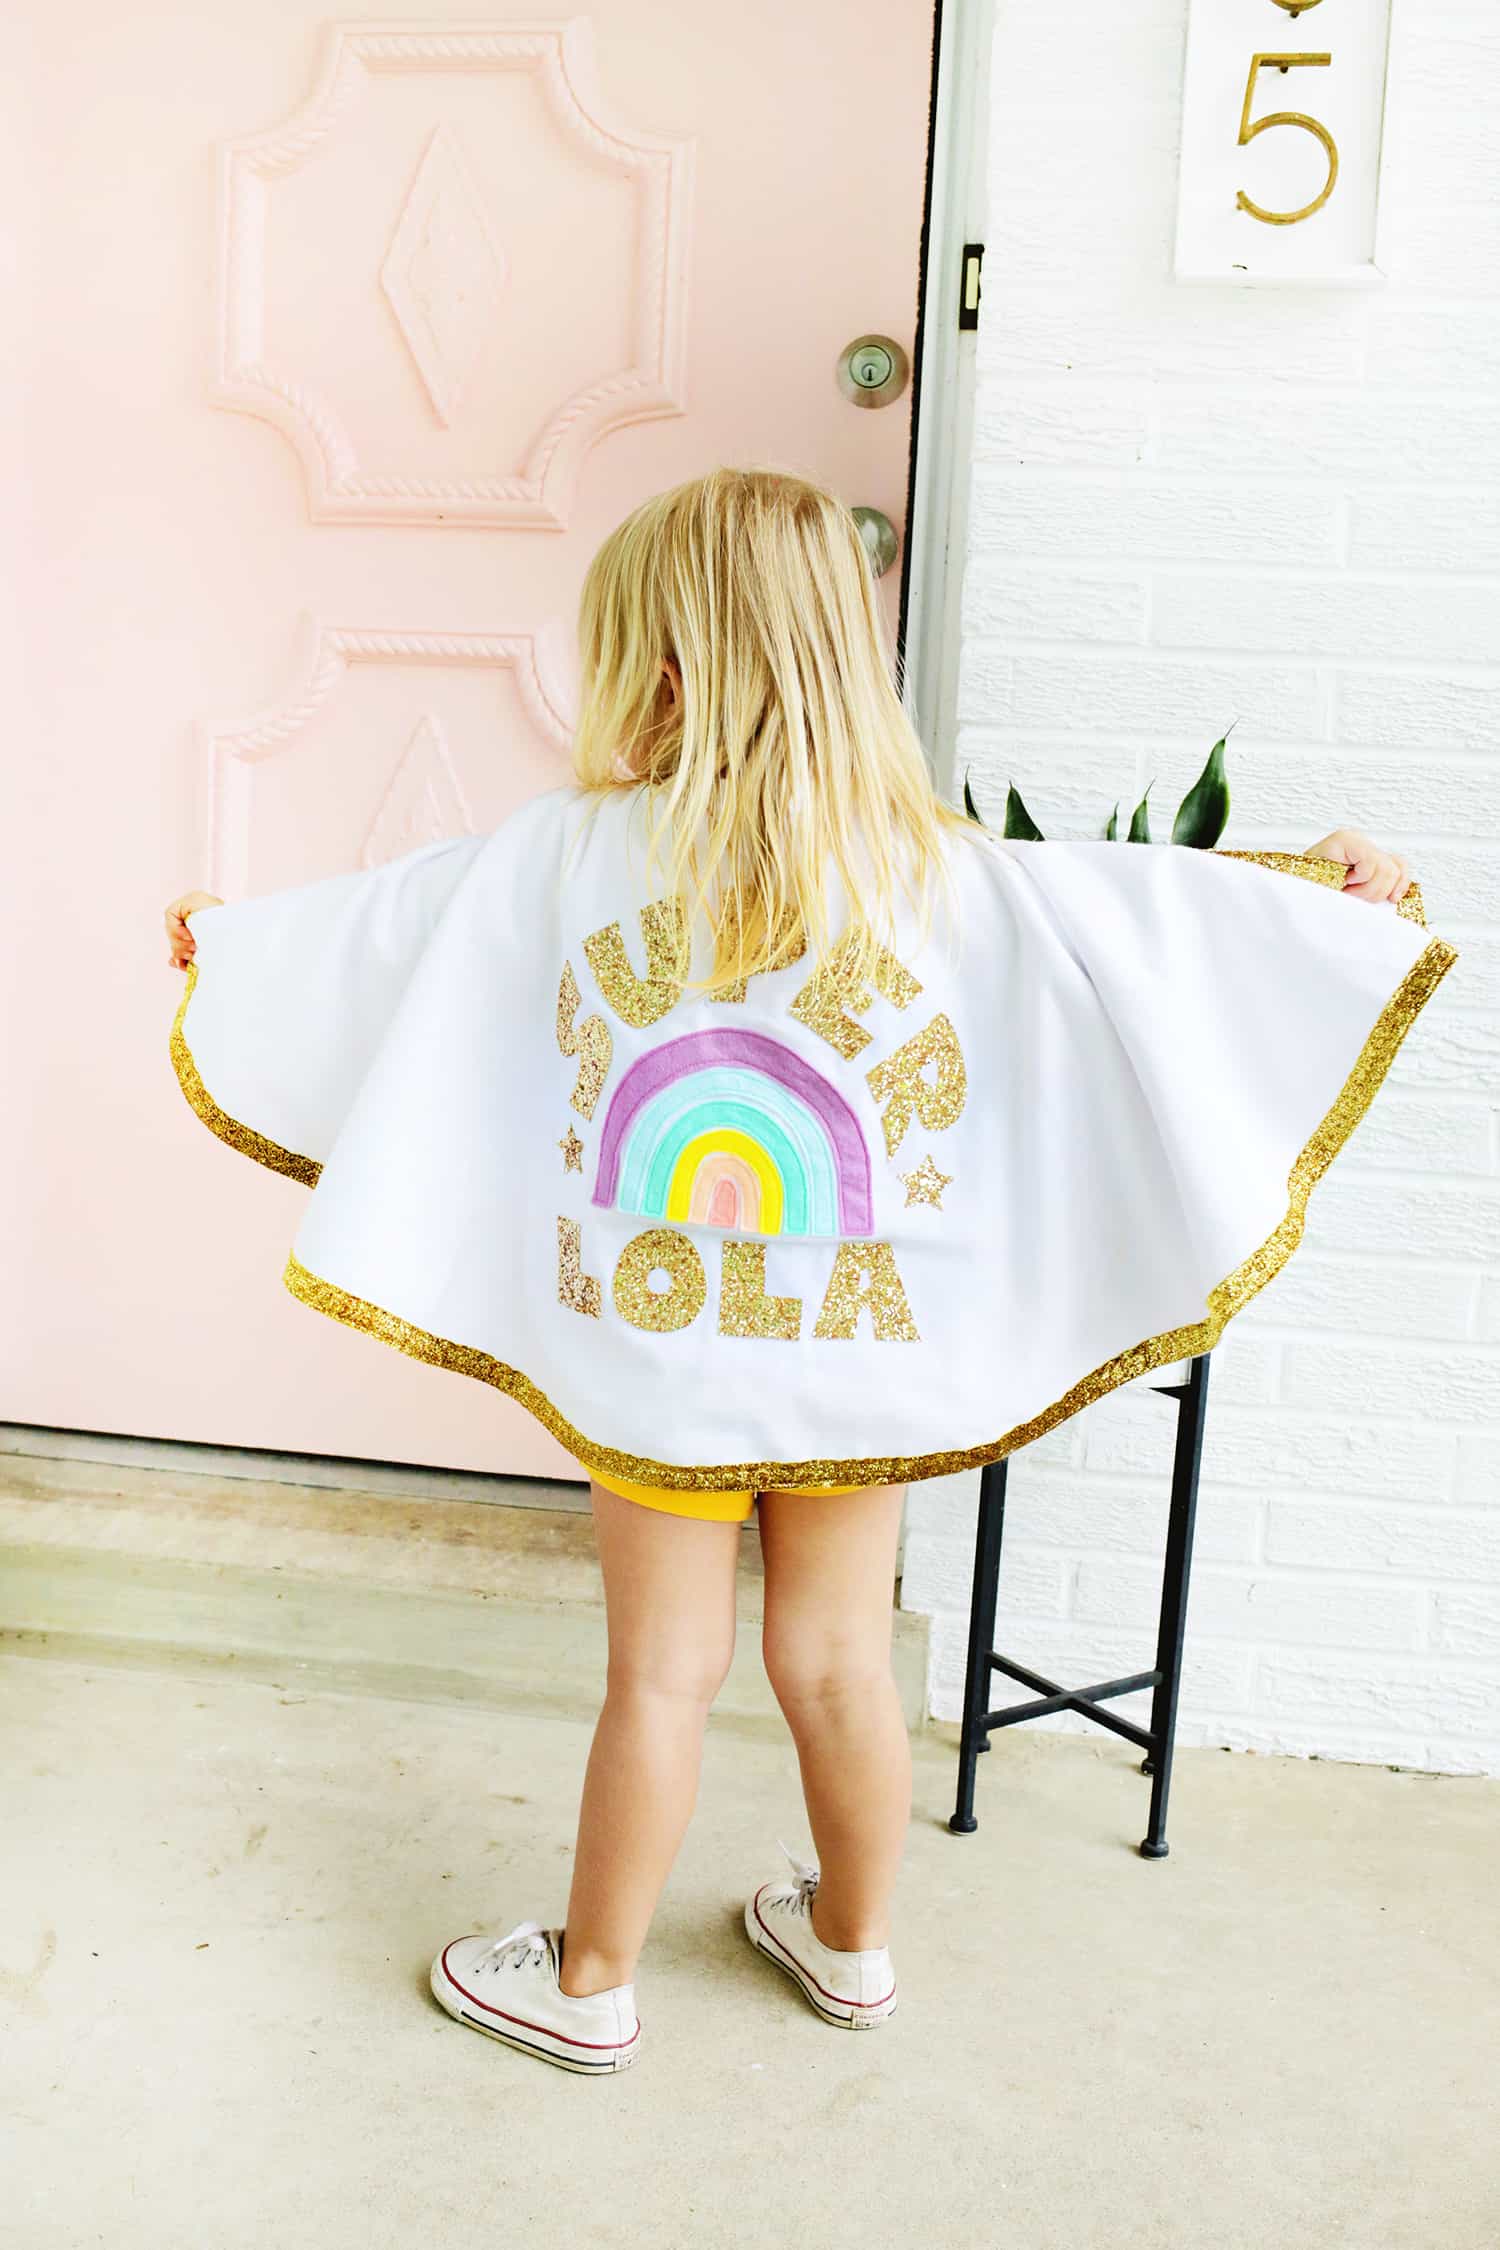
I’m not sure if she saw it on TV somewhere lately or if we’ve just been watching too much Buzz Lightyear, but either way, Lola’s been wearing a baby blanket around her shoulders and running around the house shouting “SUPER LOLA!” while flying though the air.
I love when she uses her imagination and I wanted to foster that kind of play, so I decided that she needed a superhero cape to make her play complete!
I searched through my fabric/sewing drawers and found a few things to make a simple cape with and I thought I’d share with you how to make one too!
Related: For more kids activities and printables check out Childhood Magic!
Supplies:
-1 1/2 yard of fabric for outside
-1 1/2 yard of fabric for inside
–stretch glitter ribbon for trim (optional)
–glitter fabric sheets for name
-felt fabric sheets for rainbow and stars (or whatever other decoration you want to add)
–fabric glue
-sewing machine
-fabric scissors and straight pins
-1″ double fold bias tape (or extra fabric to make your own bias tape)
SIDE NOTE: This cape can be washable or not just depending on what items you choose to decorate the cape with, so if you want it to be washable, just choose all items that can be washed!
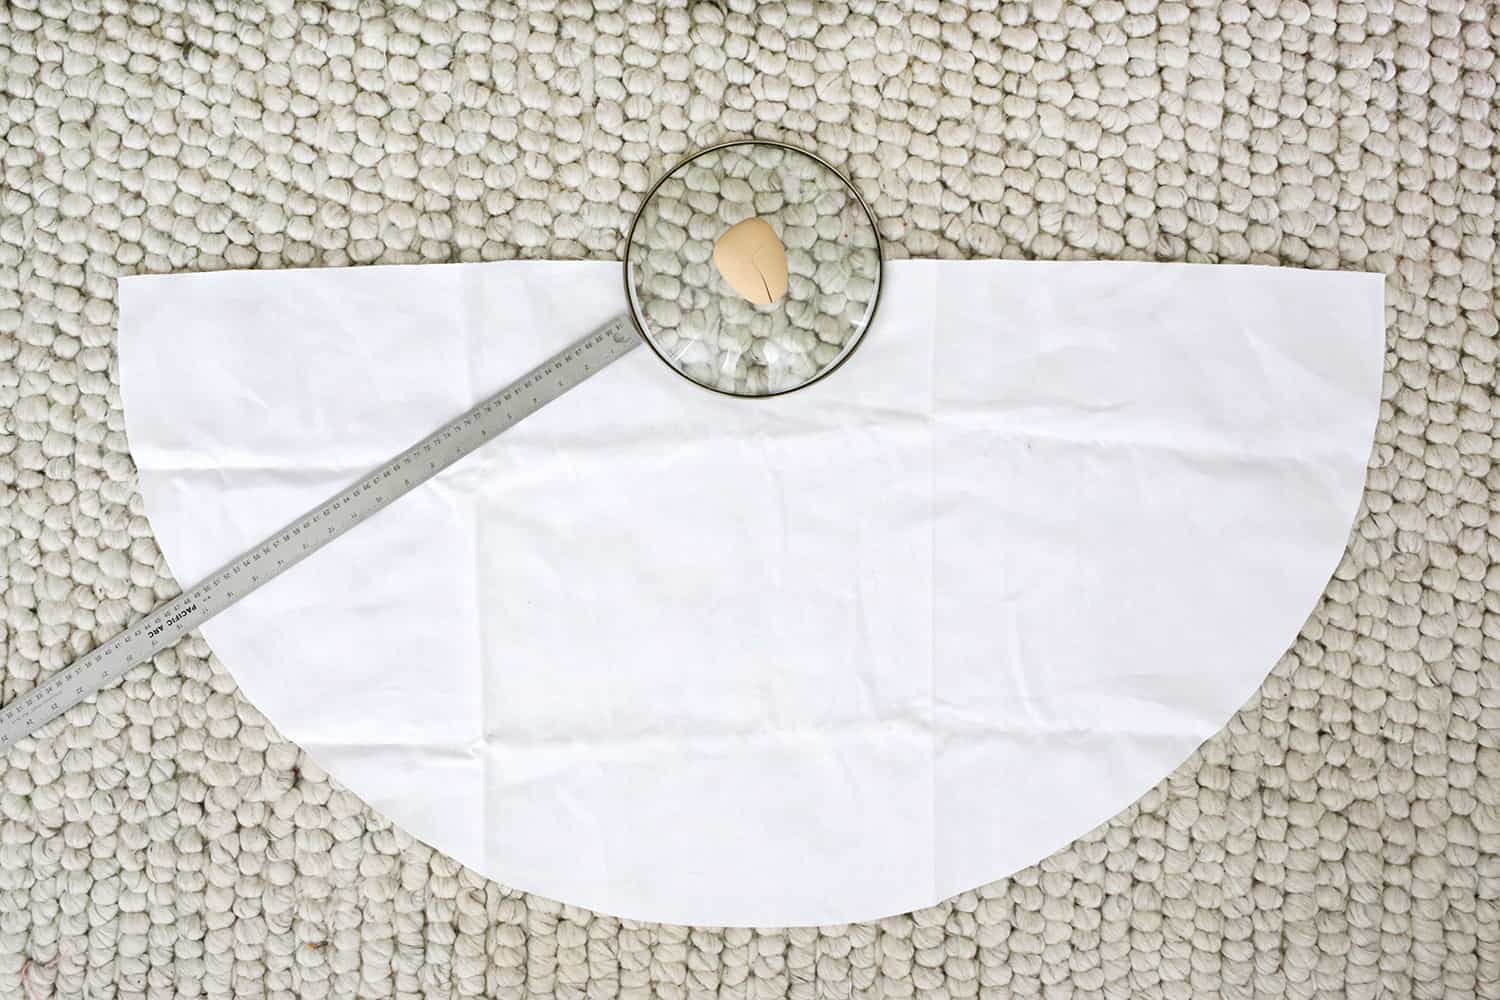
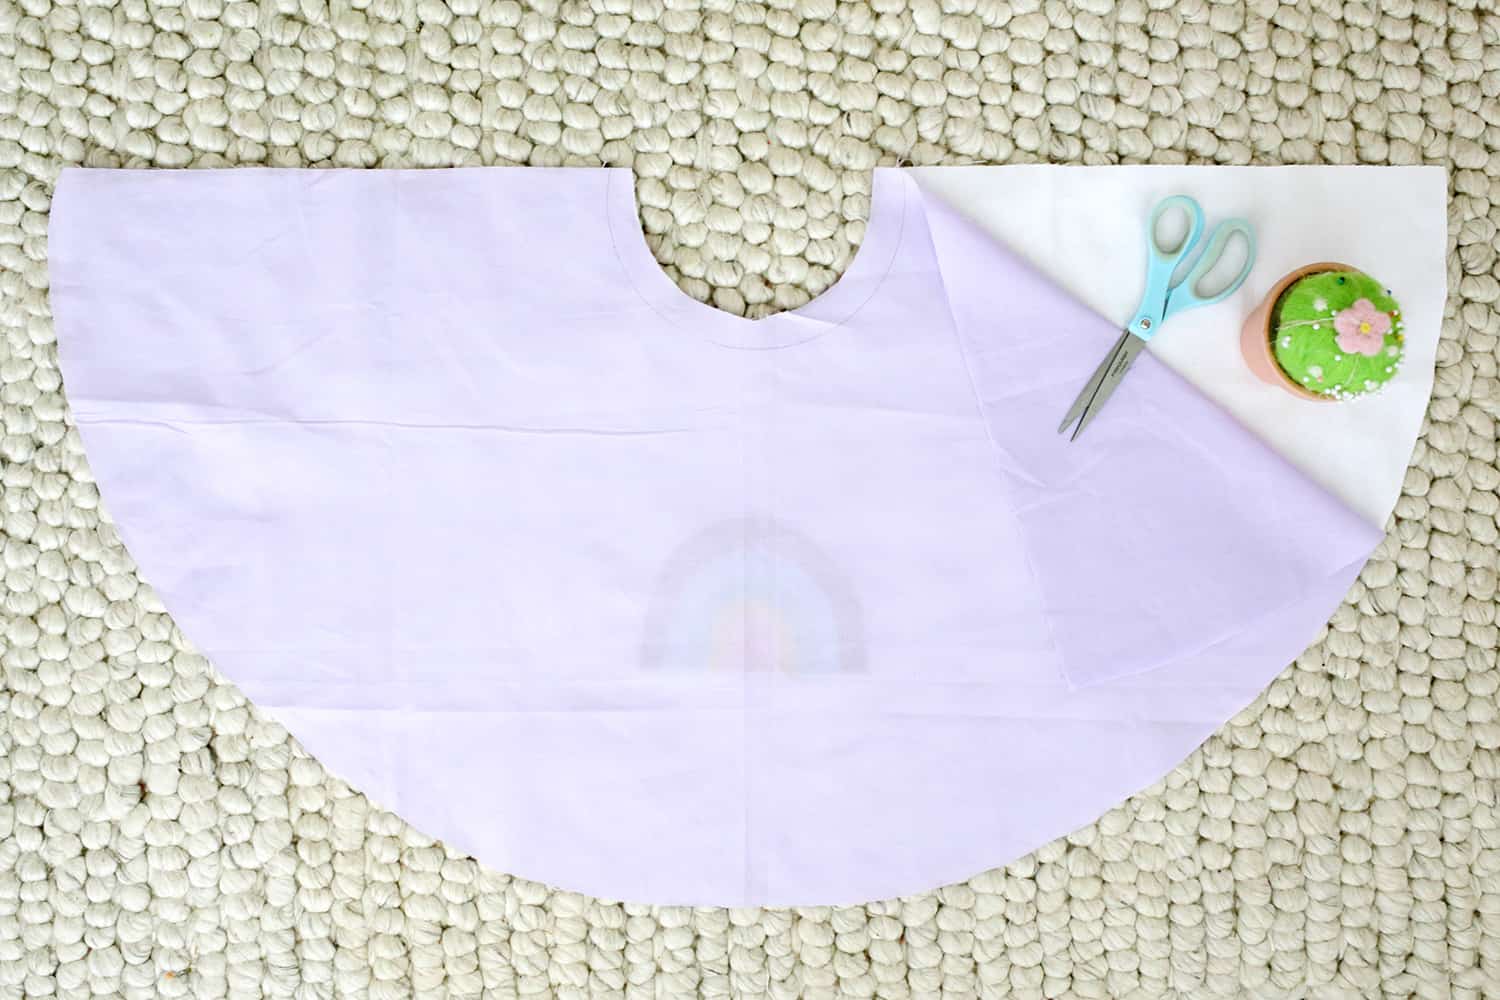
You can change the size cape you want pretty easily, but what I did was to lay my outside fabric down on the floor and traced half a pot lid that was about 7″ wide to be the neck of my cape.
Then I just measured out 17.5″ away from the curve of the lid to get the curve of my cape and cut that shape out with fabric scissors.
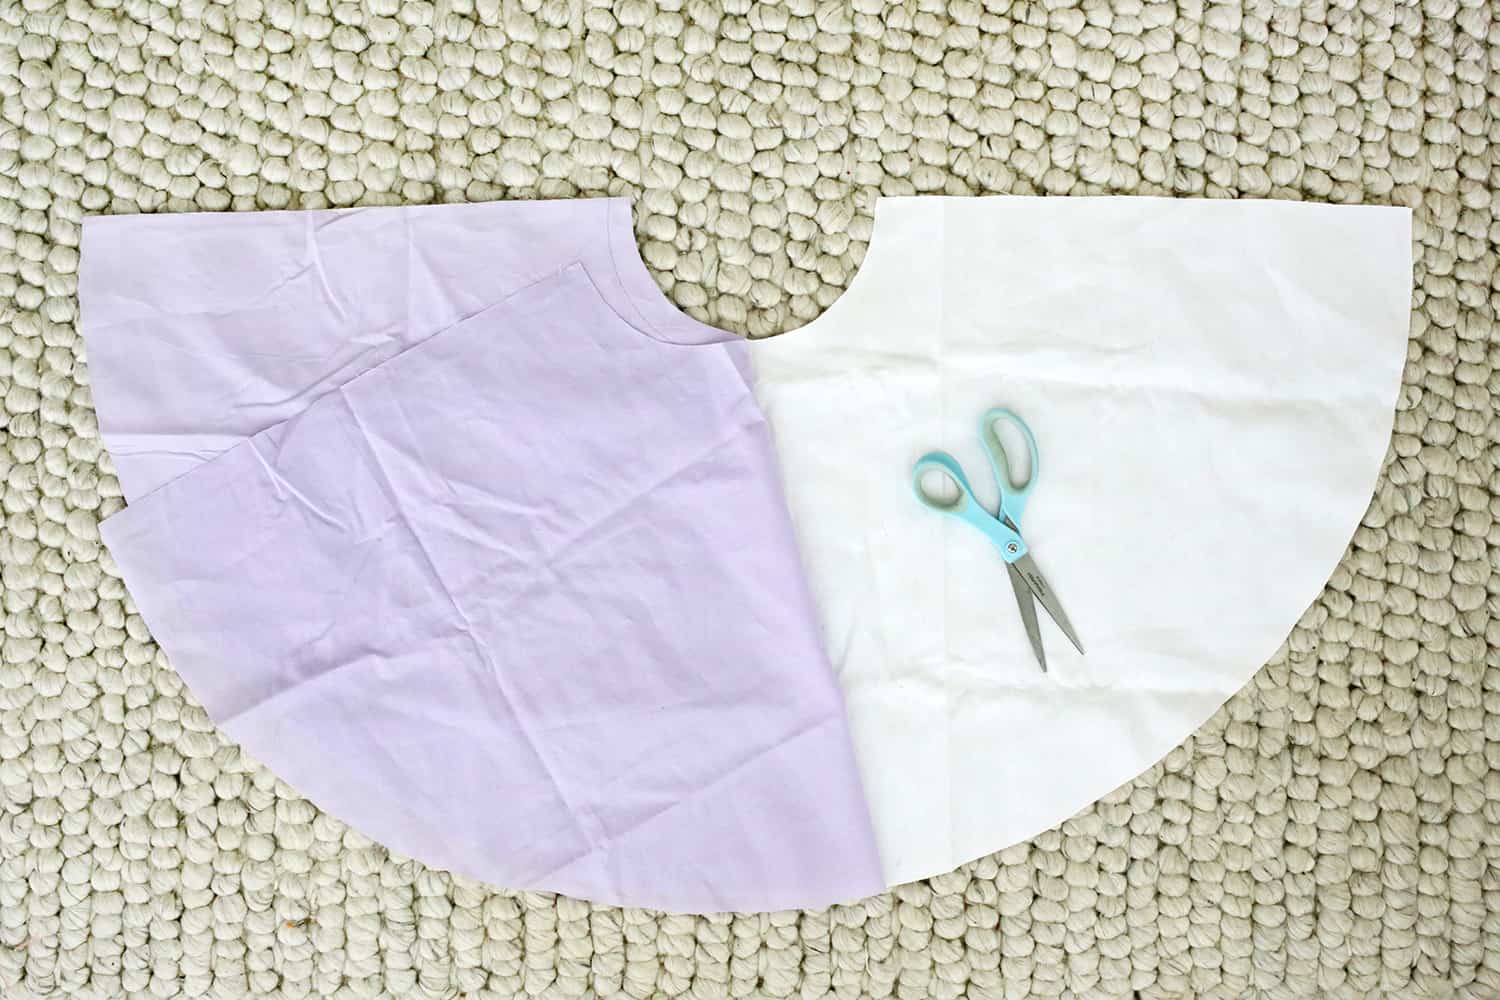
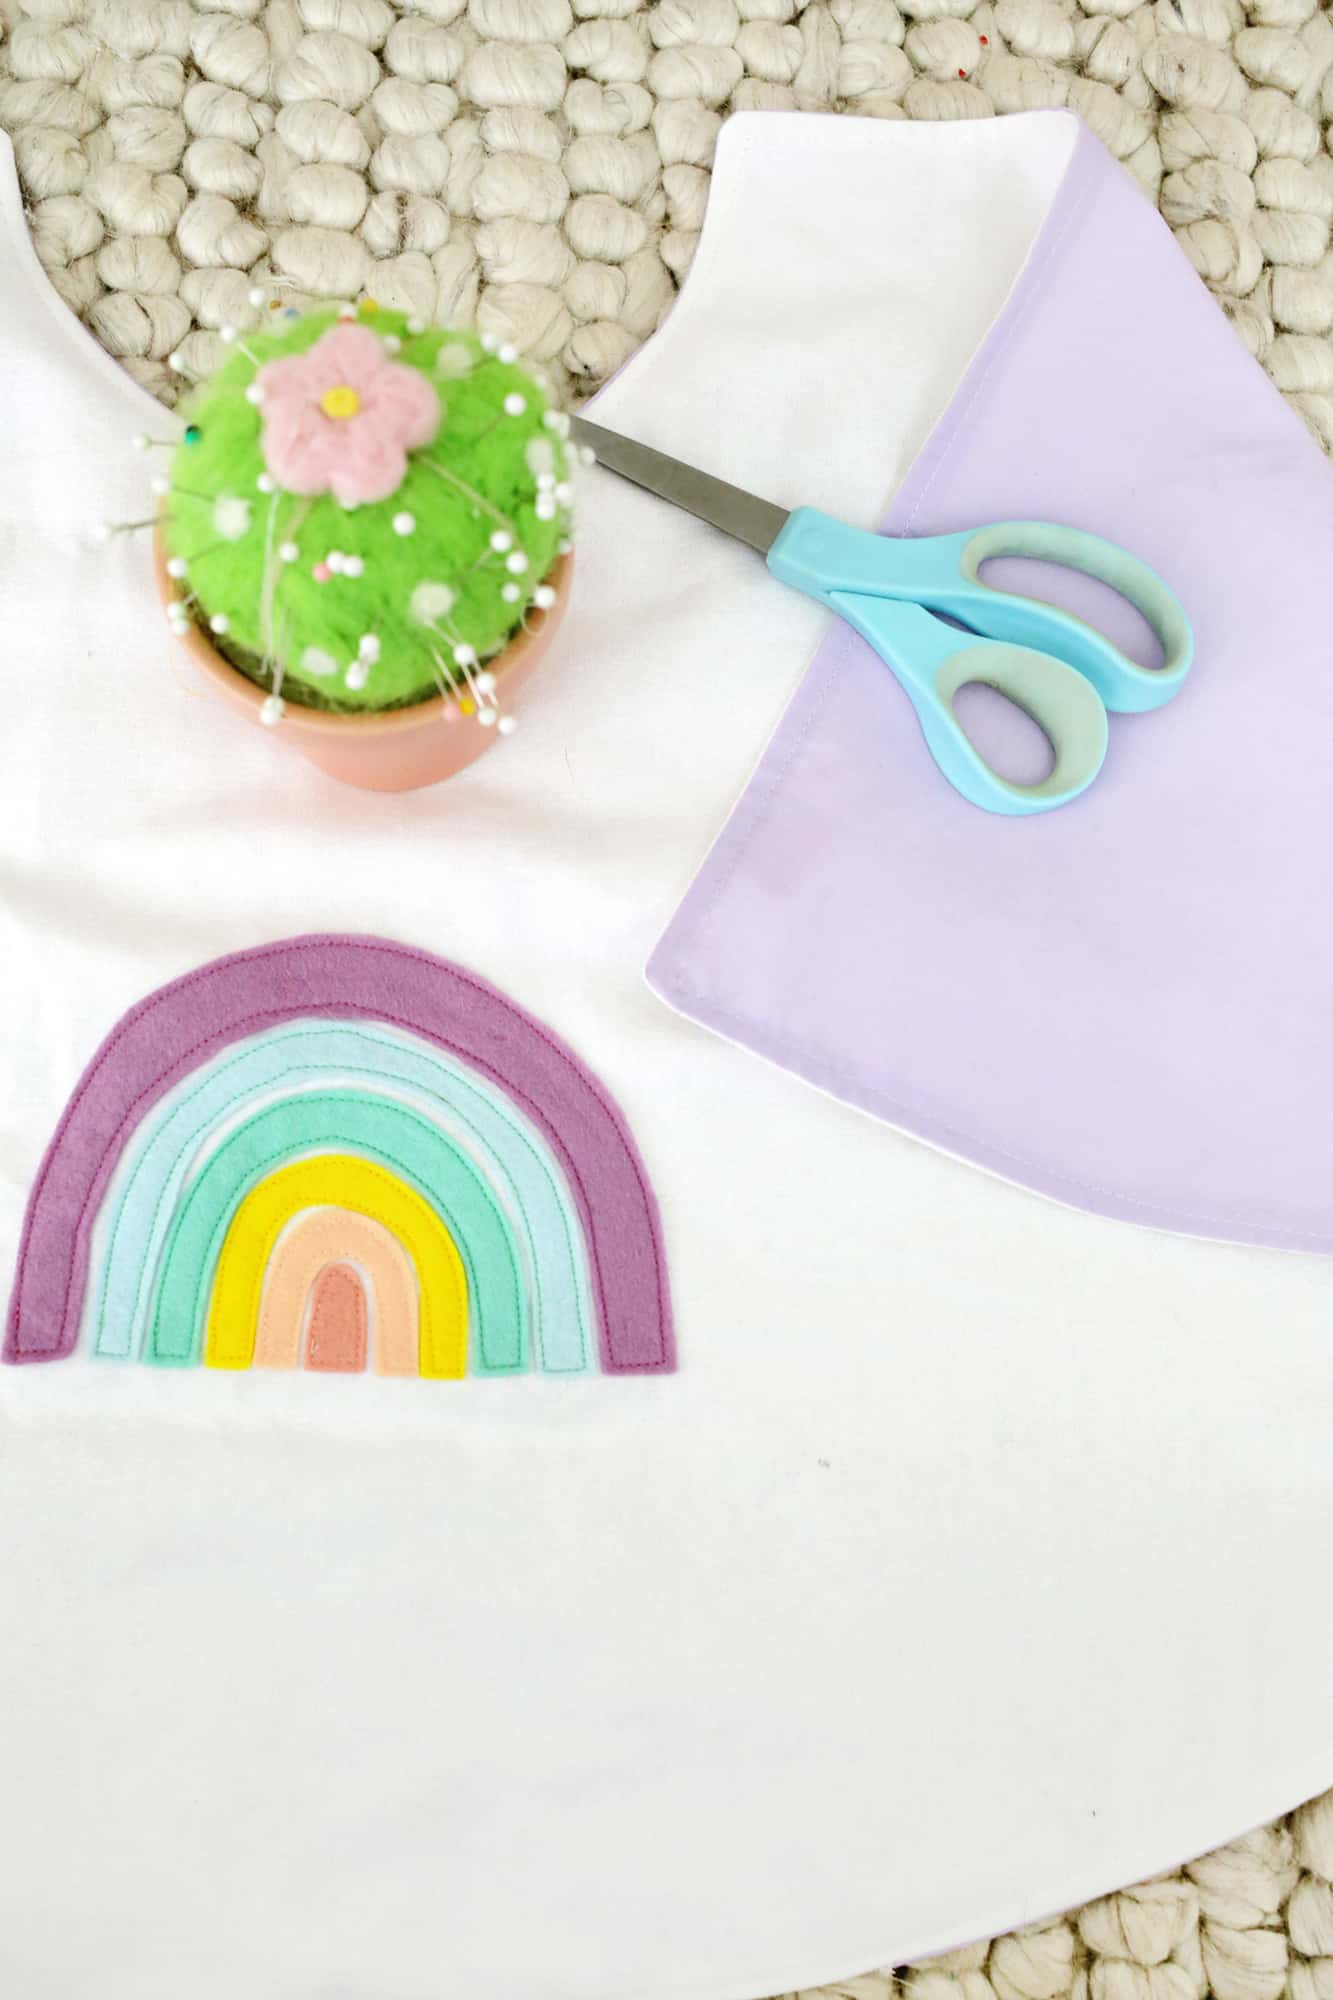
Use that shape as a pattern to cut another layer for the inside of your cape. You can do two of the same color or you can make the inside a different color like I did with the light purple.
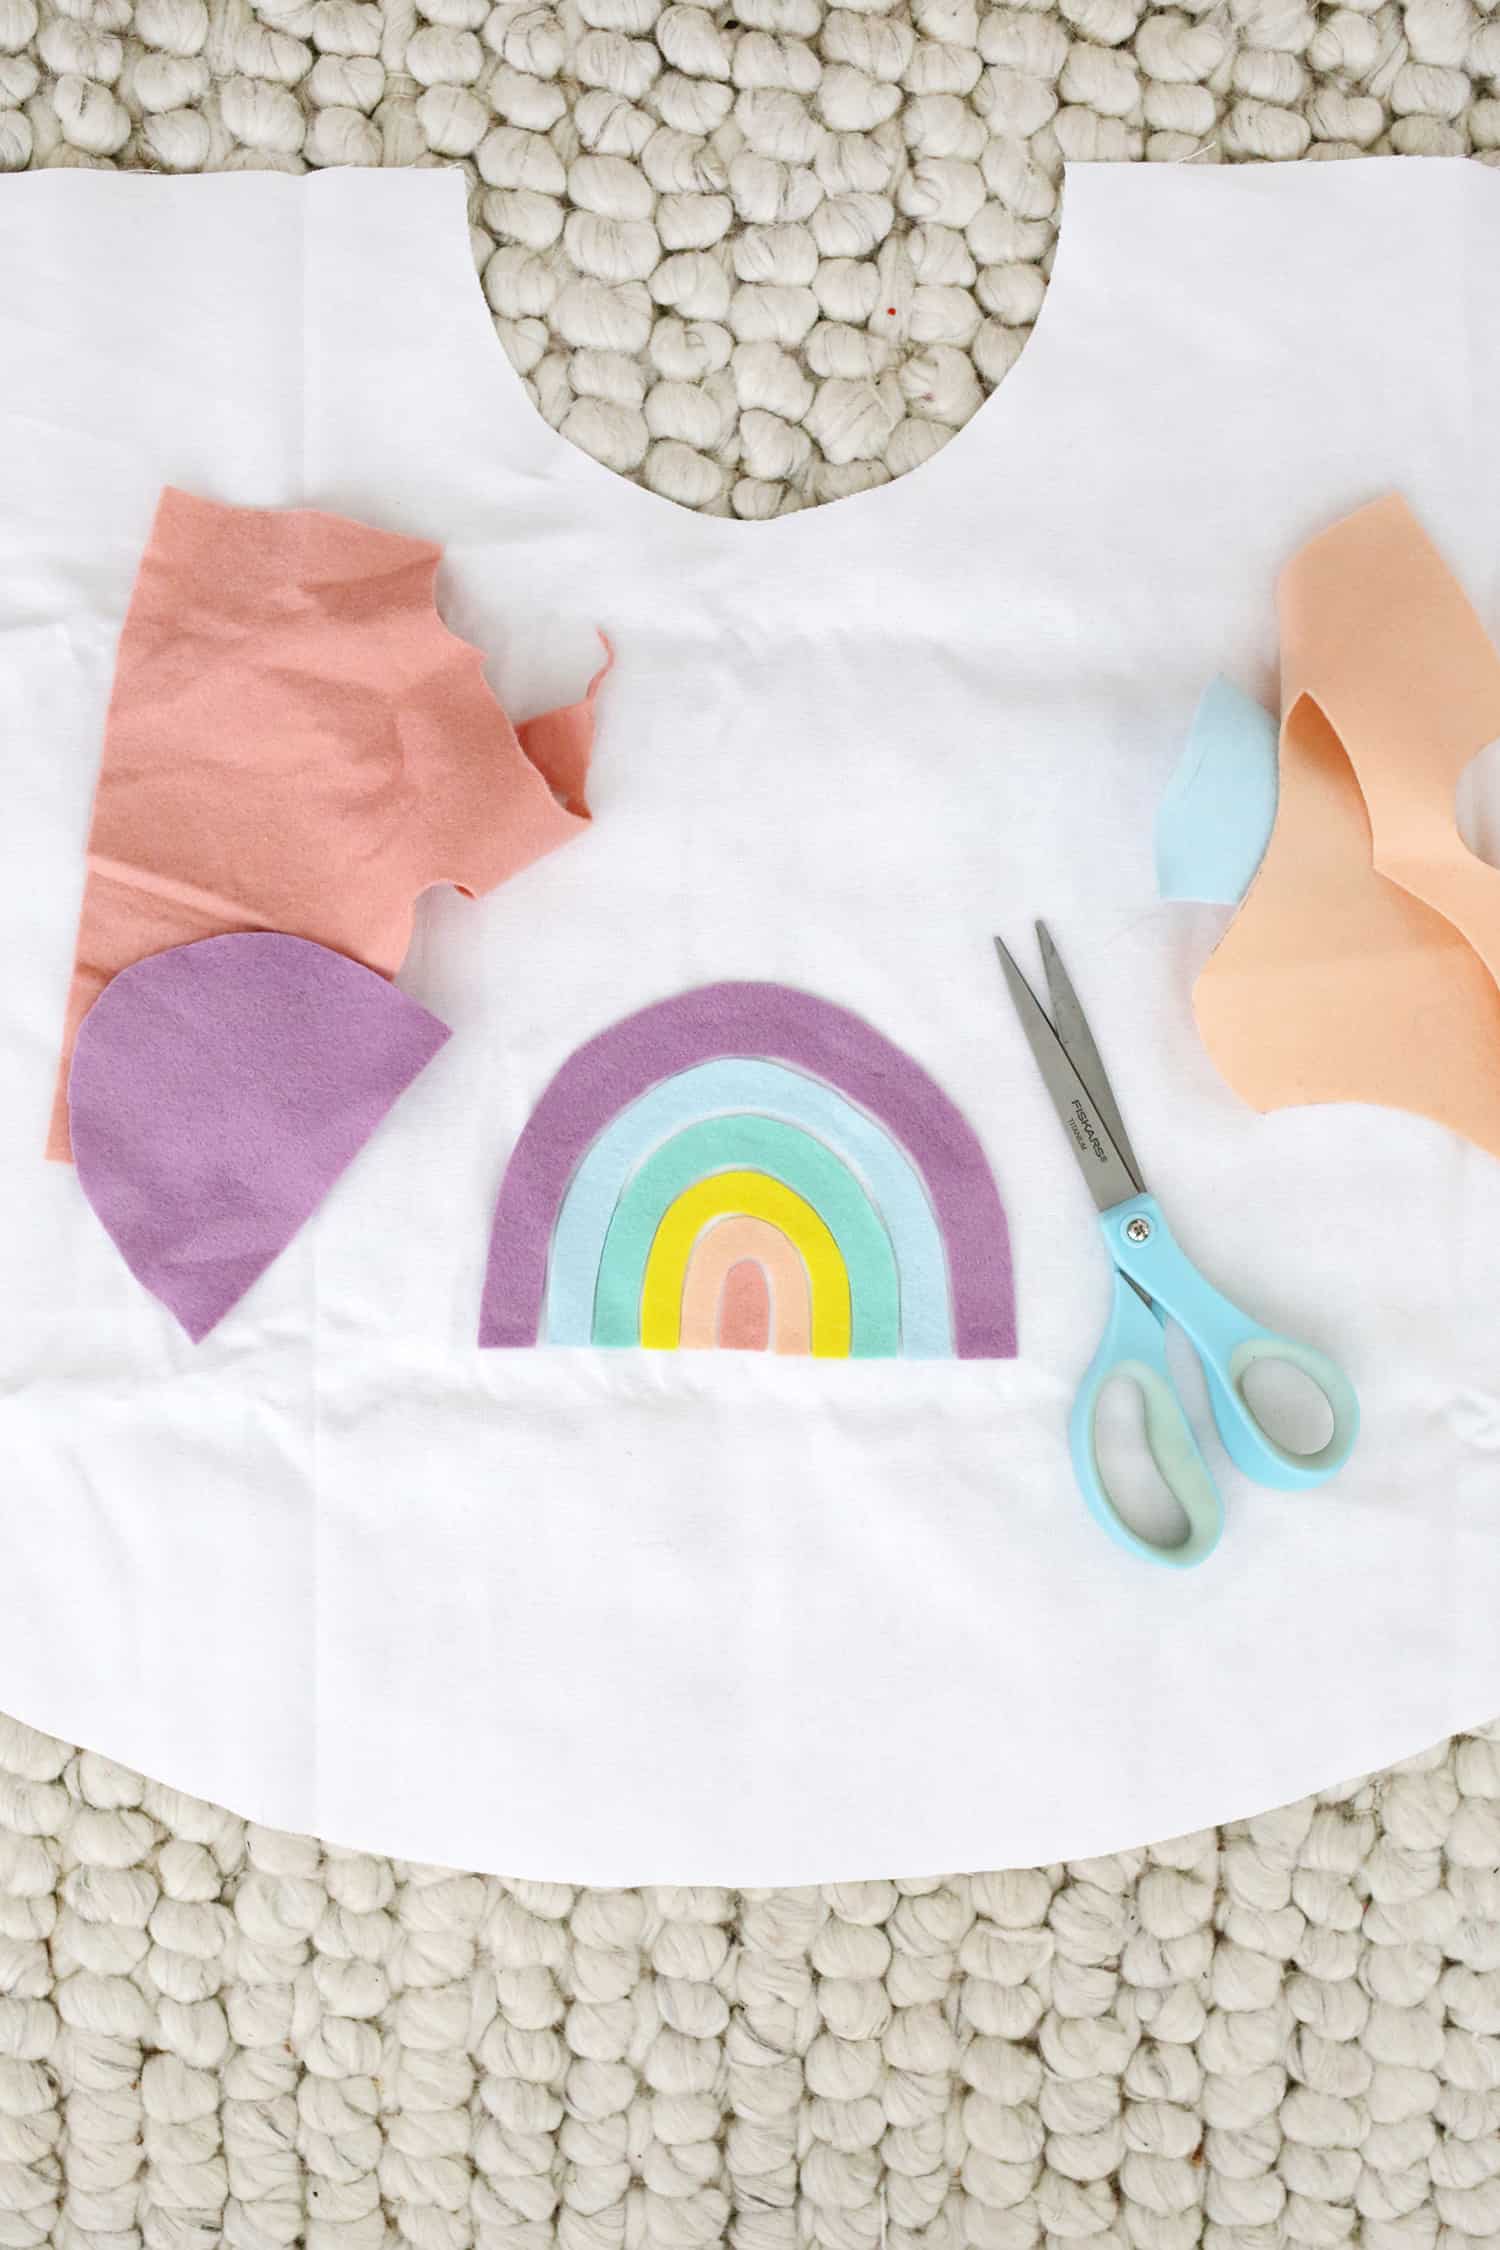 Now, before we put our two cape layers together, decide if you want to sew on or glue on your cape decorations. If you want to sew them then you’ll want to sew on your elements to each appropriate side before putting them together.
But if you want to glue them on, then you can go ahead and assemble your cape and then glue the design on. I did a combo of both so I sewed on some elements, assembled the cape, and then glued on the rest of the pieces.
I just cut out some rainbow arches from some felt sheets as the main decoration for my cape, but you can do whatever shape you want or just keep it simple with stars or their name.
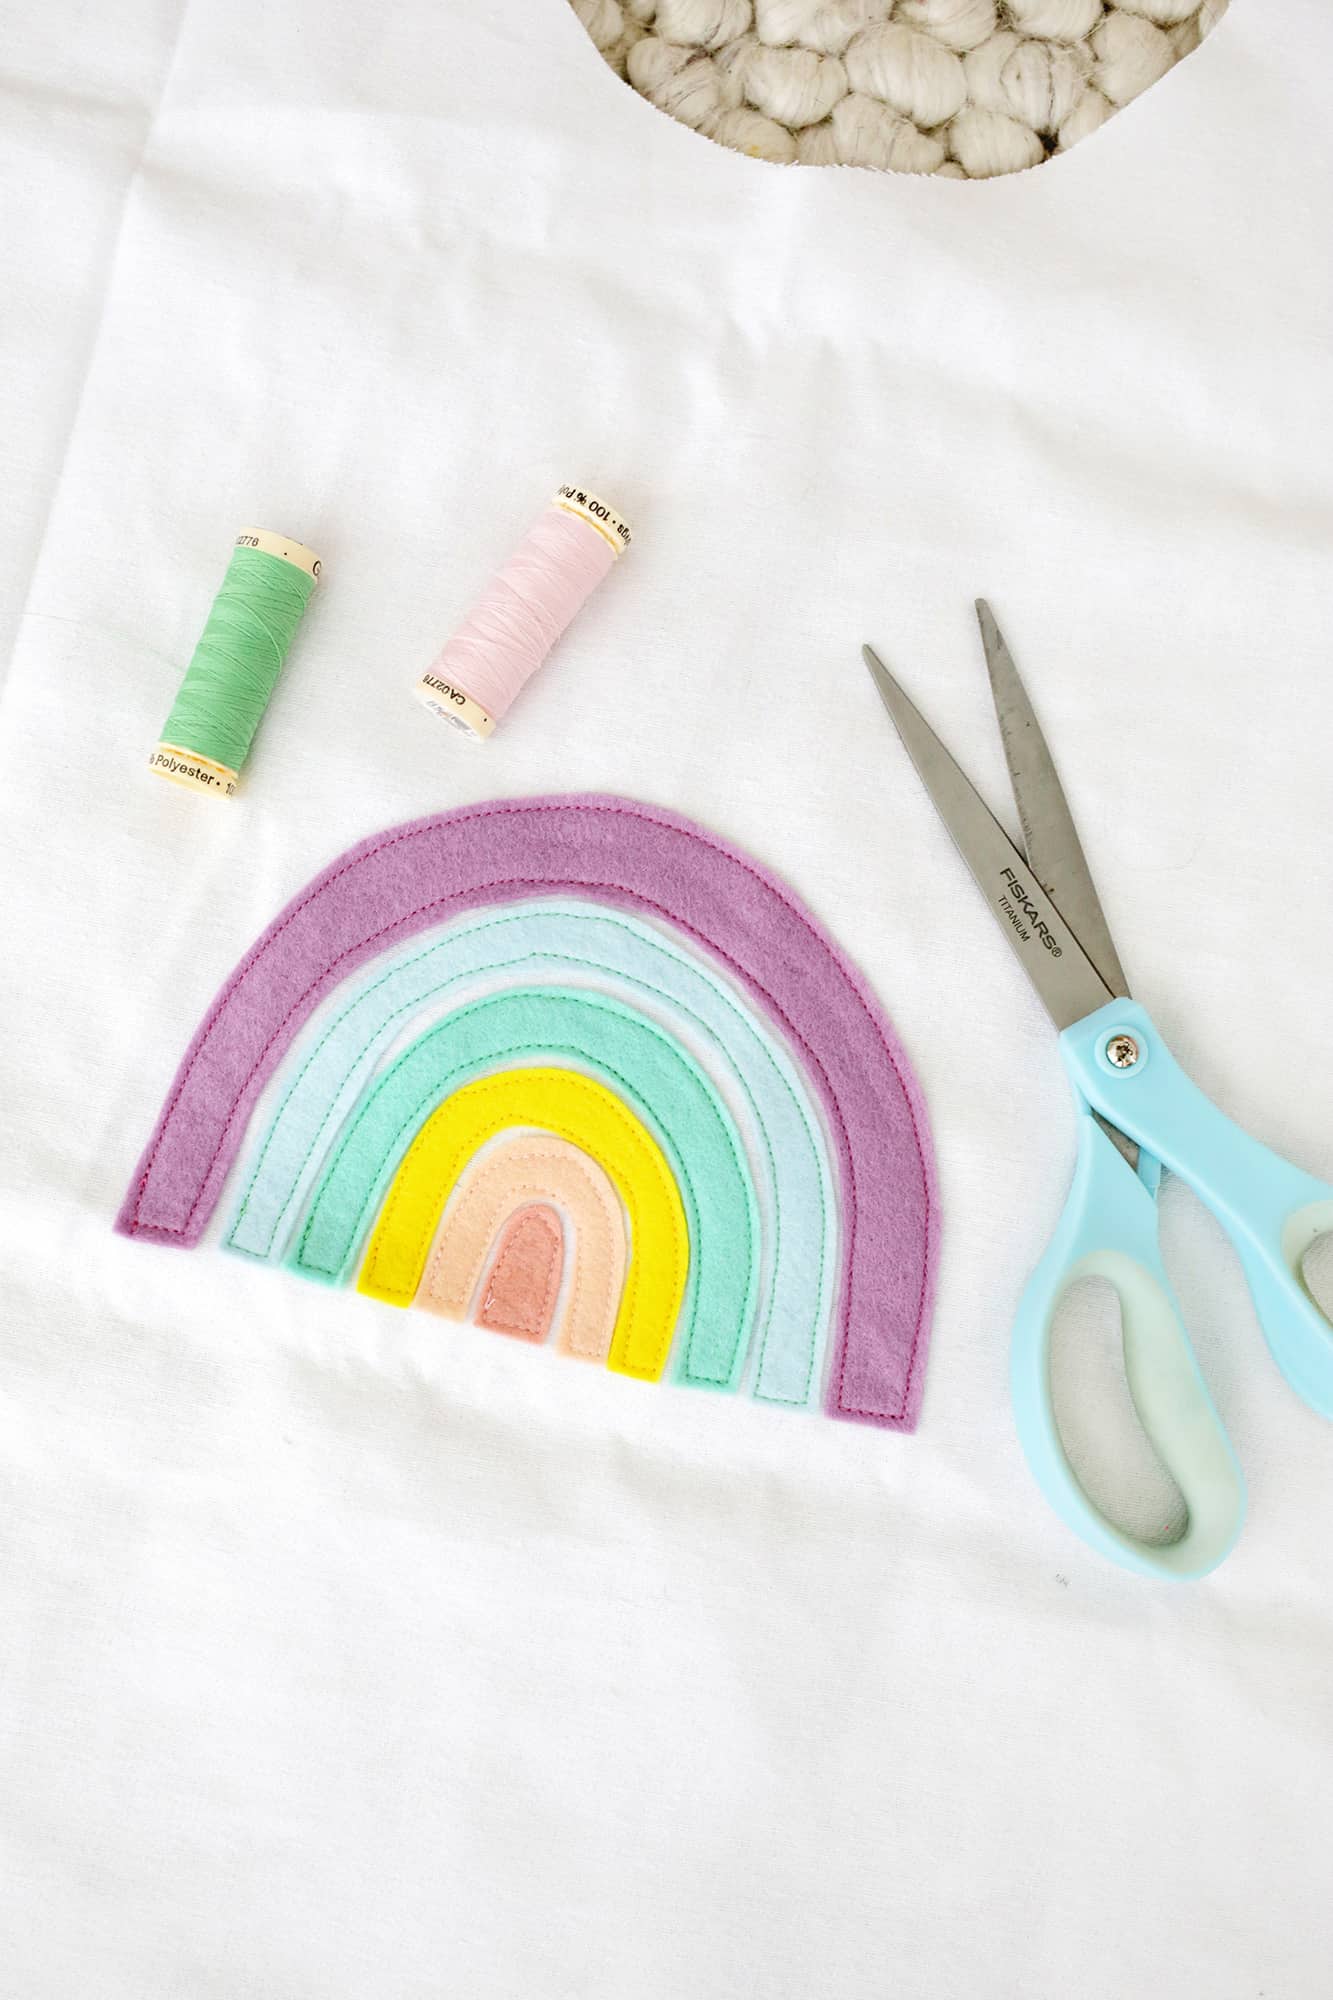
Once I sewed on my felt shapes (I glued them down lightly first to keep them in place while sewing), it was time to assemble the two layers of my cape.
 Place your fabric layers right sides together and then pin the cape all the way around with straight pins.
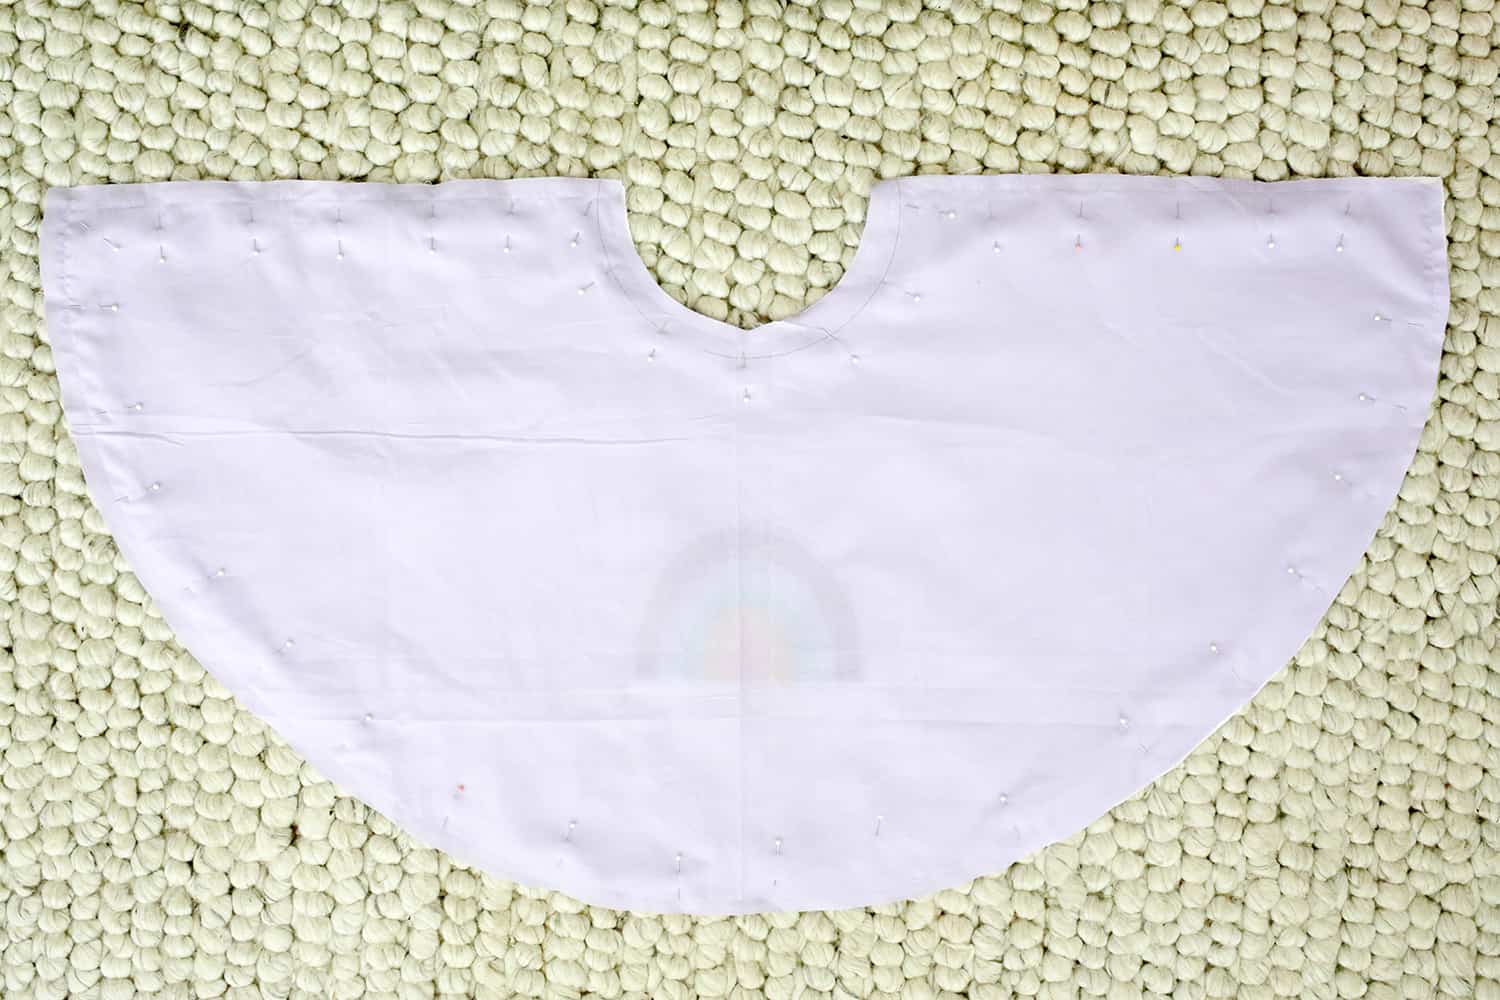 Sew all the way around the edge with a 1/2″ seam allowance and leave a 3″ gap for you to turn your cape right side out through. I would also clip the corners of your cape and make notches all along the neck hole so the fabric will lay flatter once turned out.
 Turn your cape through the hole and use an iron to press your seams flat. I would suggest pressing the seams at your neck area first and then ironing the cape outwards from that point to the outer edge so your two layers lie perfectly flat with each other (I just pressed the seams along all the edges without doing that, so I ended up with a little bit of bubbling in the fabric—whoops!).
Topstitch all the way around the edge of your cape with a 1/4″ seam allowance as this will help your cape layers lie flat and will also close up the 3″ gap you left for turning the cape.
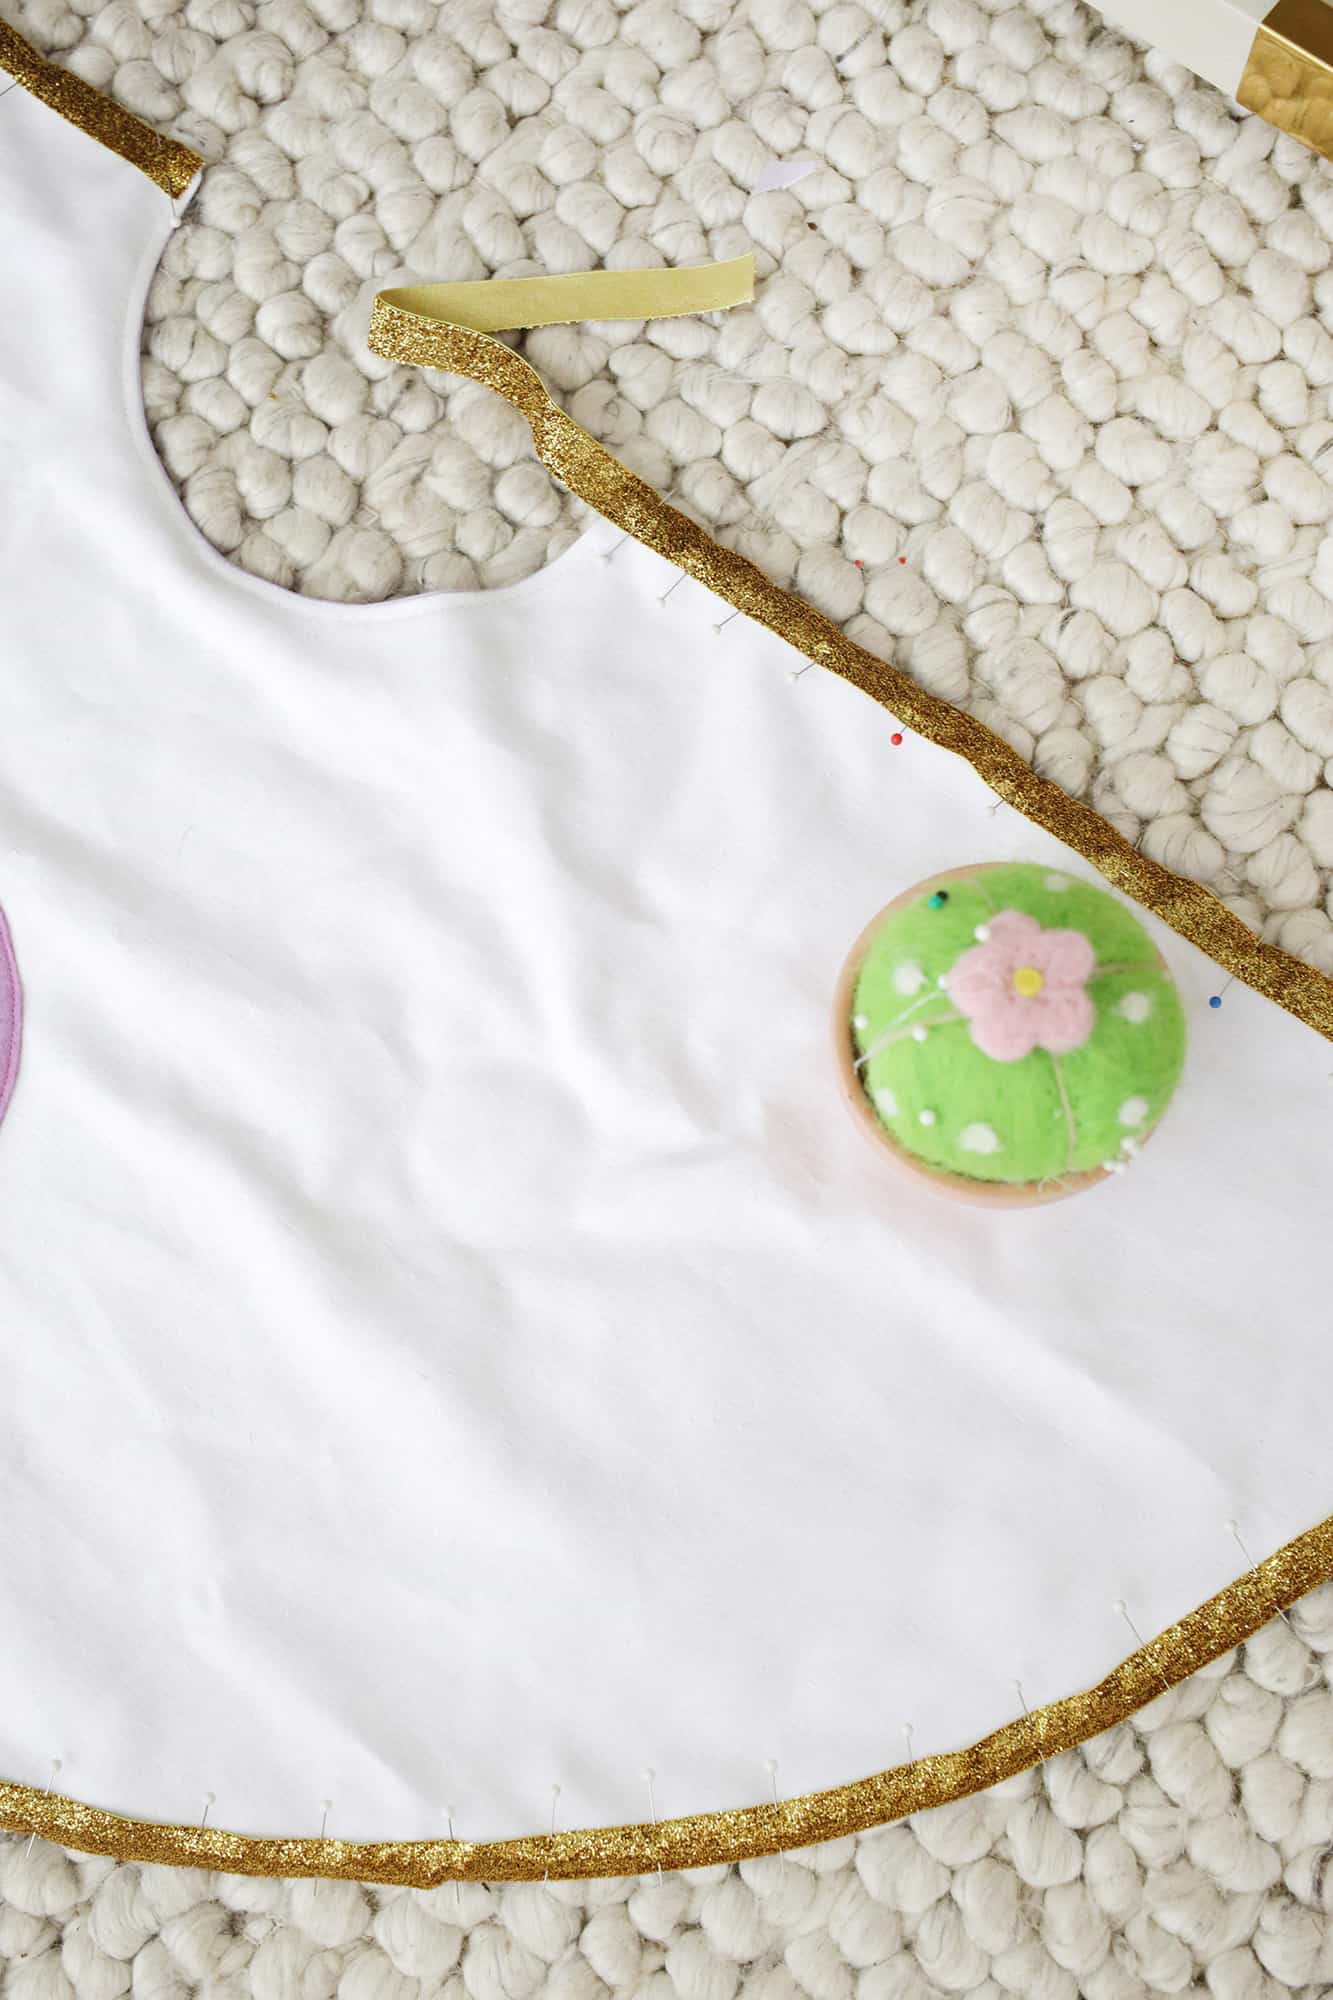
If you want to do a decorative trim around the edge, pin it all the way around the edge of the top layer of the cape, avoiding the neck area.
Sew your trim on with a corresponding colored thread (I just sewed once around close to the inside edge of the trim and then again close to the outside edge).
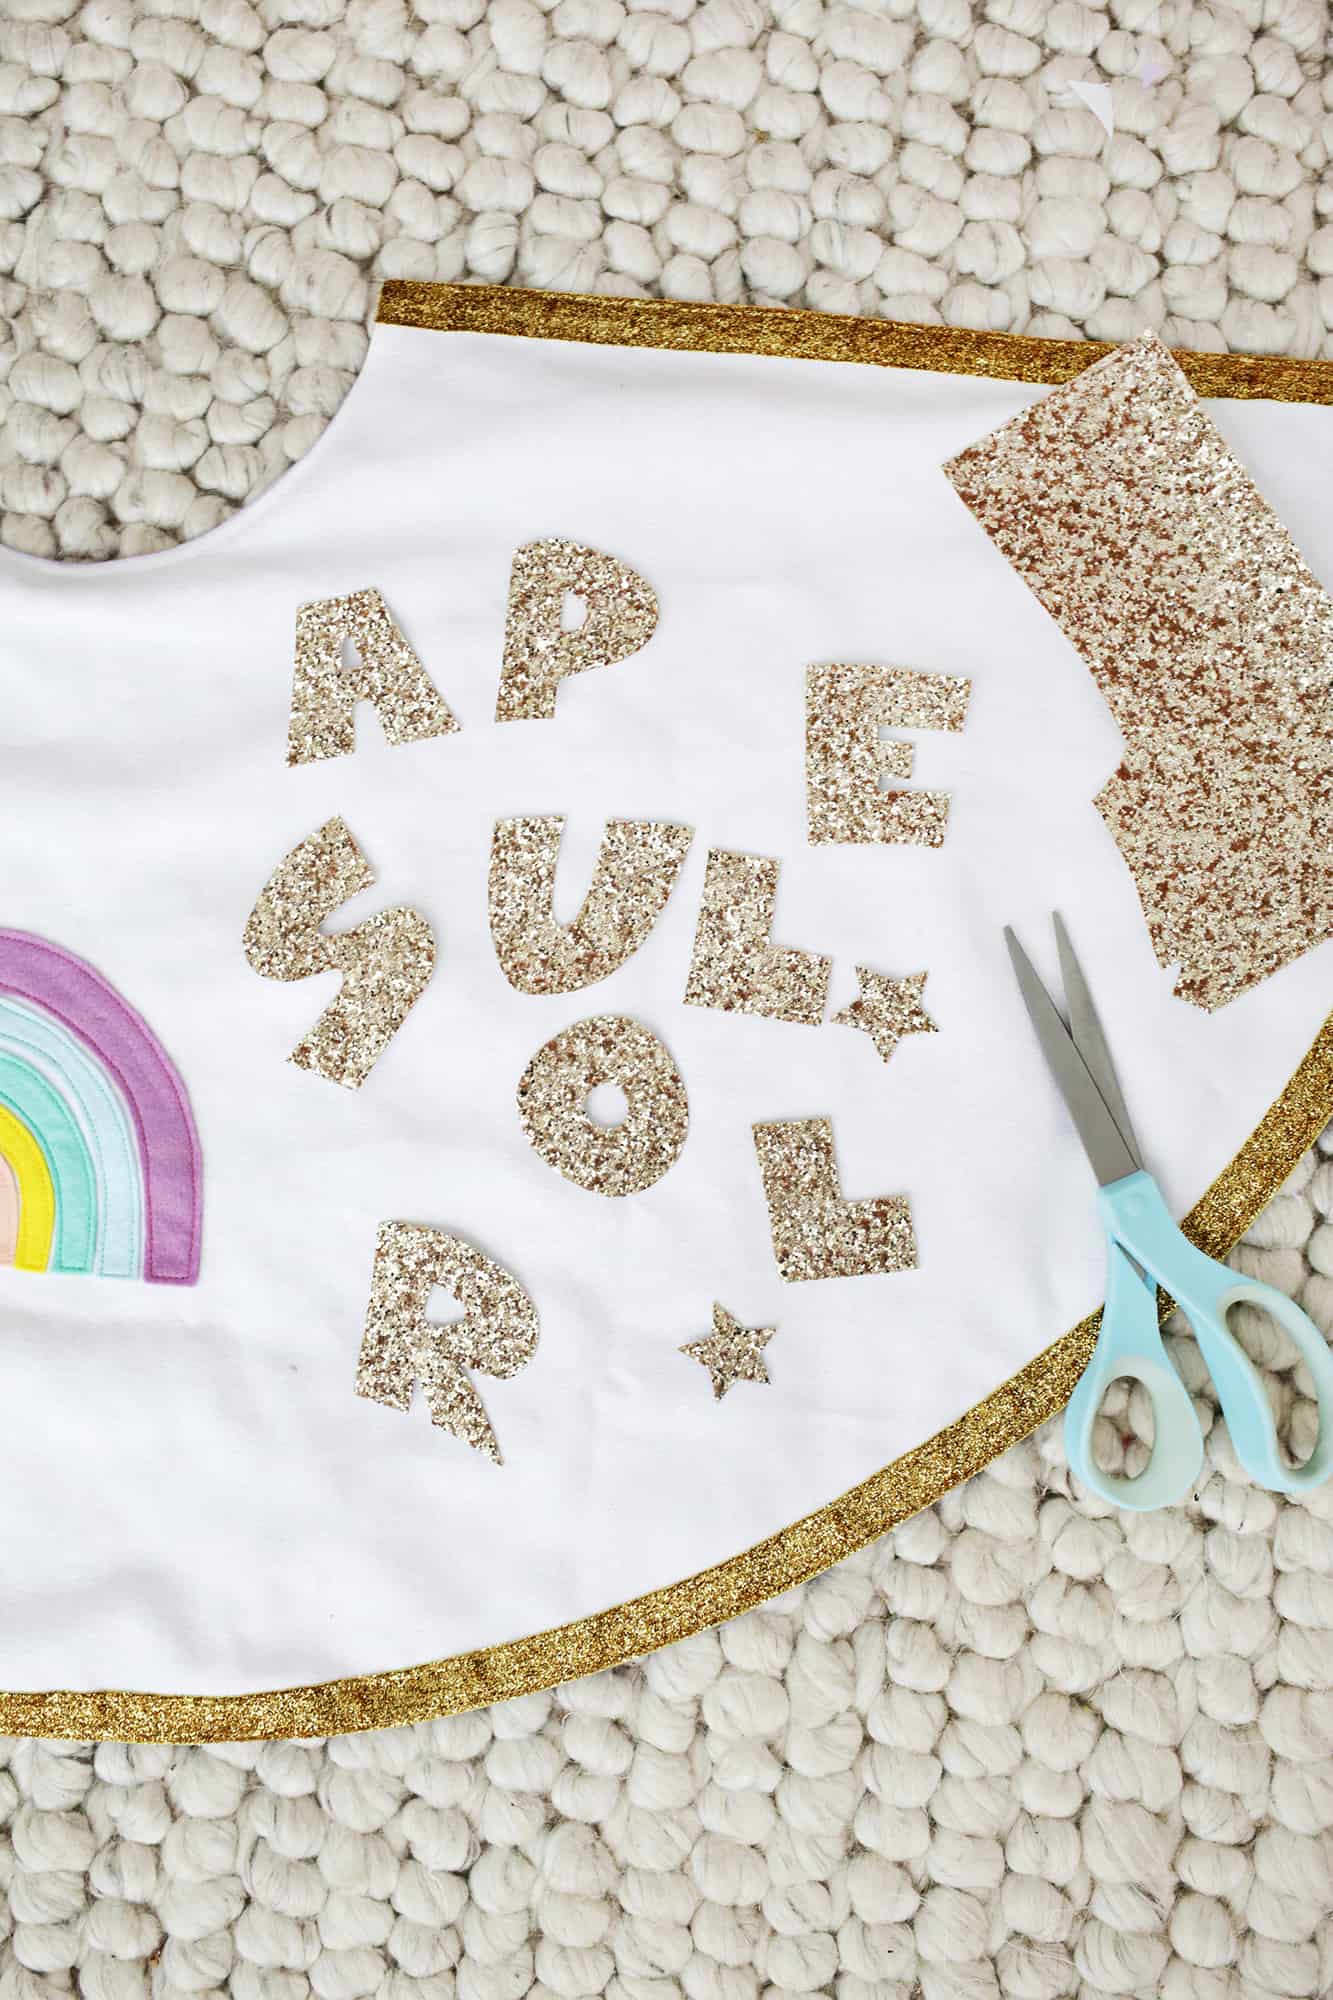
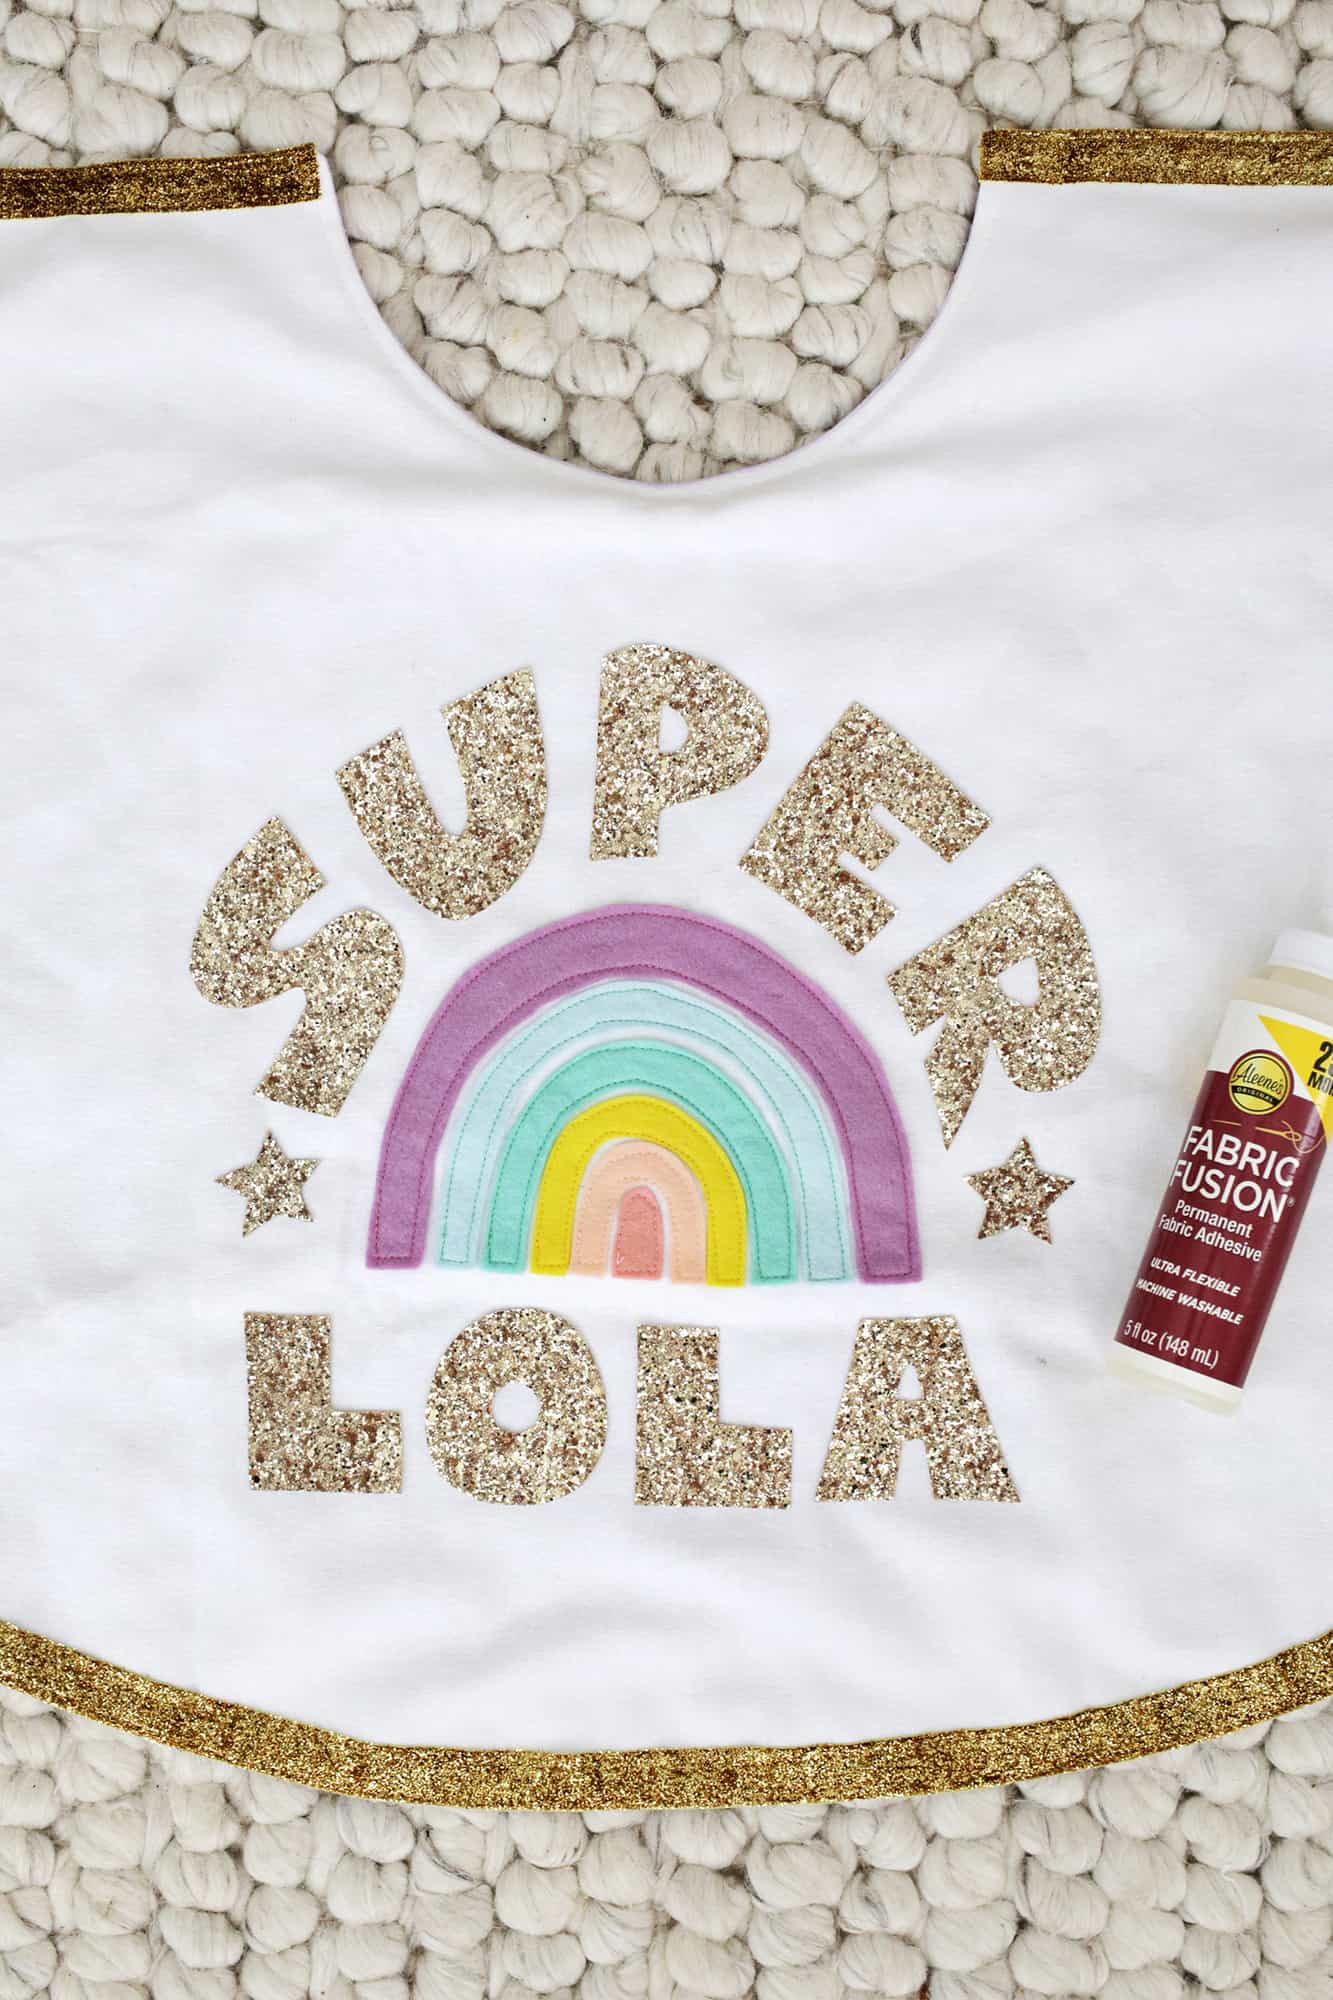
Now that my trim was on, I added the rest of my glued elements like Lola’s name in sparkle fabric and some yellow stars for the inside of the cape.
So cute!
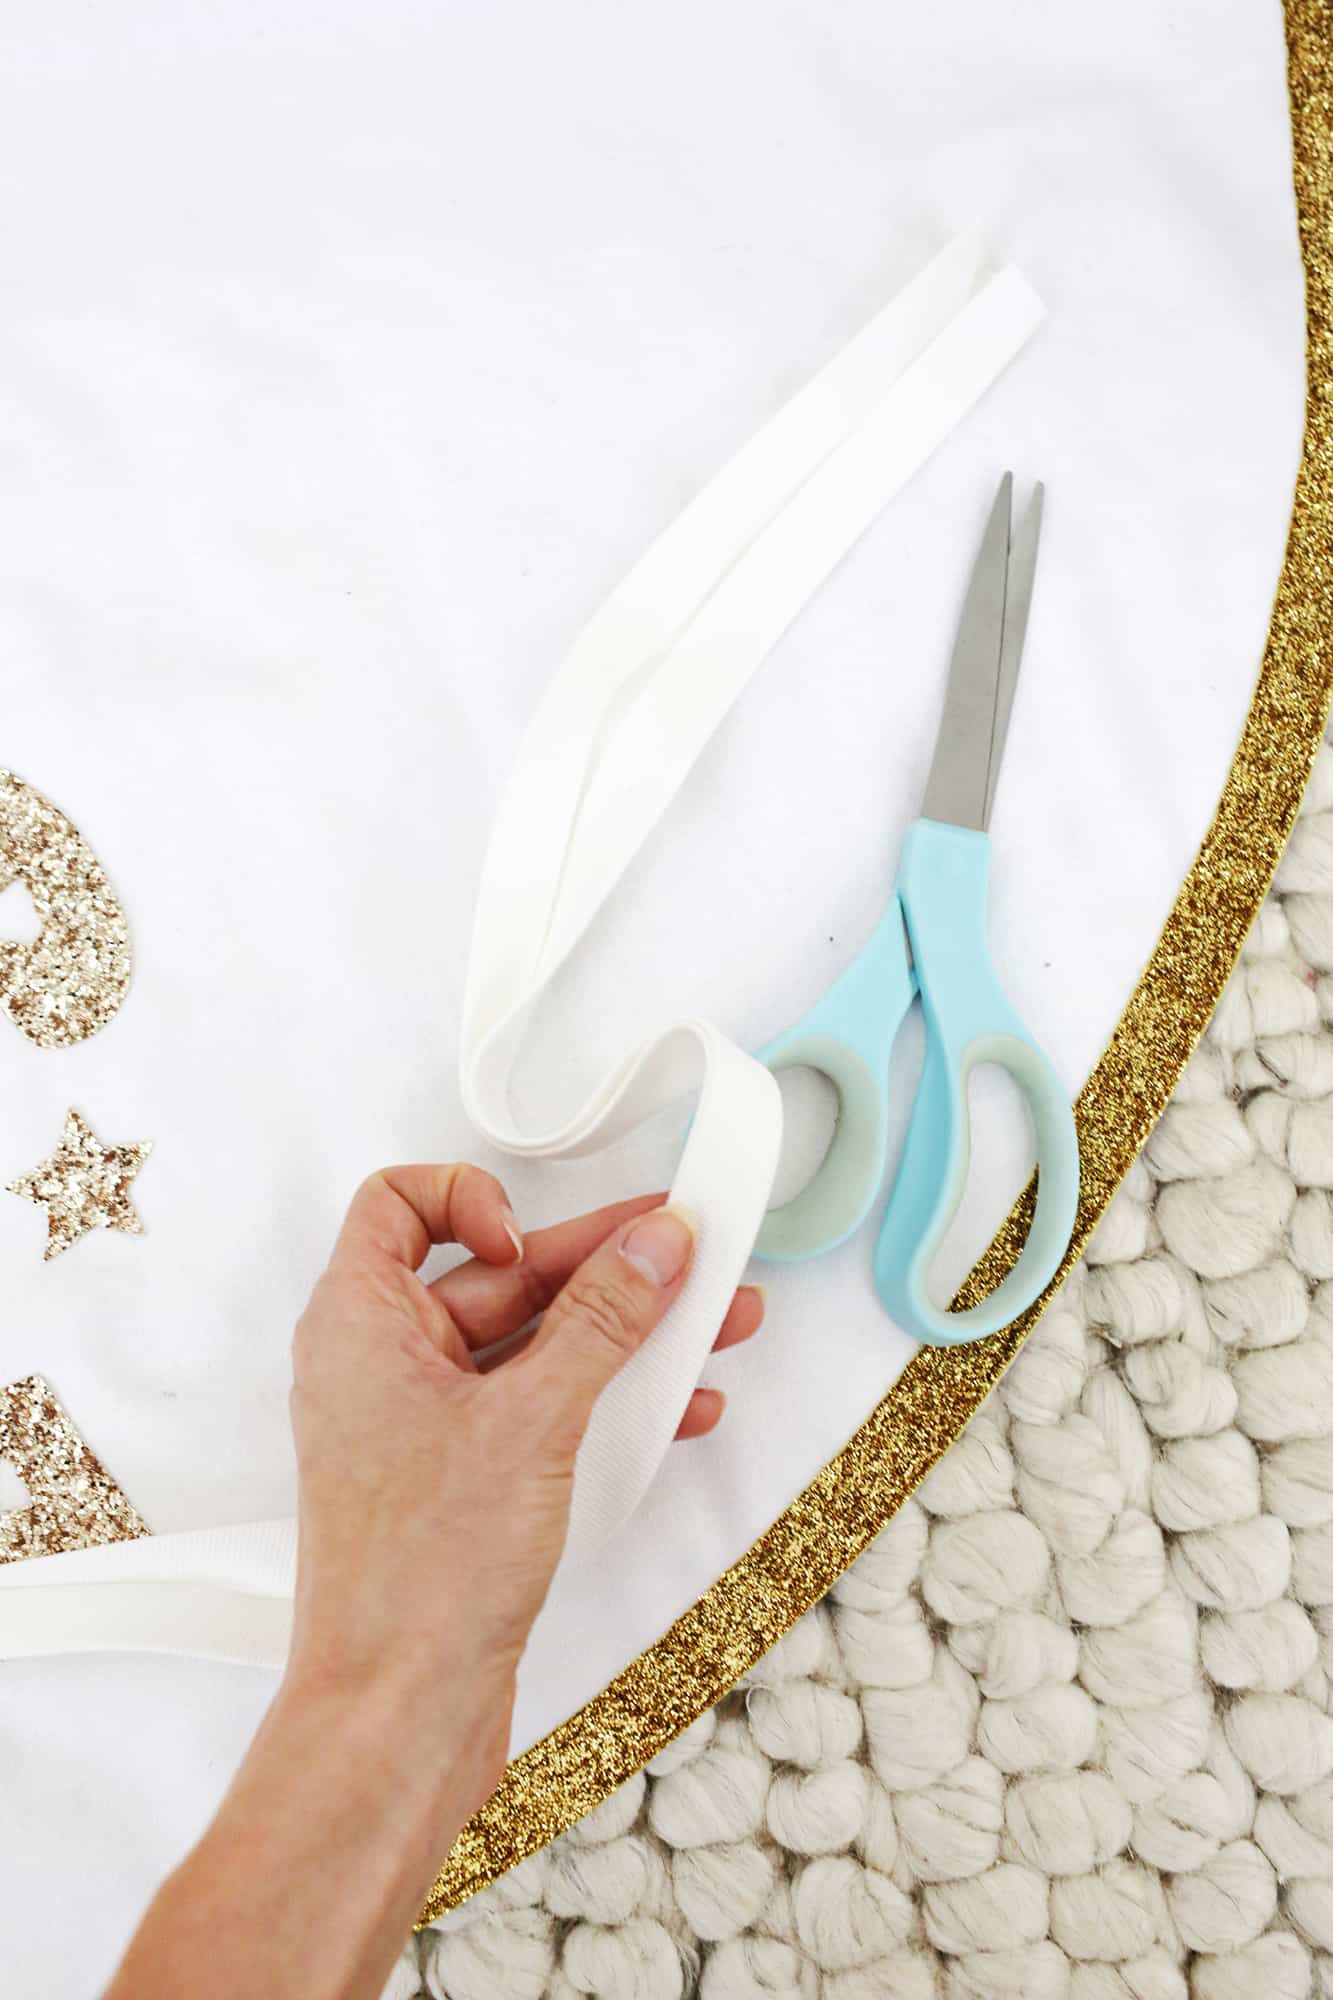
Next, to complete the cape, we just need a tie for the neck! If you have 1″ doubled folded bias tape you can use that for the tie, but if you don’t have any on hand (or not in a color you like), you can also make some with extra fabric from your cape’s top layer.
Cut a piece of fabric that’s 4″ x 48″ (or two pieces of fabric that are 4″ x 24″ long if you don’t have a piece that long and sew them together like I did), but you want to cut it on the bias of your fabric (that just means to cut it on an angle so it has more stretch to it).
Once it’s cut, you’ll fold the 4″ wide tape down the length of the middle, and use an iron to press it and make a crease so you can see that middle line. Then, you’ll fold both outer edges inward to almost touch that middle line and press it flat all the way down the tape (it should look like the tape does at the top of the picture above).
Once you have the folded 2″ wide tape, fold the halves together again and press it so you have a 1″ wide tape with 4 layers of fabric folded inside.
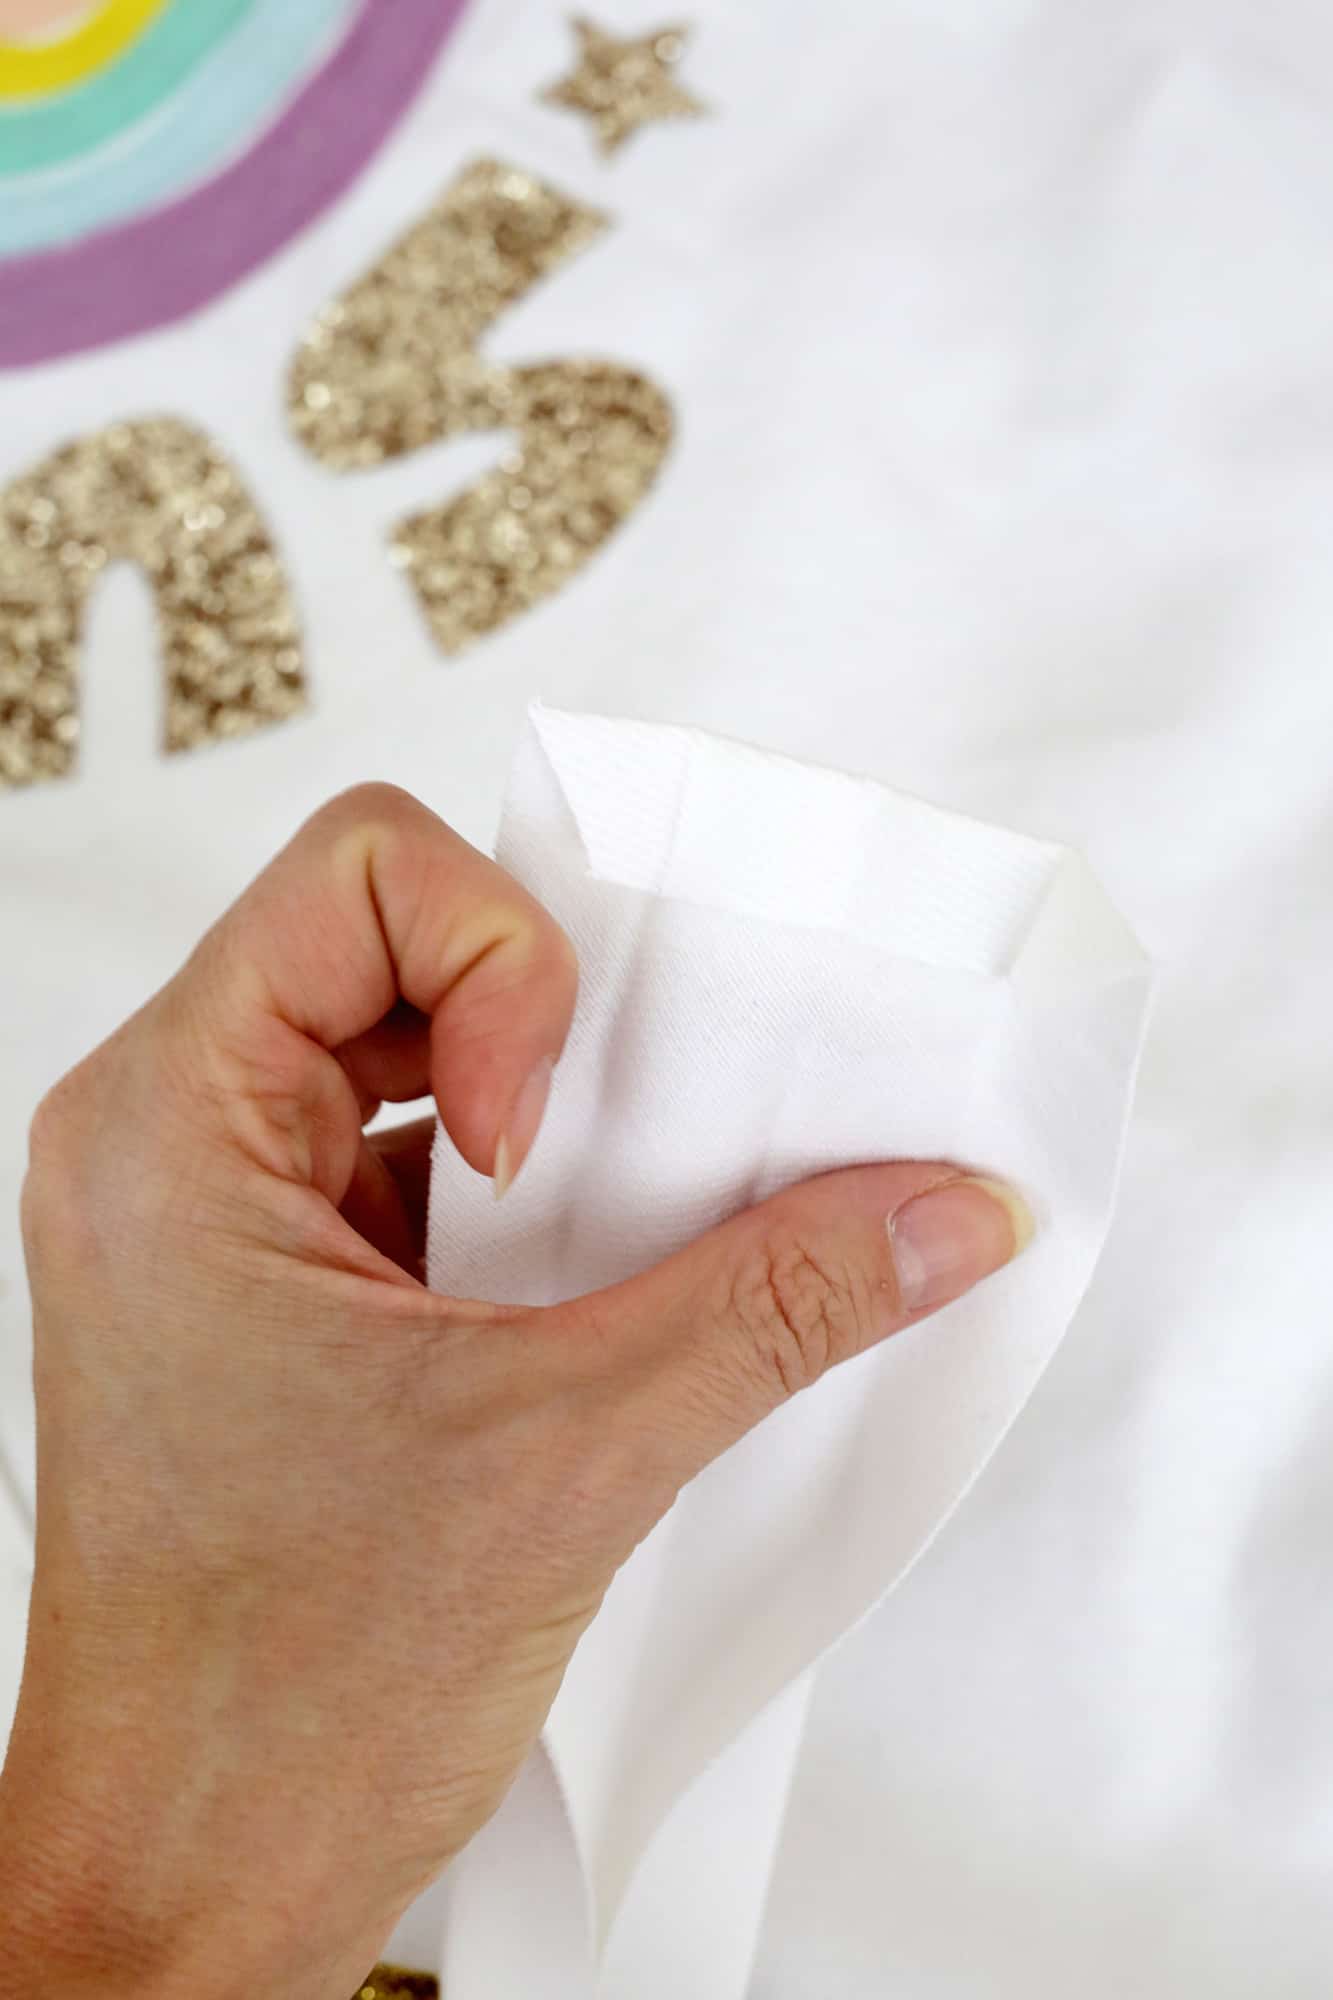
To finish the edges of the bias tape so it doesn’t unravel, unfold just the edge and cut the last 1/2″ at an angle like you see above and fold in and press the last 1/2″ of fabric.
Then refold it all back into the 1″ wide tape that it was folded into before and you’ll see that your cut edge is now hidden and tucked up inside the tape.
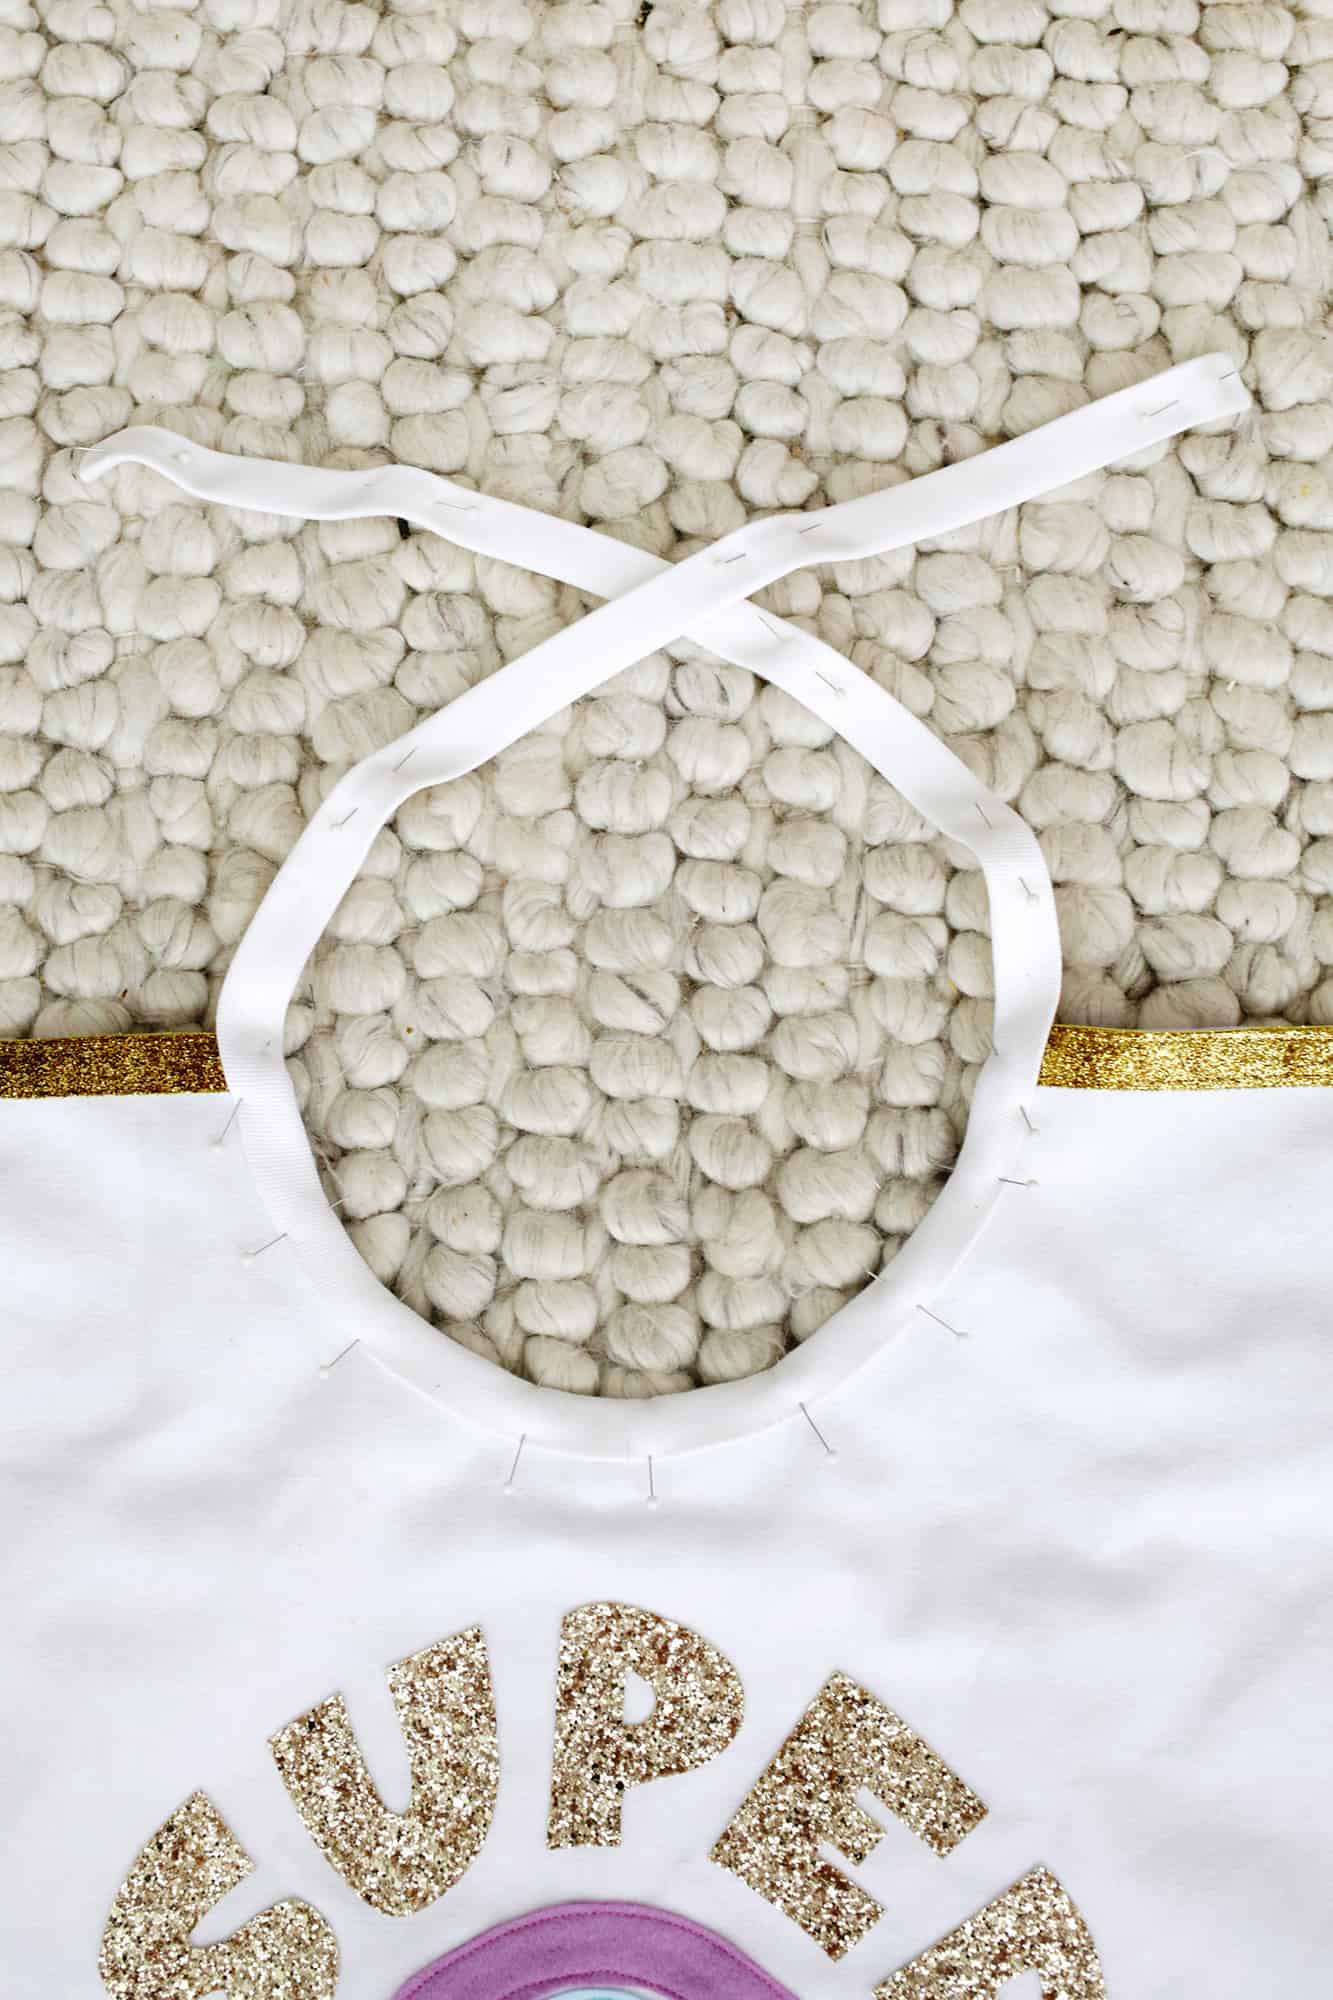
Pin your bias tape centered around the neck of your cape so the cape is sandwiched in the middle of the tape opening and sew your bias tape all the way around the edges with a 1/4″ seam allowance. Remove the pins and your cape is ready to wear!

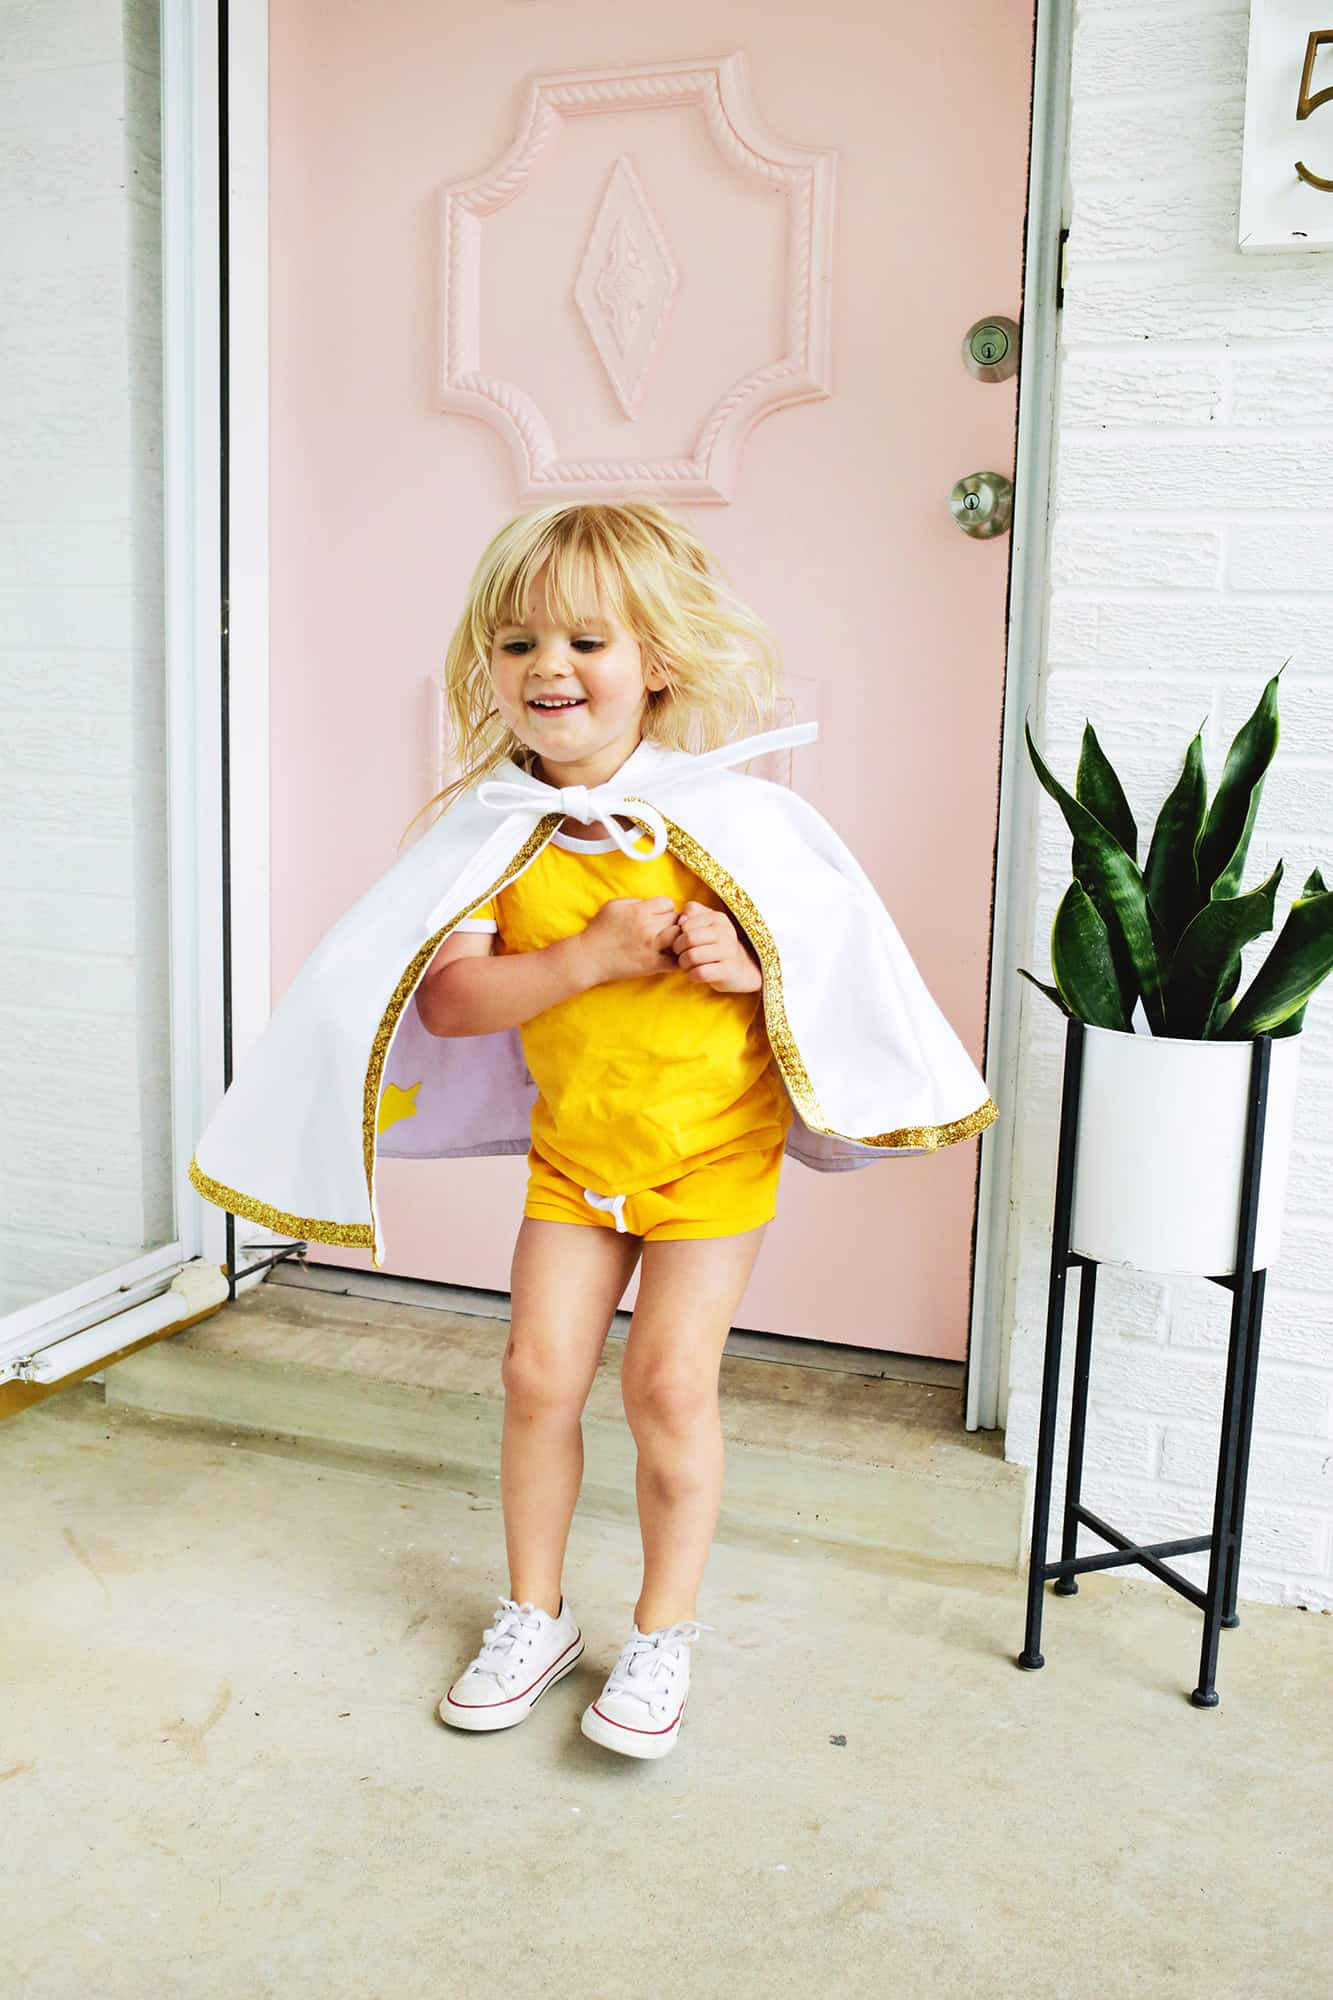

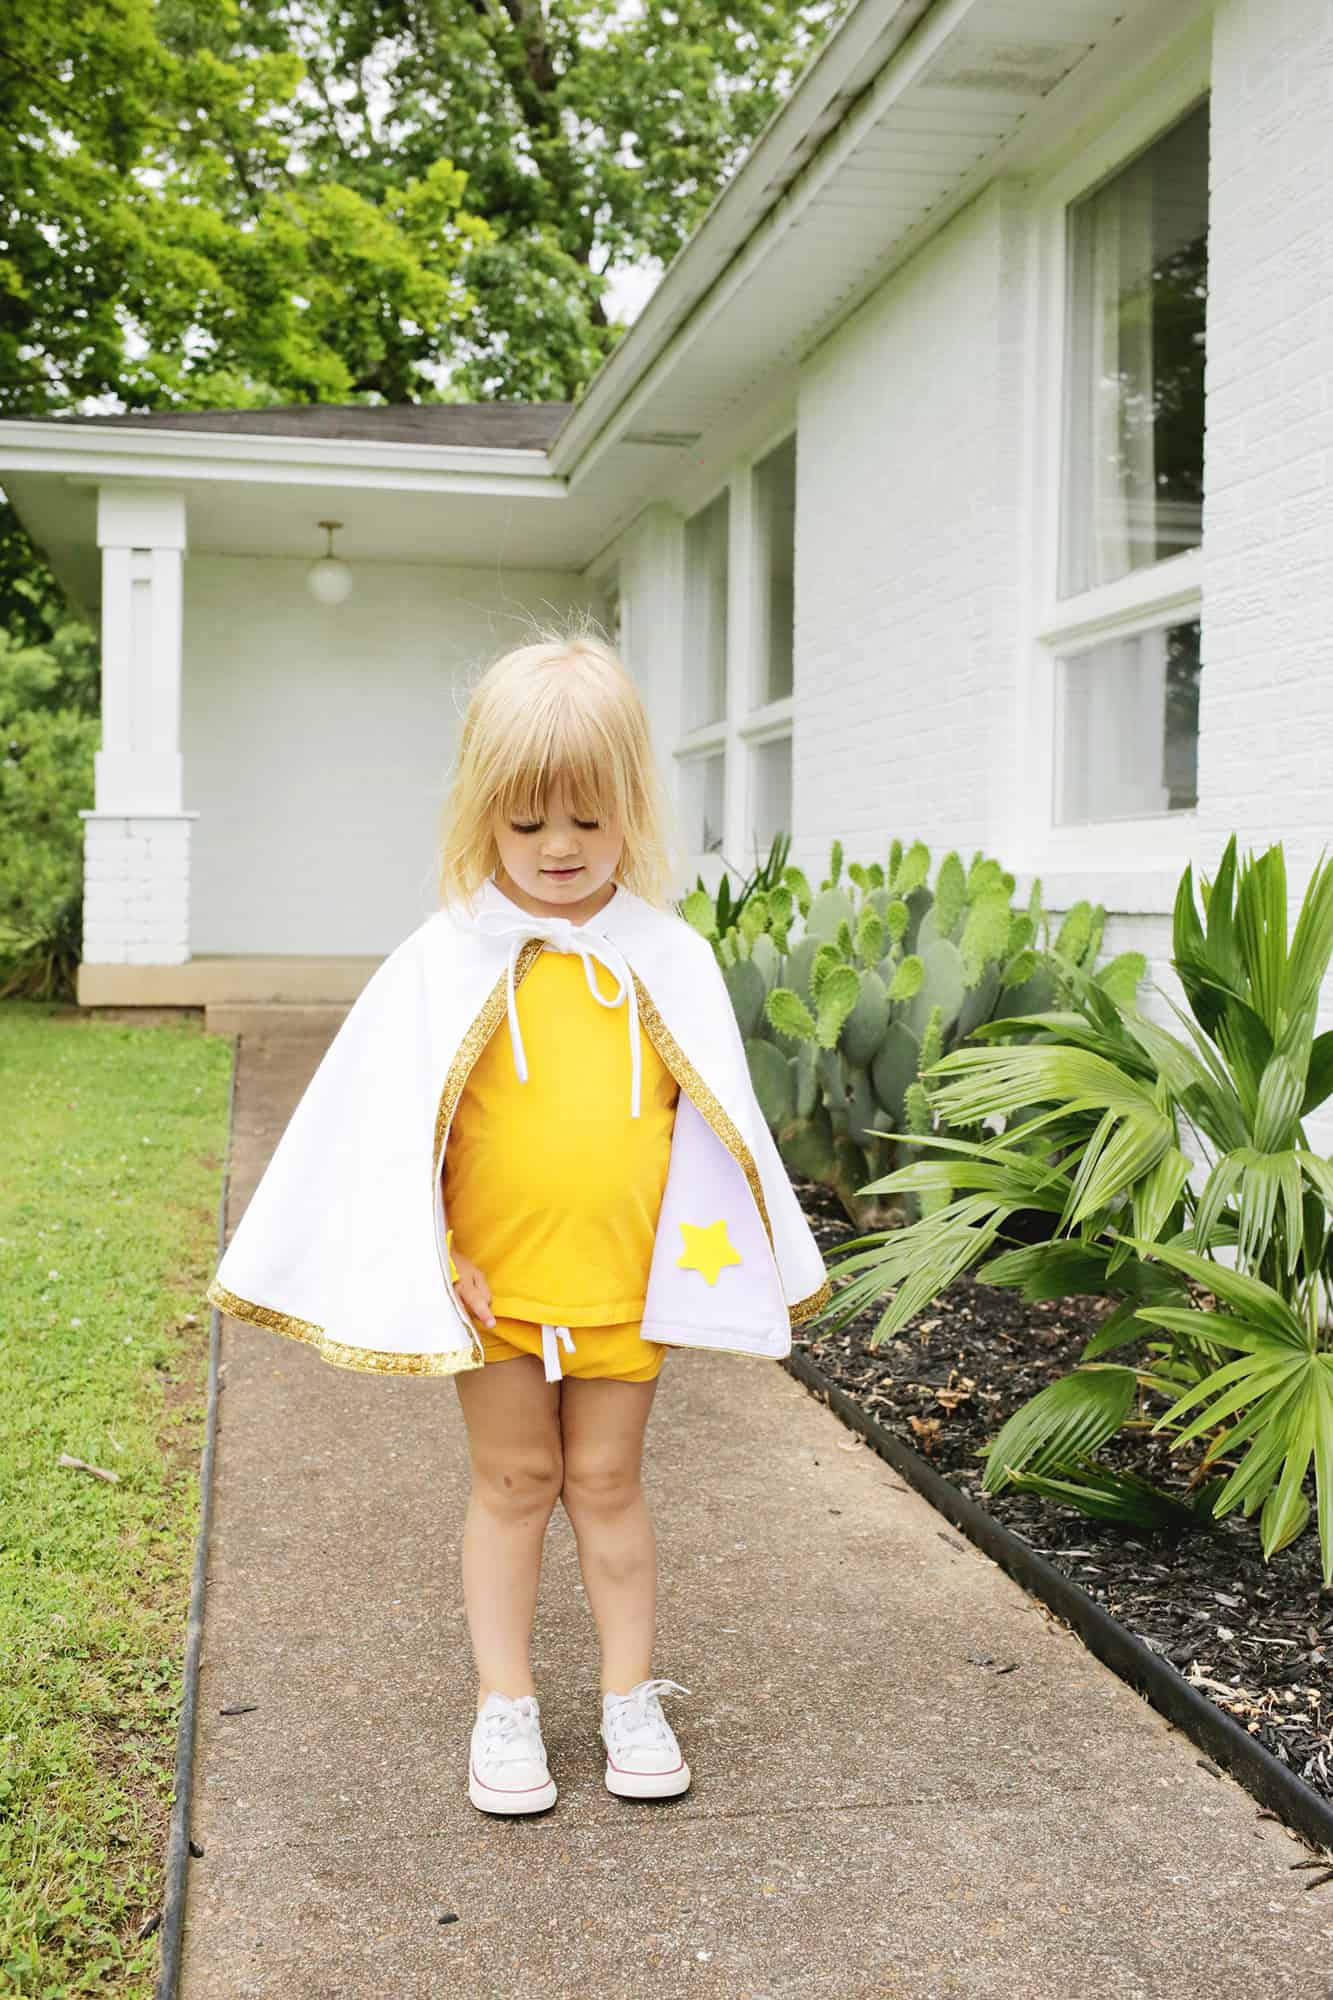


Lola was so excited to wear her cape that the glue didn’t quite have time to dry yet, so I had to reattach a few stars once she was done with the first playtime—haha!
She mostly loves to yell “to in-fid-did-dy … ah beyoooond!” like Buzz Lightyear and jump off the front porch in the cape, but it makes my heart so happy to see her zooming around the yard in this and see how “official” the cape makes her feel. Hope this project helps to brighten up some days for a little one in your life! xo. Laura
P.S. Lola’s cute little outfit is from June and January, one of my fave places for kid’s clothes!
Love this post? Sign up for our newsletter for more ideas!

Get creative ideas for recipes, crafts, decor, and more in your inbox!
 Get the How-To

Supplies
- 1 1/2 yard of fabric for outside
- 1 1/2 yard of fabric for inside
- 3 yards stretch glitter ribbon for trim (optional)
- glitter fabric sheets for name
- felt fabric sheets for rainbow and stars (or whatever other decoration you want to add)
- fabric glue
- sewing machine
- fabric scissors and straight pins
- 1″ double fold bias tape (or extra fabric to make your own bias tape)
Instructions
- You can change the size cape you want pretty easily, but what I did was to lay my outside fabric down on the floor and traced half a pot lid that was about 7″ wide to be the neck of my cape. Then I just measured out 17.5″ away from the curve of the lid to get the curve of my cape and cut that shape out with fabric scissors.
- Use that shape as a pattern to cut another layer for the inside of your cape. You can do two of the same color or you can make the inside a different color like I did with the light purple.
- Now, before we put our two cape layers together, decide if you want to sew on or glue on your cape decorations. If you want to sew them, then you’ll want to sew on your elements to each appropriate side before putting them together. But if you want to glue them on, then you can go ahead and assemble your cape and then glue the design on. I did a combo of both, so I sewed on some elements, assembled the cape, and then glued on the rest of the pieces. I just cut out some rainbow arches from some felt sheets as the main decoration for my cape, but you can do whatever shape you want or just keep it simple with stars or their name.
- Once I sewed on my felt shapes (I glued them down lightly first to keep them in place while sewing), it was time to assemble the two layers of my cape.
- Place your fabric layers right sides together and then pin the cape all the way around with straight pins.
- Sew all the way around the edge with a 1/2″ seam allowance and leave a 3″ gap for you to turn your cape right side out through. I would also clip the corners of your cape and make notches all along the neck hole so the fabric will lay flatter once turned out.
- Turn your cape through the hole and use an iron to press your seams flat. I would suggest pressing the seams at your neck area first and then ironing the cape outwards from that point to the outer edge so your two layers lie perfectly flat with each other (I just pressed the seams along all the edges without doing that, so I ended up with a little bit of bubbling in the fabric—whoops!).
- Topstitch all the way around the edge of your cape with a 1/4″ seam allowance as this will help your cape layers lie flat and will also close up the 3″ gap you left for turning the cape.
- If you want to do a decorative trim around the edge, pin it all the way around the edge of the top layer of the cape, avoiding the neck area. Sew your trim on with a corresponding colored thread (I just sewed once around close to the inside edge of the trim and then again close to the outside edge).
- Now that my trim was on, I added the rest of my glued elements like Lola’s name in sparkle fabric and some yellow stars for the inside of the cape.
- Next, to complete the cape, we just need a tie for the neck! If you have 1″ doubled folded bias tape you can use that for the tie, but if you don’t have any on hand (or not in a color you like) you can also make some with extra fabric from your cape’s top layer.
- Cut a piece of fabric that’s 4″ x 48″ (or two pieces of fabric that are 4″ x 24″ long if you don’t have a piece that long and sew them together like I did), but you want to cut it on the bias of your fabric (that just means to cut it on an angle so it has more stretch to it). Once it’s cut, you’ll fold the 4″ wide tape down the length of the middle, and use an iron to press it and make a crease so you can see that middle line. Then you’ll fold both outer edges inward to almost touch that middle line and press it flat all the way down the tape (it should look like the tape does at the top of the picture above). Once you have the folded 2″ wide tape, fold the halves together again and press it so you have a 1″ wide tape with 4 layers of fabric folded inside.
- To finish the edges of the bias tape so it doesn’t unravel, unfold just the edge and cut the last 1/2″ at an angle like you see above and fold in and press the last 1/2″ of fabric. Then refold it all back into the 1″ wide tape that it was folded into before and you’ll see that your cut edge is now hidden and tucked up inside the tape.
- Pin your bias tape centered around the neck of your cape so the cape is sandwiched in the middle of the tape opening and sew your bias tape all the way around the edges with a 1/4″ seam allowance. Remove the pins and your cape is ready to wear!


Hi Laura! Can you provide links to the font you used to decorate the cape with “Super Lola?” How did you get it so perfectly in that shape? Photoshop? Thanks!
Amazing!! Thank you for this great idea. My daughter is so happy right now.
From the Netherlands a big Hello to Super Lola from Super Elise.
First of all your daughter is cutest & so adorable! I must say she’s blessed as well to have a super creative, loving mom like you.
I really loved the crape. I’m not so creative but how nicely you’ve explained how to make it, it’s giving me the courage to recreate this one for my babysister. But I have a question, if I use glue on the cape it’ll be still washable right?
Can you suggest me a fabric glue name?
Too beautiful superhero cape, my son who likes Batman will also like it!
This is so so cute! Thanks so much for sharing. I am definitely going to have to make some for my kiddos at school. Perfect for halloween time too!
Hi Laura,
Your daughter is truly lucky to have a Mom like you, truly loving, caring and wonderfully gifted with creative skills. And you are lucky too to have a cute baby like her, soo cutee.
I’m working as a housemaid in a family in Dubai, UAE and I’m taking care of kids here. I’m looking for creative ideas like this, it will attract them as they are interested in these things. I’m quite happy to have found your blog and, obviously, this article.
Thanks,
Joanna Michael
Nanny at https://www.housekeepingco.com
Aw, thank you!
Laura
OMG!!!! So cute! Lola is adorable and looks so happy in her superhero cape.
She’s the cutest!
Laura
You are one creative mom and your daughter super adorable 🙂
Aw, thank you!
Laura