I’ve been experimenting with natural dyes for the last few months, with an increasing curiosity for the broad range of colors that can be found in nature.
I used to think of natural dye colors as muddy and dull, but there are some fantastic hues that make all of my pink and yellow dreams come true!
There is more on this subject to share than can fit in one blog post, so I’m sharing a brief overview of what you’ll need to get started (as you resist the urge to dye everything in your closet!)

One of the reasons I love this medium is that each color experiment is dependent upon the kind of water you used, the freshness of your materials, the mordants you use or don’t use, and the type of fibers you are dyeing.
Other dependents are the temperature of your dye pot, the length of time you allow it to sit, and whether or not it’s the first, second, or fourth item in the dye pot. You can usually get a bright pink, red, and purple from the same cochineal dye pot!


Dye Stuffs:
There are plenty of vegetables and plants that you can use to create natural dyes, and they are likely already sitting in your kitchen somewhere. In fact, my favorite outcome from this process ended up being the avocado pit dye that gave me the perfect blush!
You can get beautiful shades of caramel-orange from onion skins, a vibrant clementine shade from turmeric, and a lovely blue from dry black beans!
If you’re able to gather your natural dye supplies, think about which season you’re going to look for them. For example, goldenrod in the early fall will offer a much brighter yellow than if picked in fall’s later months.
Be sure to gather items responsibly and without trespassing if you’re foraging in your neighborhood or the countryside. We made sure to only take as many black walnuts as needed last fall to ensure the squirrels weren’t going to go hungry on our street.
The amount of dye stuffs you’ll need will differ depending on the dye. Measurements are usually given based on the dry weight of the fiber you’re dyeing, so it’s a great idea to check out some of the books mentioned at the end of this post for more specific measurements.
For example, I only used 2 oz. of cochineal to create a dark fuchsia/cranberry color, and probably could’ve used only 1 oz. for the desired fuchsia I was after. I used 6 oz. of dried marigold petals, and still had a weaker color than I was expecting.
Take notes of your measurements as you experiment so you can make adjustments down the road.
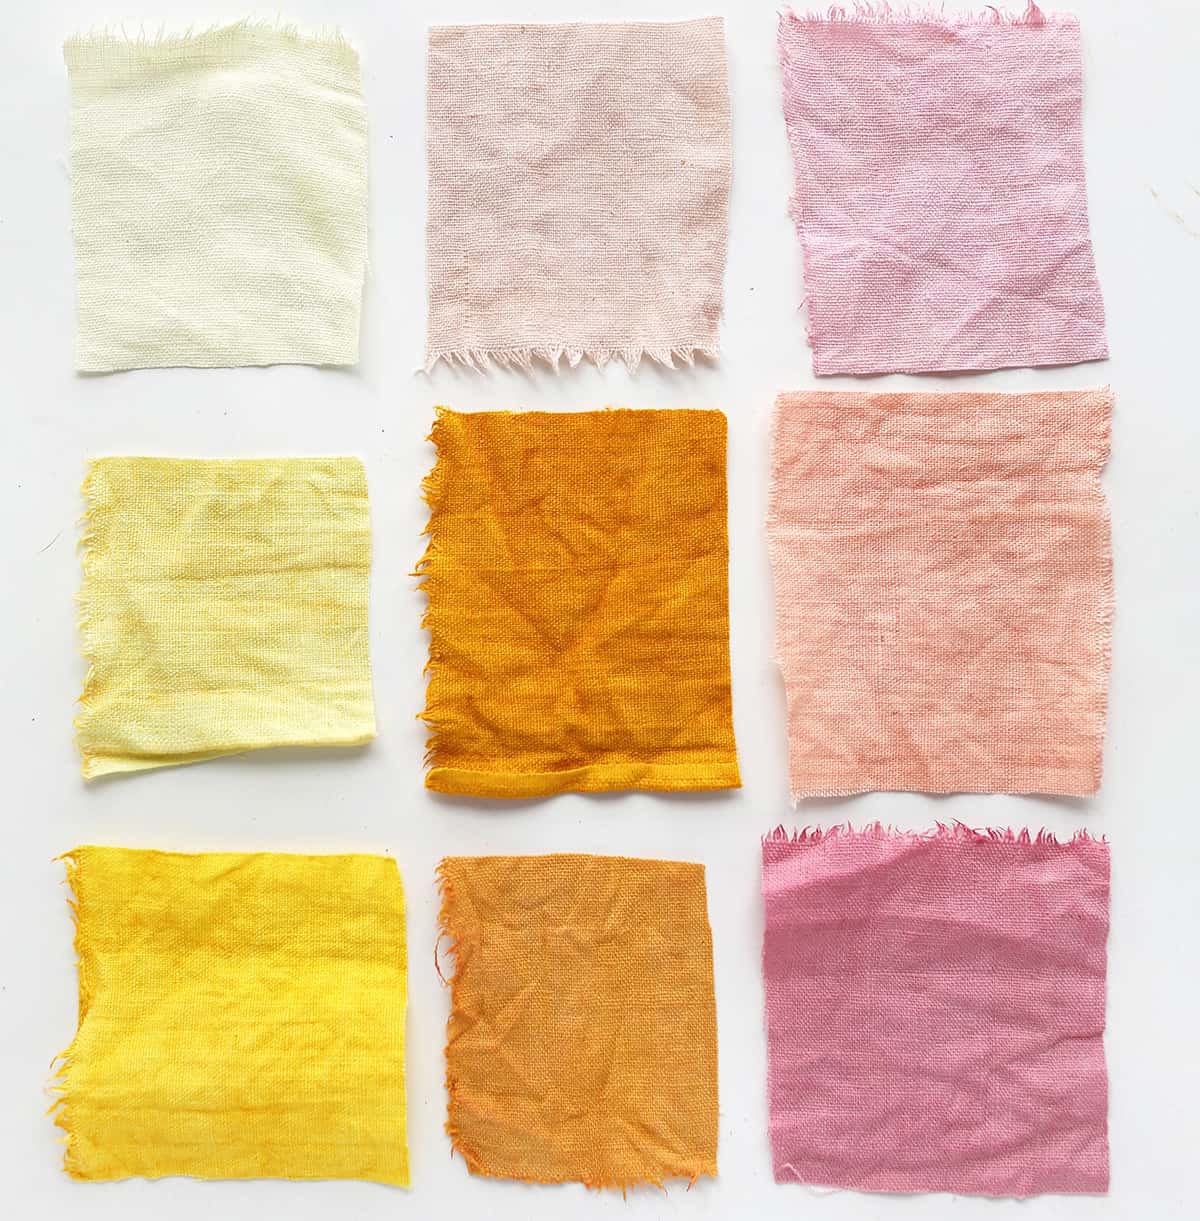
Color Guide:
Avocado Pits: light peachy pink on linen, light peach on silk, light blush on wool
Marigolds: light yellow on cotton and linen, olive green when used with iron
Turmeric: bright tangerine on linen, bright yellow when mixed with white vinegar
Yellow onion skins: warm orange on linen
Red onion skins: grayish purple on linen
Madder root: bright rust on linen
Cochineal: bright cranberry on linen and silk
Hibiscus: a cool pink on linen

Mordants:
Mordants allow the dye to chemically bind to the fabric. You can add mordant to your fabric before you dye it, or you can add it to your dye pot. Mordants (such as copper and iron) will also alter the color of your dye.
For example, you can dye one piece of linen a beautiful shade of yellow using only one marigold dye pot. Then, after adding the appropriate amount of iron to the marigold dye bath, you can dye a second piece of linen olive green!
Some dye stuffs (avocados, onion skins, and black walnuts) contain tannins, which act as mordants. This means you can skip this step altogether unless you want to change the color.
Always use precautions when working with both dye powders and mordants so as not to inhale them. Some mordants may irritate sensitive skin.
Types of Mordants:
Alum: Alum is one of the easier mordants to use, and should always be added to a cup of warm water to dissolve before being added to a dye pot. Too much alum can affect the softness of your wool, so don’t get crazy with it.
Cream of tartar: Pairing cream of tartar with alum can help brighten the overall color. I recommend using 2.5 – 3 tbsp. of alum combined with 1 tbsp of cream of tartar.
Copper: Copper is usually used to dull or darken your colors.
Iron: Iron can also darken and change your colors. Use it to get greens, grays, or browns.
White vinegar: I’ve used white vinegar to brighten my turmeric dye, and it changed it from a bold orange to a bold yellow. I also tried using it to see if it would brighten the blush in my avocado dye pot, but it faded the color instead.
The moral of this story is that one mordant won’t do the same thing to every single dye. No, that would be too simple! Lesson learned.

Types of Fibers:
100% linen: I use linen to test all of my colors because it’s very consistent. Linen is a cellulose (plant) fiber, and takes all of the colors well, although some dyes needed mordants and others didn’t.
Wool and silk (protein fibers) accept dyes the best.
Plant fibers (cotton and linen) need a mordant or a dye with natural tannins (avocados, onion skins, or black walnuts).
All fibers should be scoured prior to dyeing for the best results. Scouring is the process of removing oils or chemicals occurring in nature or through the manufacturing process.
How Do I Scour My Fabric?
You can scour linen and cotton using hot water and a pH neutral laundry detergent in your washing machine. You can also use a scent-free dish soap in a pot on the stove top.
Tip: Be sure to scour wool in a pot on the stove so you don’t accidentally felt it.

Tools:
-Clothesline or drying rack
–Mason jar(s) with lids for storing unused dye
Once a pot or tool has been used to dye something, it is no longer food-safe.
I always look for large stainless steel pots at thrift stores and garage sales, and have a separate place in my kitchen for everything so it isn’t accidentally pulled out at dinnertime.
Copper and aluminum pots should be avoided, as they will act as natural mordants throughout the dye process. So, unless you’re wanting to use them to alter the specific color of your dye, stick to stainless steel.
How Do I Store Excess Dye?
You can also store excess dye for later use as long as you strain all of the dye bits out of it and refrigerate it.

How to Dye Your Own Fabric:
So, you have gathered your linen and are ready to make a set of cloth napkins! Here’s the rundown:
Step One: Wash 1 yard of 100% linen in your washing machine with a pH neutral detergent in warm to hot water, or heat it in a pot of water and unscented dish soap until it’s boiling.
Simmer for an hour and let cool. Rinse with cool water. Add it while it’s wet to your empty dye pot.
Step Two: Prepare your dye pot by filling your stainless steel pot with enough cool, filtered water to cover your 1 yard of linen fabric. Add your dye stuffs to your pot and bring it to a simmer. You don’t want it to boil, as it will muddle your color.
Let it simmer for 45-60 minutes before turning off your heat and letting it cool. The longer you leave your linen in your dye pot, the stronger the color may become. Understand that the color you see when wet may be slightly darker than the color of your linen when dry.
Step Three: Let your linen air dry in a shady spot before rinsing it in cool water. Feel free to wash and dry as usual. Linen will obviously get softer with each wash cycle.
Step Four: Cut and sew your fabric into linen napkins by double-folding the edges and stitching along the inner fold.


There’s something intrinsically special about using plants to dye your own fabric. It connects you to the process of designing your own clothes and home goods in a way that gives you more respect and curiosity for the materials used and the process itself.
Whether you’re interested in natural dyes as an alternative to synthetic one, or are just curious about all of the colors you can find in your own backyard, you are sure to get hooked!
Helpful Books:
Two books that have greatly aided me in my natural dye experiments in the last few months are The Modern Natural Dyer and Natural Color. They are two of the most beautiful and knowledgable books on the subject that I’ve come across in my research.
There are also a wealth of older publications that you’ll be able to find at libraries, book stores, and thrift stores.
Dyeing with indigo is an altogether different process than the ones described above. You can find my tutorial for working with pre-reduced indigo and creating a beautiful pattern using shibori techniques here.
Looking for something much simpler? Check out this faux-indigo technique shared in this post, and then make your own dyed cloth napkins using this tutorial.
Or, support another dye artist by browsing beautifully dyed cloths! –Rachel

Hi does anyone know what you use to preserve natural dyes? Does 91% Isopropyl Alcohol act as a preservative?
I love this, but i’m wondering if you can use these to stain wood? Have any of you ever tried that?
So I love your post but I wanted to know if the linen has to be bleached for this to work or if you can use natural? Thanks!
Will dyeing with onion skins make your fabric smell of onion?
No
What other vegetables can we use to dye fabrics? What have been your favorites? Cecily is doing this for a science fair project. Thank you for the information!
Debra – does the color of turmeric dyed cotton rub off or transfer? I’m doing the cotton canvas backs to 4 director’s chairs. Also which pH neutral soap do you use? Didn’t understand the comment about once you use a pot as a dye pot it isn’t food safe. I’m using food to dye natural fabric and nothing I’m using will degrade or alter the stainless steel at all…What chemical reaction am I missing? I understand that precaution with indigo for instance and with using some mordants.
Thank you
Cynthia.Sells49@gmail.com
I wish your question was answered. I also don’t understand the dangers of using a cooking pot.
You’ve mentioned the use of vinegar. This will make your solution acidic. I have read somewhere else that you can use baking soda. To make make a base solution.
be careful with alum, I’ve heard some not good things about it health-wise.
I have read (including in Sasha Duerr’s book) that you can do an all-on-one technique of combining mordant plus dye in the same pot. I haven’t been able to find much information about this. Does it work as well as the traditional method? What are the negatives and positives of this technique versus mordanting first, then dyeing?
Add pickleing lime to the turmeric and it will change it to rust red
Wow, these are so pretty! Great effort and excellent documentation. Kudos!
Arjun | Managing Partner
https://swagswami.com
if you can get fabric ” prepared for dyeing” pfd , does natural dyeing still require a mordant?
Wow ? Gedeon! What a great tip, as I love rust! I haven’t heard of pickling lime… from what sort of store would I get it? Thank you so much.
Sooo Beautiful! Would love to know what plants you used in the last picture, the second and third color are just perfect!!! I wonder if they would turn out the same on raw silk 🙂
can you tell me why the cloth has to be wet before u put in the dye pot
I loved coming across your info here because you’ve actually done some experimenting rather than just reporting things that you’ve researched. 🙂 I was wondering . . . what part of the marigolds and goldenrods did you use? Flowers, just petals, leaves, or the whole plant? Thanks!
What did you use for the vibrant RED color? I’ve experimented with a few natural dyes but a true RED as shown in your article is difficult – would love to know what you used and with or without a mordant? Thanks for any info you can provide!
Lovely feature and beautiful colours. To learn more visit www.NaturalFabricDyeing.com
When it comes to dyeing fabrics or any works that requiring the use of dyes, natural dyes are highly recommended to use. Unlike synthetic dyes, natural dyes are more eco-friendly given that they come from natural resources and more reliable as well. Aside from that, it’s safer for human health because of its chemical free composition, that’s why many people are choosing it over synthetic dyes. Anyway, I have just begun experimenting with yarn dyeing. The first time I tried dyeing with madder root, it came out the weird orange-yellow. But it’s still good 🙂
Wow thanks for sharing this, it’s very useful! Now I know what to do with all those old avocados!!
This is one of the most beautiful posts I have ever seen on natural dyeing! Really! Well done!