
 The room is an extra bedroom, so it had a closet that I wanted to convert into an extra storage area but that wasn’t a total eye sore. This closet used to have a sliding door on it, but the door got damaged and I never had it repaired as I’m not a huge fan of the look of those doors anyway.
I knew in order to keep this area looking tidy but still functional the easiest solution would be to add a curtain to hide the random (but needed) contents of the closet. We store everything from our important documents file folder to guitar cases to old brides maid dresses in there.
 I wanted to add a curtain that was light in color (white or cream) but that wasn’t boring and would still had interest and texture to that corner of the room.
We decided to create a macrame curtain from thin rope. Here’s how we made it! We used colorful yarn to illustrate the process better:
 1. Tie four strands together on a foam core board and put pins into the top knot and at the bottom of the two middle strands to keep those in place.
2. Take the outer right strand (pink) and pass it to the left side over the other middle two strands. Take the outer left strand (yellow) and pass it underneath the pink strand, behind the middle strands, and over the pink strand on the other side.
3. Pull the two strands tight. Now you just reverse what you did in the first step! Take the outermost left strand (which is now the pink) and lay it across the middle two strands.
Take the outermost right strand (which is now the yellow) and pass it underneath the pink, behind the two middle strands, and over the pink on the other side.
Pull these two strands tight until they make a knot with the woven strands from the previous step. That’s the hardest part! The rest of the steps just repeat these basic motions.
 4. Repeat steps 1-3 with four more strands to make another knot right next to your first knot. Bring the two rightmost strands of the first knot to make a new group with the leftmost two strands of the second knot.
5. Repeat your basic knot with the new group by taking the outer right strand (purple) and passing it to the left side over the middle two strands.
Take the outer left strand (green) and pass it underneath the purple strand, behind the middle strands, and over the purple strand on the other side.
6. Pull the two strands tight. Now reverse the first step! Take the outermost left strand (which is now the purple) and lay it across the middle two strands.
Take the outermost right strand (which is now the green) and pass it underneath the purple, behind the two middle strands, and over the purple on the other side. Pull these two strands tight.
7. Divide the middle group of strands by moving the two leftmost strands left and the two rightmost strands right. Repeat the basic knot with both the groups and continue this process until you have done as many rows as you would like.
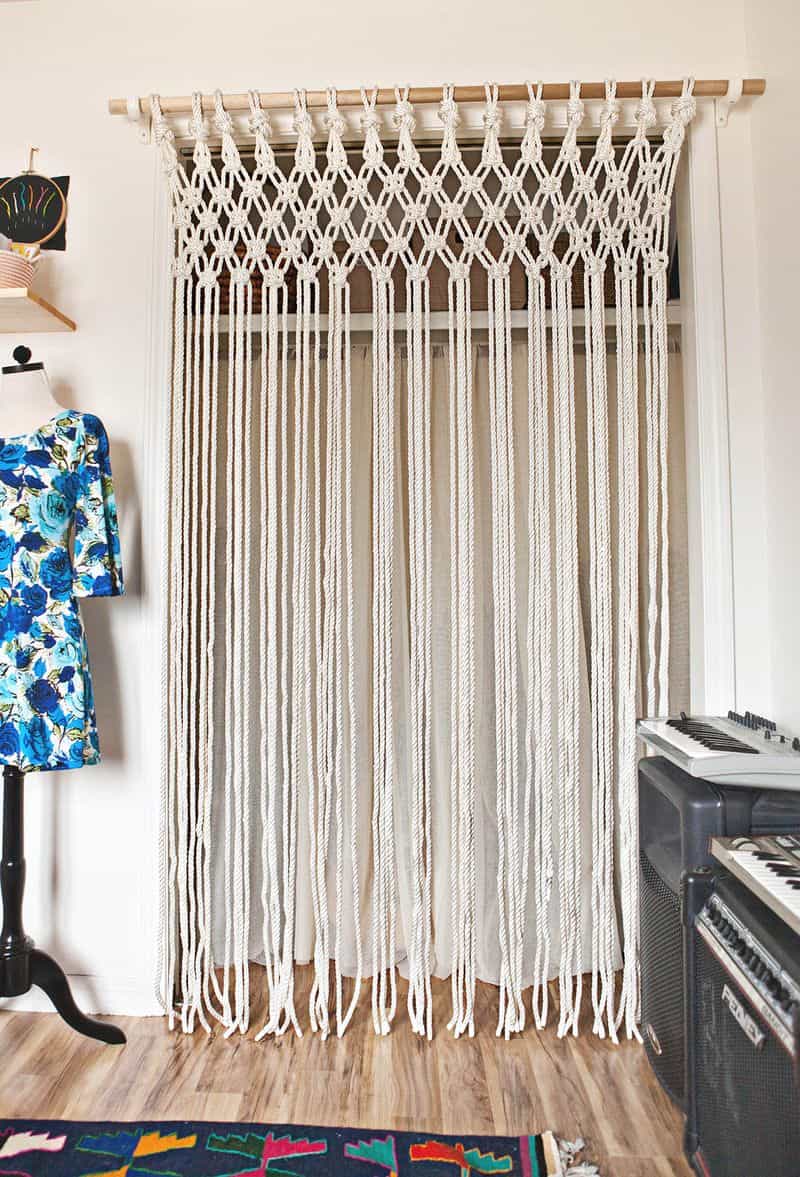
 When beginning to make the actual curtain, I made 14 groups of rope, each group with four strands that were all 100 inches long.
I found it made a neater knot at the top of the curtain to cut two strands of rope that were twice the needed length (so 200 inches) and then I hung the strands over the rod at the middle point and tied a knot to create a four strand group.
Since doing this process with big ropes is a much bigger scale than the yarn, you’ll have to find something to hang your rod from so you let your rope hang beneath it (we used a bike rack to hang ours).
 You can see that it’s really the same principle of making the basic knots in the steps with the yarn, but just on a much bigger scale. I just made the basic knot near the top of all the 14 groups and then made another row of knots beneath and between those knots (like in the yarn instructions).
Then, I moved down another row and made knots underneath the original knots and just kept alternating the rows of knots until I had done as many rows as needed.
Make sure to keep stepping back as you make your knots to ensure that you are tying your knots into even rows.
I kept a ruler handy so I could measure the distance between each knot in a row and the wooden curtain rod to make sure they would turn out even. Once I did five rows of even knots, I let the rest of the strands hang down to complete the curtain.
 Once you finish braiding the ropes hang your new curtain in your desired spot. To finish, wrap masking tape (or other white tape, I used “dorm tape“) around the ends right where the rope hits the floor (my curtain is 6 1/2 feet tall).
Cut through the tape, leaving 2/3 to half of the tape intact on the rope. This will help the ends to keep from fraying overtime.
 I also hung an off white long piece of fabric behind on the macrame curtain (on the existing clothing rack). I love how the curtain turned out! It feels different but still functional and not overly loud.
We have a very loud rug in the room, so we didn’t need something with tons of color or that took up a lot of attention.
 Now that my curtain is done, I just need to pop in a few baskets to organize the inside (ohhh, this one has pom poms)!
In case you want more curtain inspiration, here’s a bunch of other curtain projects to refresh your space as well!
Oh, and if you love the look of macrame but don’t feel like making your own, I love this one. Happy macrame days! xo. Emma
P.S. If you love DIYs, check out 20+ of The Cutest Yarn and Textile DIYs!
Update: We’ve had commenter’s ask about how much the rope costs to make the size project you see here. Here is the response I added in the comments below:
I have to admit, this project was made years ago and I don’t have the original measurements or what we spent. That being said, I just measured a closet in my home that I believe is the same size (5ft wide by 6.6 ft tall) or at least very close.
Based on those measurements and how many strands of rope I can count from the photos (and adding a little more on just for extra to be safe)
I think it will take around 250 ft of rope to make this in the size you see. I checked a hardware store website and they have 1/2 in x 50ft nylon twist rope at $34. So if you used that rope you’d need $170 worth (plus tax) of rope plus a few other supplies, like the wooden dowel and tape, to make this project.
Love this post? Sign up for our newsletter for more ideas!

Get creative ideas for recipes, crafts, decor, and more in your inbox!
 Get the How-To

Supplies
- rope
- wooden dowel / curtain rod
- masking tape
- scissors
Instructions
- Tie four strands together on a foam core board and put pins into the top knot and at the bottom of the two middle strands to keep those in place.
- Take the outer right strand (pink) and pass it to the left side over the other middle two strands. Take the outer left strand (yellow) and pass it underneath the pink strand, behind the middle strands, and over the pink strand on the other side.
- Pull the two strands tight. Now you just reverse what you did in the first step! Take the outermost left strand (which is now the pink) and lay it across the middle two strands. Take the outermost right strand (which is now the yellow) and pass it underneath the pink, behind the two middle strands, and over the pink on the other side. Pull these two strands tight until they make a knot with the woven strands from the previous step. That’s the hardest part! The rest of the steps just repeat these basic motions.
- Repeat steps 1-3 with four more strands to make another knot right next to your first knot. Bring the two rightmost strands of the first knot to make a new group with the leftmost two strands of the second knot.
- Repeat your basic knot with the new group by taking the outer right strand (purple) and passing it to the left side over the middle two strands. Take the outer left strand (green) and pass it underneath the purple strand, behind the middle strands, and over the purple strand on the other side.
- Pull the two strands tight. Now reverse the first step! Take the outermost left strand (which is now the purple) and lay it across the middle two strands. Take the outermost right strand (which is now the green) and pass it underneath the purple, behind the two middle strands, and over the purple on the other side. Pull these two strands tight.
- Divide the middle group of strands by moving the two leftmost strands left and the two rightmost strands right. Repeat the basic knot with both the groups and continue this process until you have done as many rows as you would like.
- When beginning to make the actual curtain, I made 14 groups of rope, each group with four strands that were all 100 inches long. I found it made a neater knot at the top of the curtain to cut two strands of rope that were twice the needed length (so 200 inches) and then I hung the strands over the rod at the middle point and tied a knot to create a four strand group.
- You can see that it’s really the same principle of making the basic knots in the steps with the yarn, but just on a much bigger scale. I just made the basic knot near the top of all the 14 groups and then made another row of knots beneath and between those knots (like in the yarn instructions). Then I moved down another row and made knots underneath the original knots and just kept alternating the rows of knots until I had done as many rows as needed. Make sure to keep stepping back as you make your knots to ensure that you are tying your knots into even rows. I kept a ruler handy so I could measure the distance between each knot in a row and the wooden curtain rod to make sure they would turn out even. Once I did five rows of even knots, I let the rest of the strands hang down to complete the curtain.
- Once you finish braiding the ropes hang your new curtain in your desired spot. To finish, wrap masking tape (or other white tape, I used “dorm tape”) around the ends right where the rope hits the floor (my curtain is 6 1/2 feet tall). Cut through the tape, leaving 2/3 to half of the tape intact on the rope. This will help the ends to keep from fraying overtime.
Credits // Author: Emma Chapman & Laura Gummerman, Photography by: Janae Hardy, Laura Gummerman and Emma Chapman

And I just found the length! I knew I’d missed it!
What are the measurements for the rope? I can’t seem to find that anywhere. I’m sure I’ve just missed it but could use some direction. TIA
Is there a short video of how to tie and knot? I’m a visual person, reading this sounds like another language to me…but I would really like to make this for my daughters doorway.
I love it think this is exactly what I’m looking for and even though I already have the rope on hand I’m going to make a smaller version tryin different colours in which case I may need to buy more rope so……any other project? lol I do have one small critique I wondered when you mentioned about making one piece twice the length of the others and making 2 strands from it whyy you hadn’t started that way? I would and will start with 12′ lengths then use a cow hitch to attach them this automatically divides them in half (or what ever ratio you want) to form two strands of rope hanging down. Also I find tape or burning rope ends to look unfinished so I have already whipped all my rope ends plus you can use them to add a little colour or you could use 4 colours to whip the ends so that while you’re working you have the same colour coding as using the coloured rope in your tutorial and then when you trim it to length at the end you can trim all the coloured ends off andrewhip it in the desired colour at the now new end of the ropes
THANKS FOR THE AWESOME INSTRUCTIONS! WHY HAVEN’T YOU ANSWERED THE VERY IMPORTANT QUESTION “WHAT THICKNESS ROPE DID YOU USE?” PLEASE ANSWER AND TELL US THE mm SIZE YOU USED. THANK YOU KINDLY 🙂
Hi! Emma used 1/4 inch rope for her curtain, but you can choose any width depending on your space.
nice! do you have other designs? and by the way, what size of rope you usually use for curtains? tnx
Hi everybody
Could someone find out what the thickness of the cord on this curtain is please as there were no answers to everybody who asked for the thickness??
I believe it’s 1/4 inch
Hello!! I am absolutely in love with this… This is gonna by the first time I’ll be creating macrame. I wanted to know if you measured twice or four times the length of the rope you required for each strand?
I am using 5mm thick rope. Is it okay? Confused.
Thankyou ?
Or just tell me how many inches you used. Thanks!
Thanks!!
Hi I can’t find the rope at Home Depot either and also would love to do it in a blue. Would macramé yarn work or another type of rope? Thx
Hi! You can use any kind of rope or yarn 🙂
Hi how many inches of rope would I need total? I couldn’t find the answer on the blog. Thanks!
Hi Christine! It really just depends on the length of your ceiling/floor— sorry I don’t have an exact answer!
Hi sorry to not be clear. My closet looks about the same size as yours so I just want to know how much you used and what you spent. As other commentors have asked. 🙂 Knowing what you used would help others gauge what they would need. Like for an x by x closet (Jacki’s/your closet size) I used (x amount) of rope. I just want to know before I buy anything if this is a $500 project or $50. Thanks! And beautiful job. 🙂
Hi Christine,
I have to admit, this project was made years ago and I don’t have the original measurements or what we spent. That being said, I just measured a closet in my home that I believe is the same size (5ft wide by 6.6 ft tall) or at least very close. Based on those measurements and how many strands of rope I can count from the photos (and adding a little more on just for extra to be safe) I think it will take around 250 ft of rope to make this in the size you see. I checked a hardware store website and they have 1/2 in x 50ft nylon twist rope at $34. So if you used that rope you’d need $170 worth (plus tax) of rope plus a few other supplies, like the wooden dowel and tape, to make this project.
Again, this is just my best guess since we don’t have the original to go off of but I hope this is helpful!
I’m going to add this info to the end of the post so hopefully others will see it as well. Thanks for the question.
What was the thicknes of the rope you used and how many feet long was it?
I’ve been looking for this for a month now, I saw this in a restaurant! I want to do this above my sofa using black rope, and the knots/shapes will continue all the way down… it’s about 8 ft by 4th…. how do I calculate the length of the rope I need?
After doing the calculations you needed 10 of these balls of 50 FT rope which puts you at around $300 dollars just for rope? am I looking at this wrong or is that correct?
Did anyone answer this question? “After doing the calculations you needed 10 of these balls of 50 FT rope which puts you at around $300 dollars just for rope? am I looking at this wrong or is that correct?”
LOVE this! I’ve been looking at buying one online but thought “I could totally make this..” and it brought me here! How much rope did you use? What length and thickness? I’m trying to figure out how much I’ll need for my one closet door! Thanks!!
Hi Devon! I would just pick whatever you prefer as far as the thickness— Emma used plain rope for hers from a hardware store. Since spaces vary, I would measure your closet door area to see what would work best. 🙂
This looks amazing! Can’t wait to try it for my bedroom windows. How much rope did you use to make it? And what is the length of your curtain? Thanks!
I want to make a curtain like yours but its for my door which it measure 24″x 38″. How many cords do i need and how long to cut them. THank you
Beautiful job. I want to make something like this for my kitchen. I had a question, and I apologize if I missed the answer somewhere. Is there a formula for figuring out how long the cords have to be from the beginning. In the same vein, is there a way to tie in more if you made them too short? Thanks in advance for any advice.
Thanks for sharing tricks for making macrame curtain. Really I like your post.
I did two similar to this, but for the ends of one I dip the ends in clear finger nail polish and the other in Elmers Glue, they both held together the ends from unraveling.
Useful Information, I have read some patterns here https://www.inhabitzone.com/diy/diy-patterns-for-macrame-curtains.html.
I personally like while macrame curtains, how much I have to spend to crate this white one.