Last year, we made this play kitchen for Nova’s big gift and it’s honestly the only gift that has been played with EVERY DAY all year long.
I also learned how meaningful it is (for me!) to spend months planning and working on a special project to give our children for Christmas.
This year, we’ve been on a bit of a Mary Poppins kick and Nova LOVES the scene in the movie where they are cleaning up with all the snaps. I asked her a month or so ago if she would like mommy to make her a dollhouse and she said, “Yes, but it needs to have doors.” Haha.
I knew right away she was referencing the dollhouse in Mary Poppins and I knew we had to build one, inspired by it, just for her!
The first step was to design the basic build of the house. I spent a long time searching all the different kits you can buy online, but ultimately decided it would be the most fun to build it from scratch.
Related: Check out our kid’s site Childhood Magic for more!
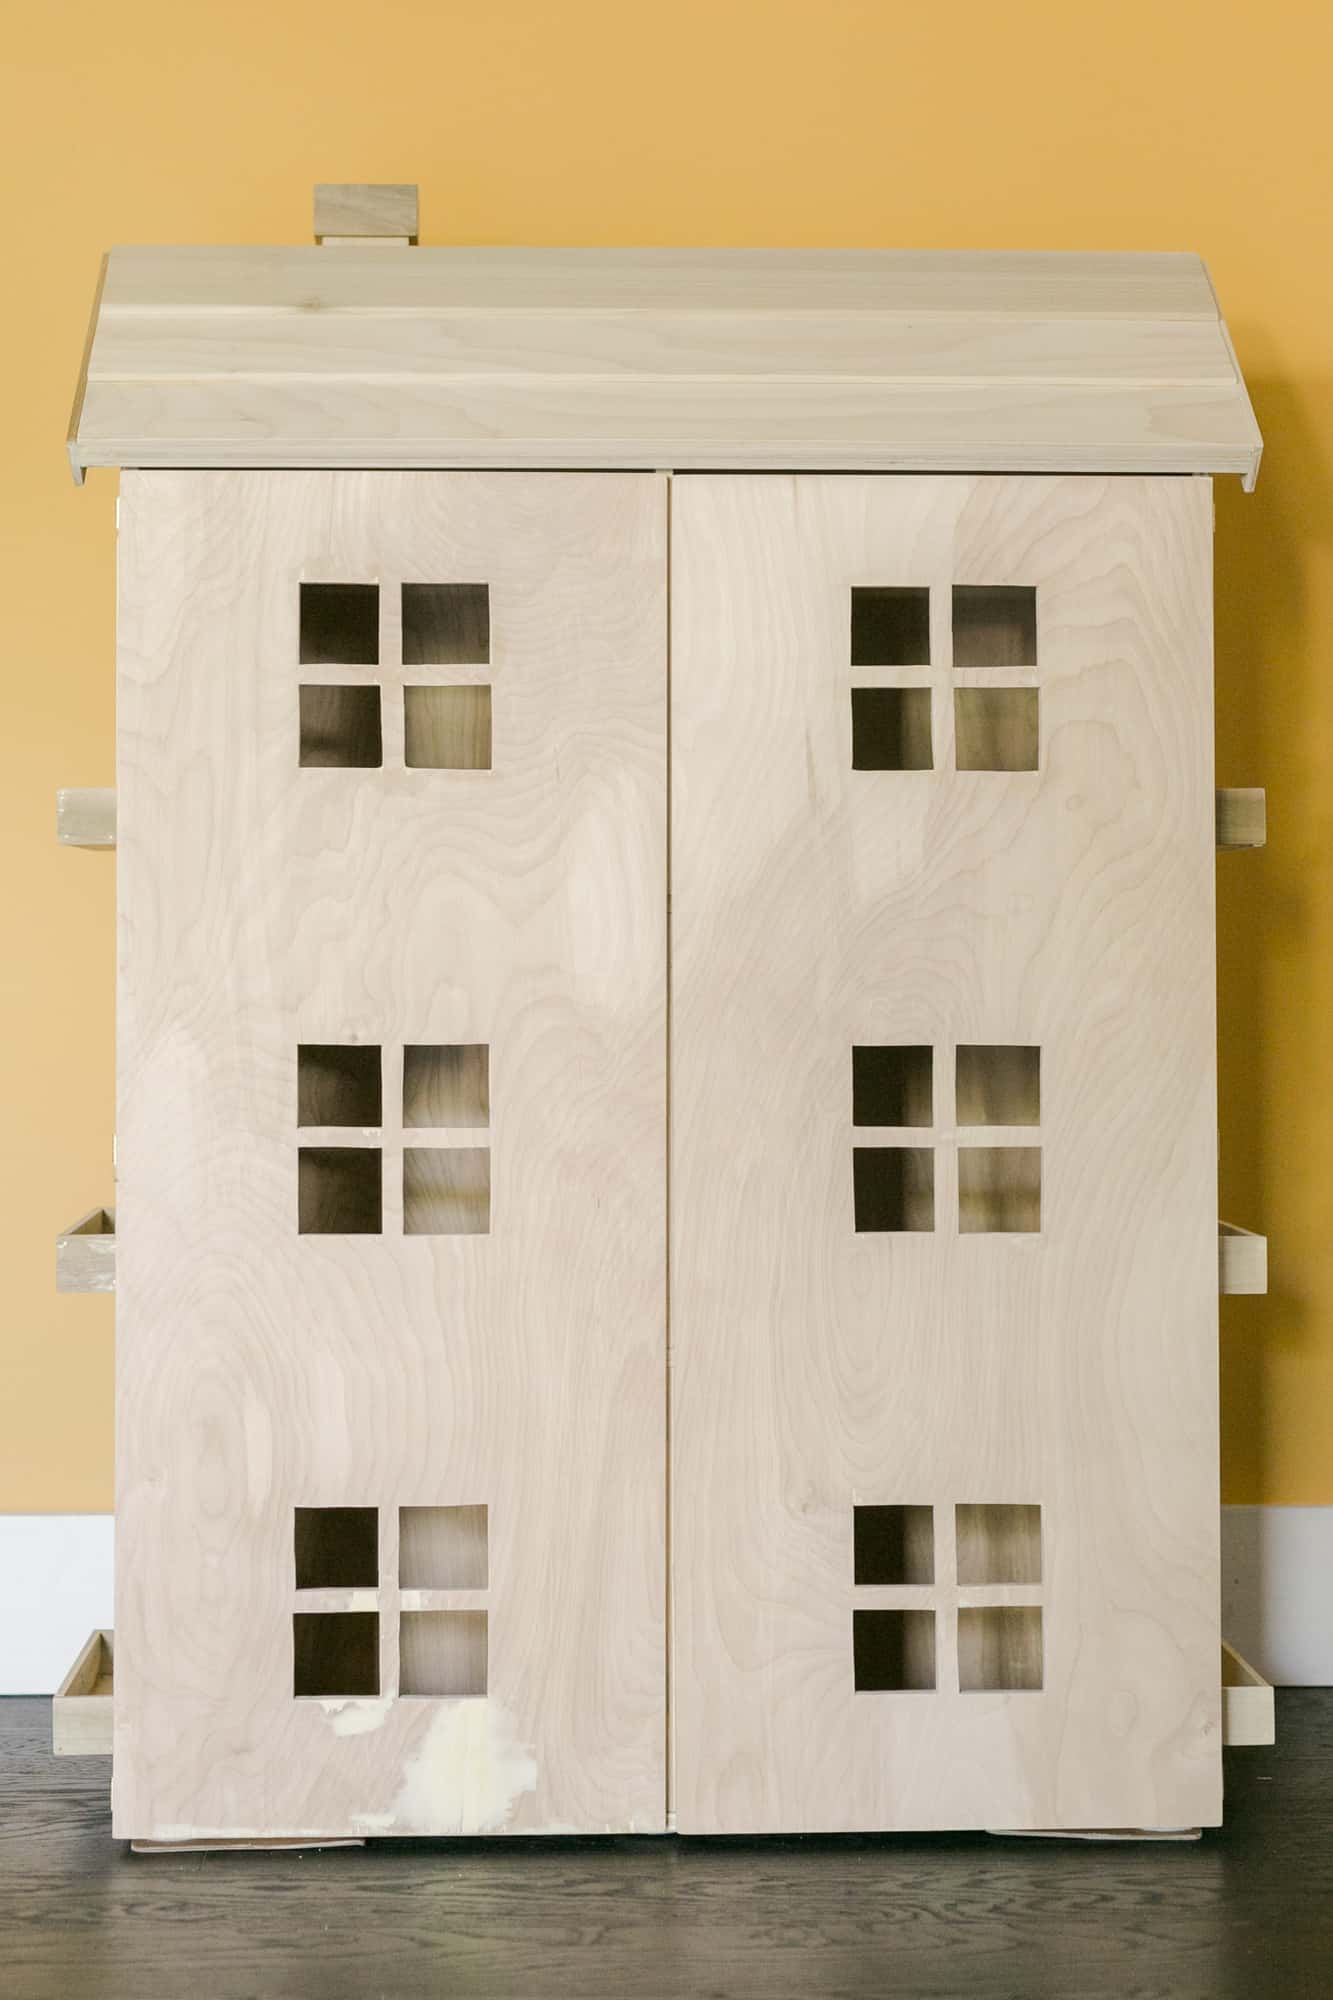
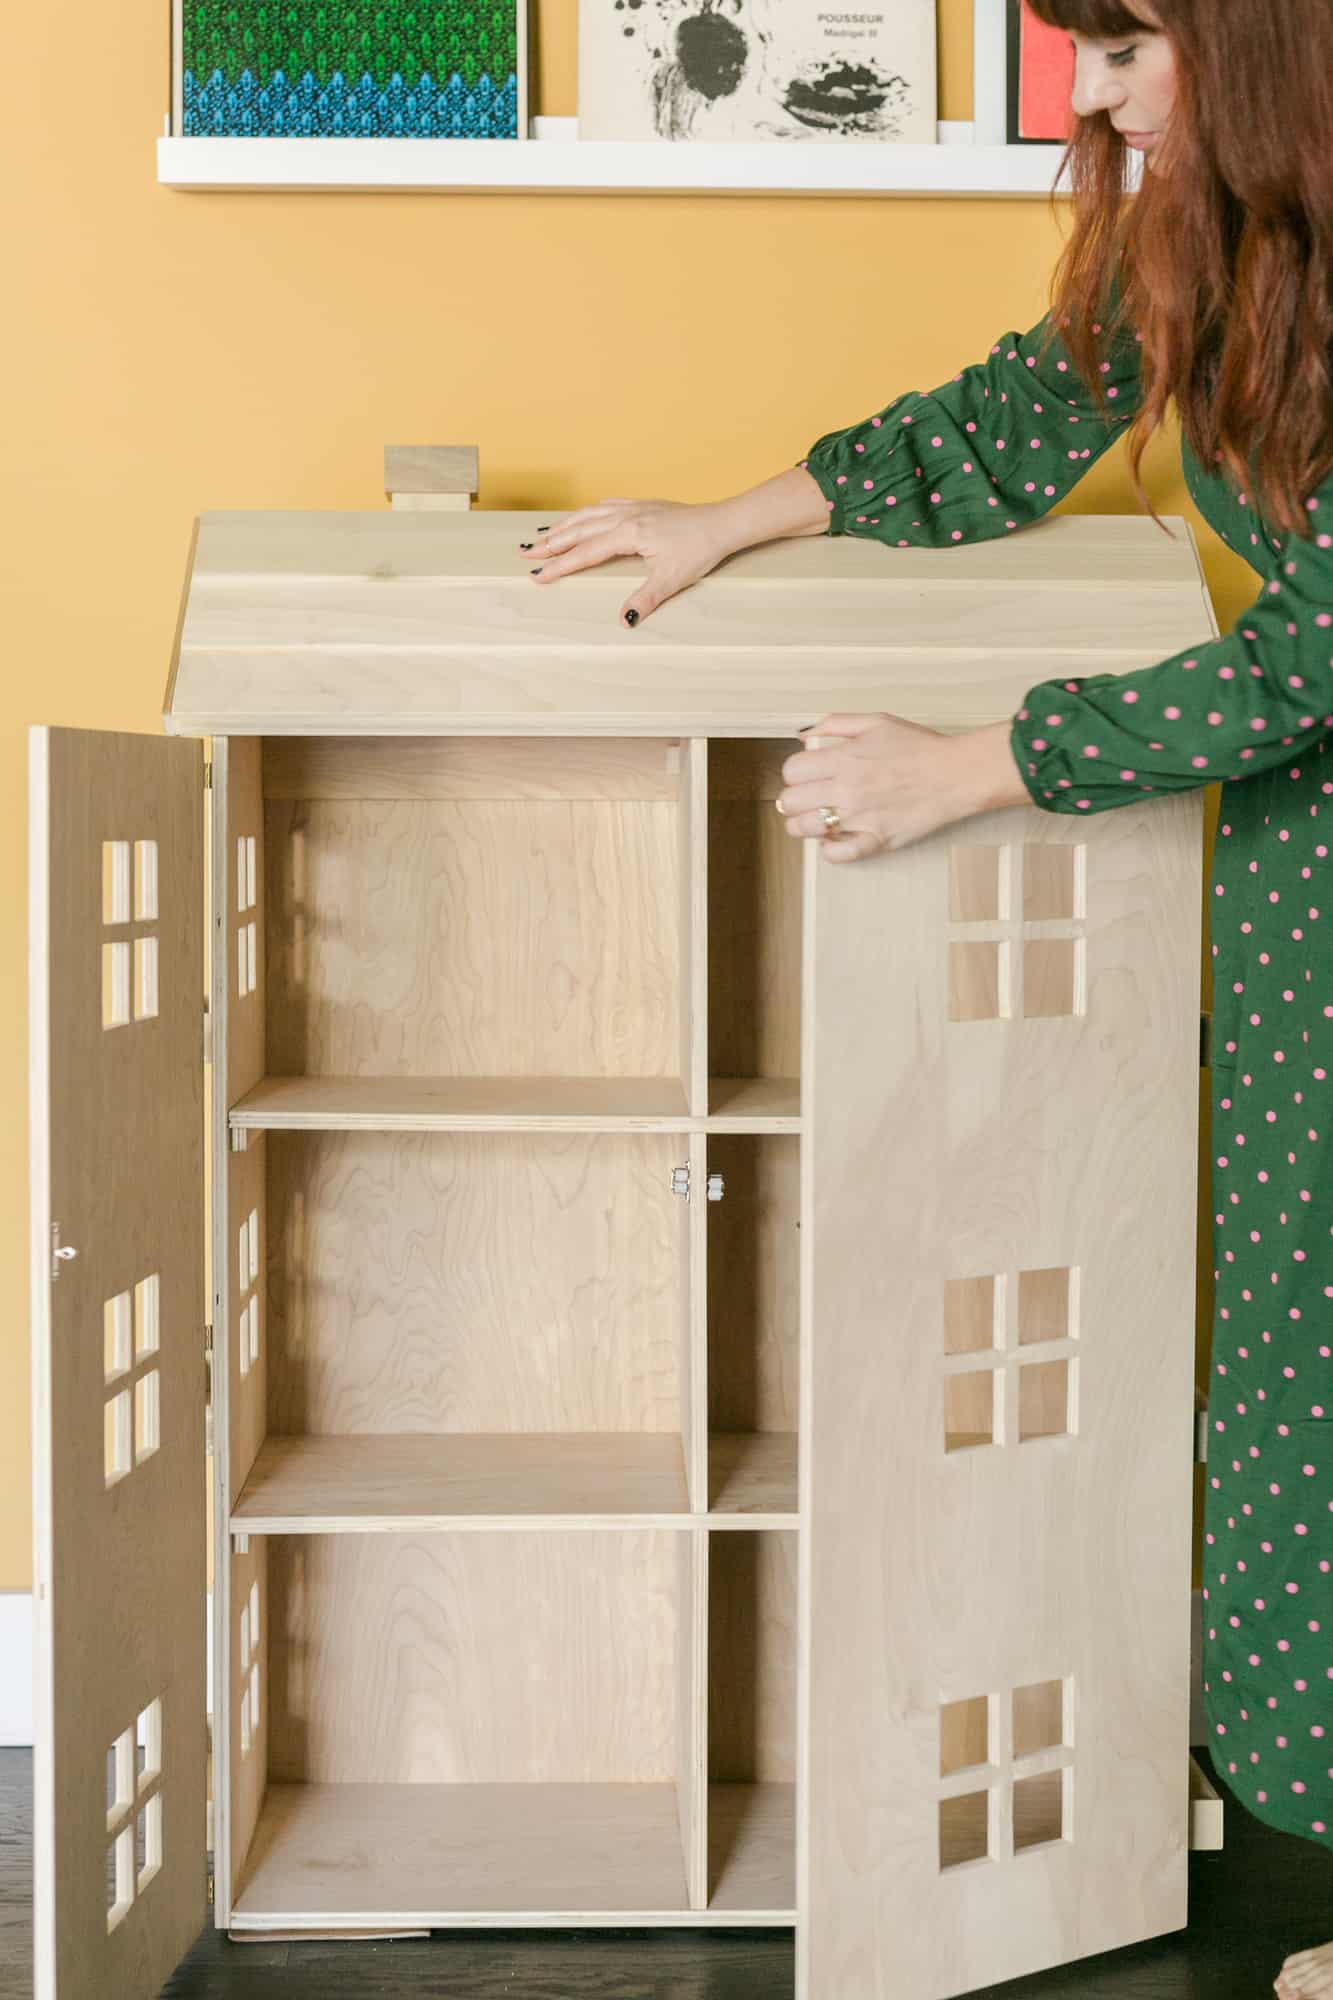
With a little advice from my friend Mandi, we got started. I chose to do a simple 4-foot tall house with two doors, six rooms, and a bonus room hiding under the roof.
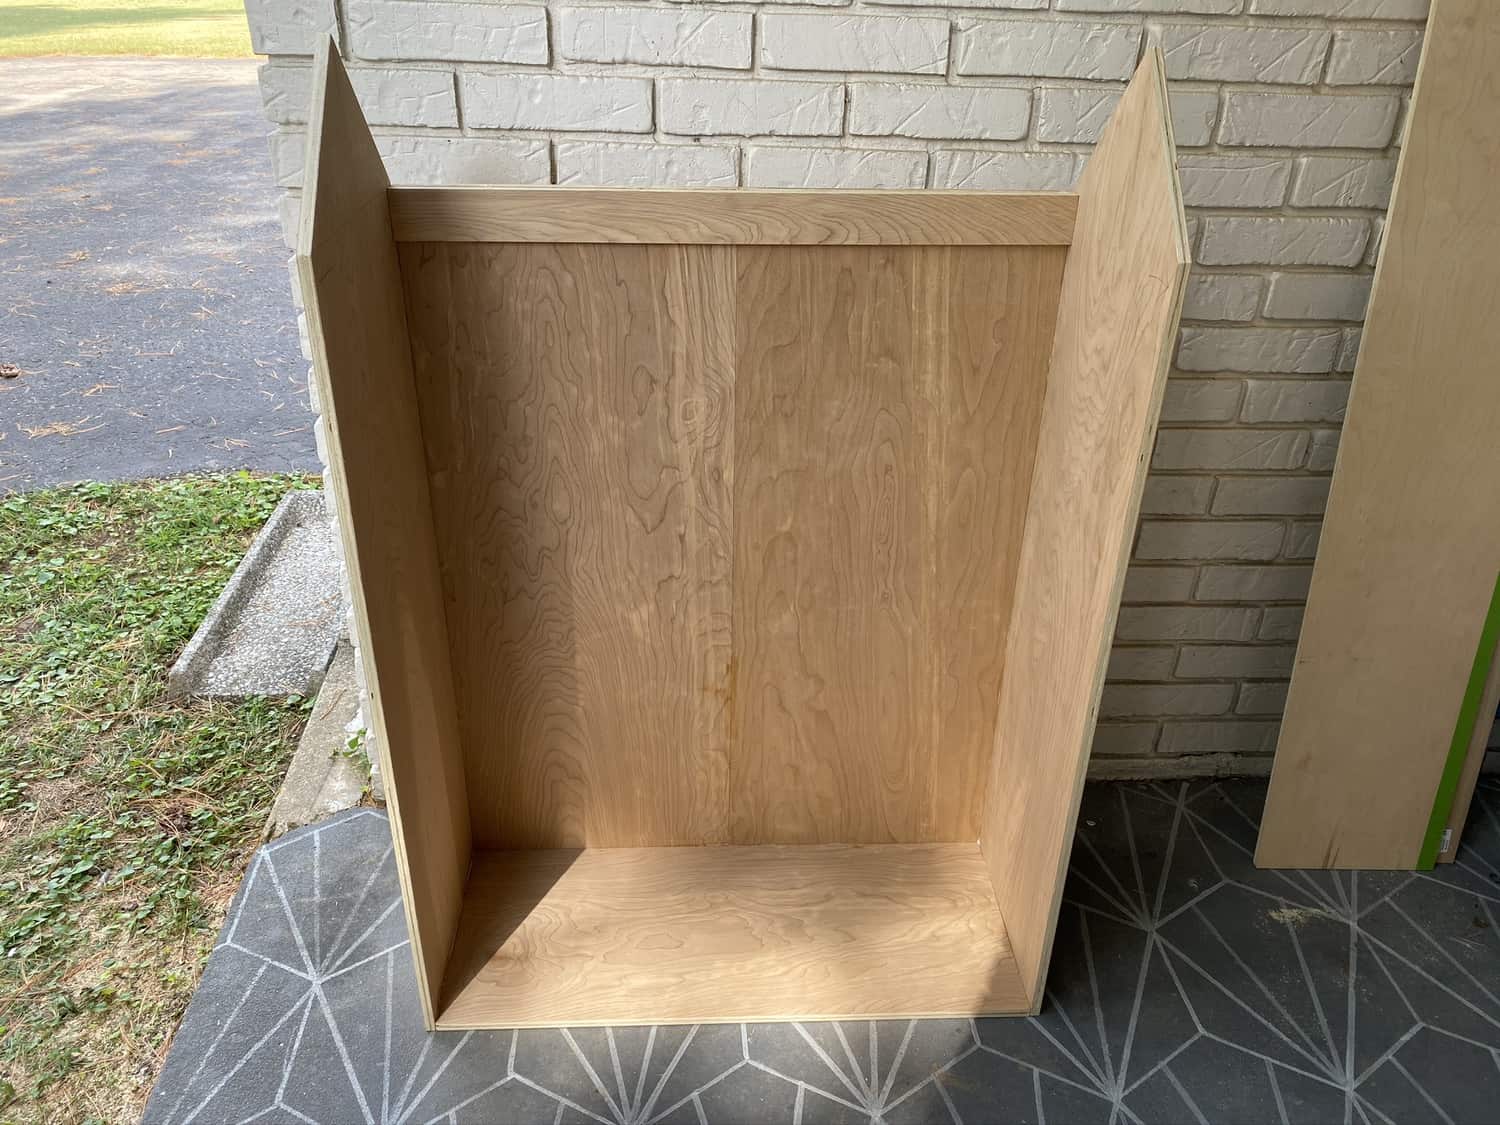
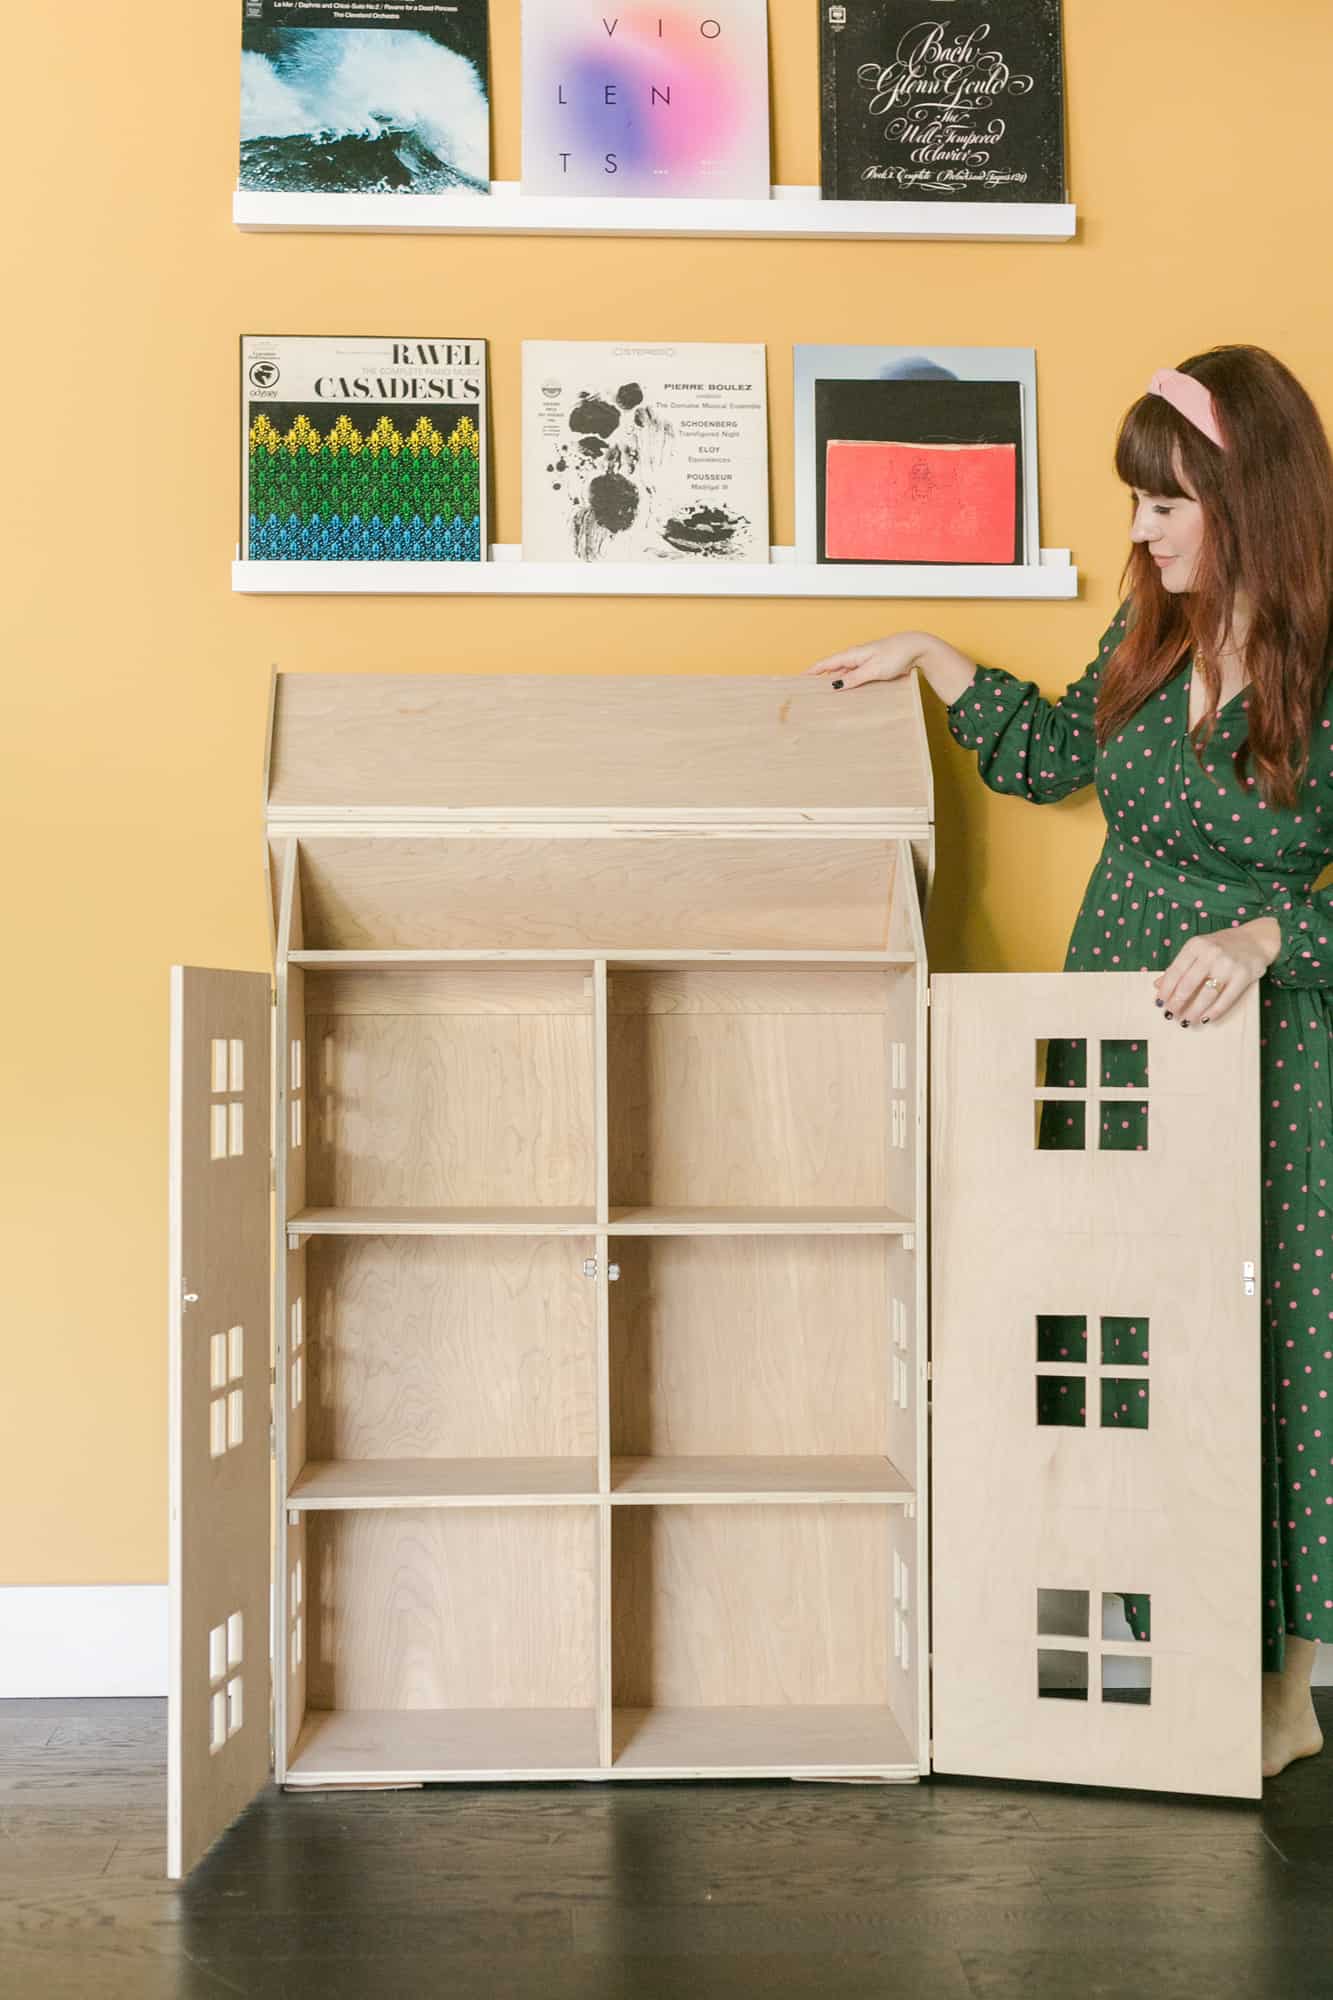 Here you can see the full inside.
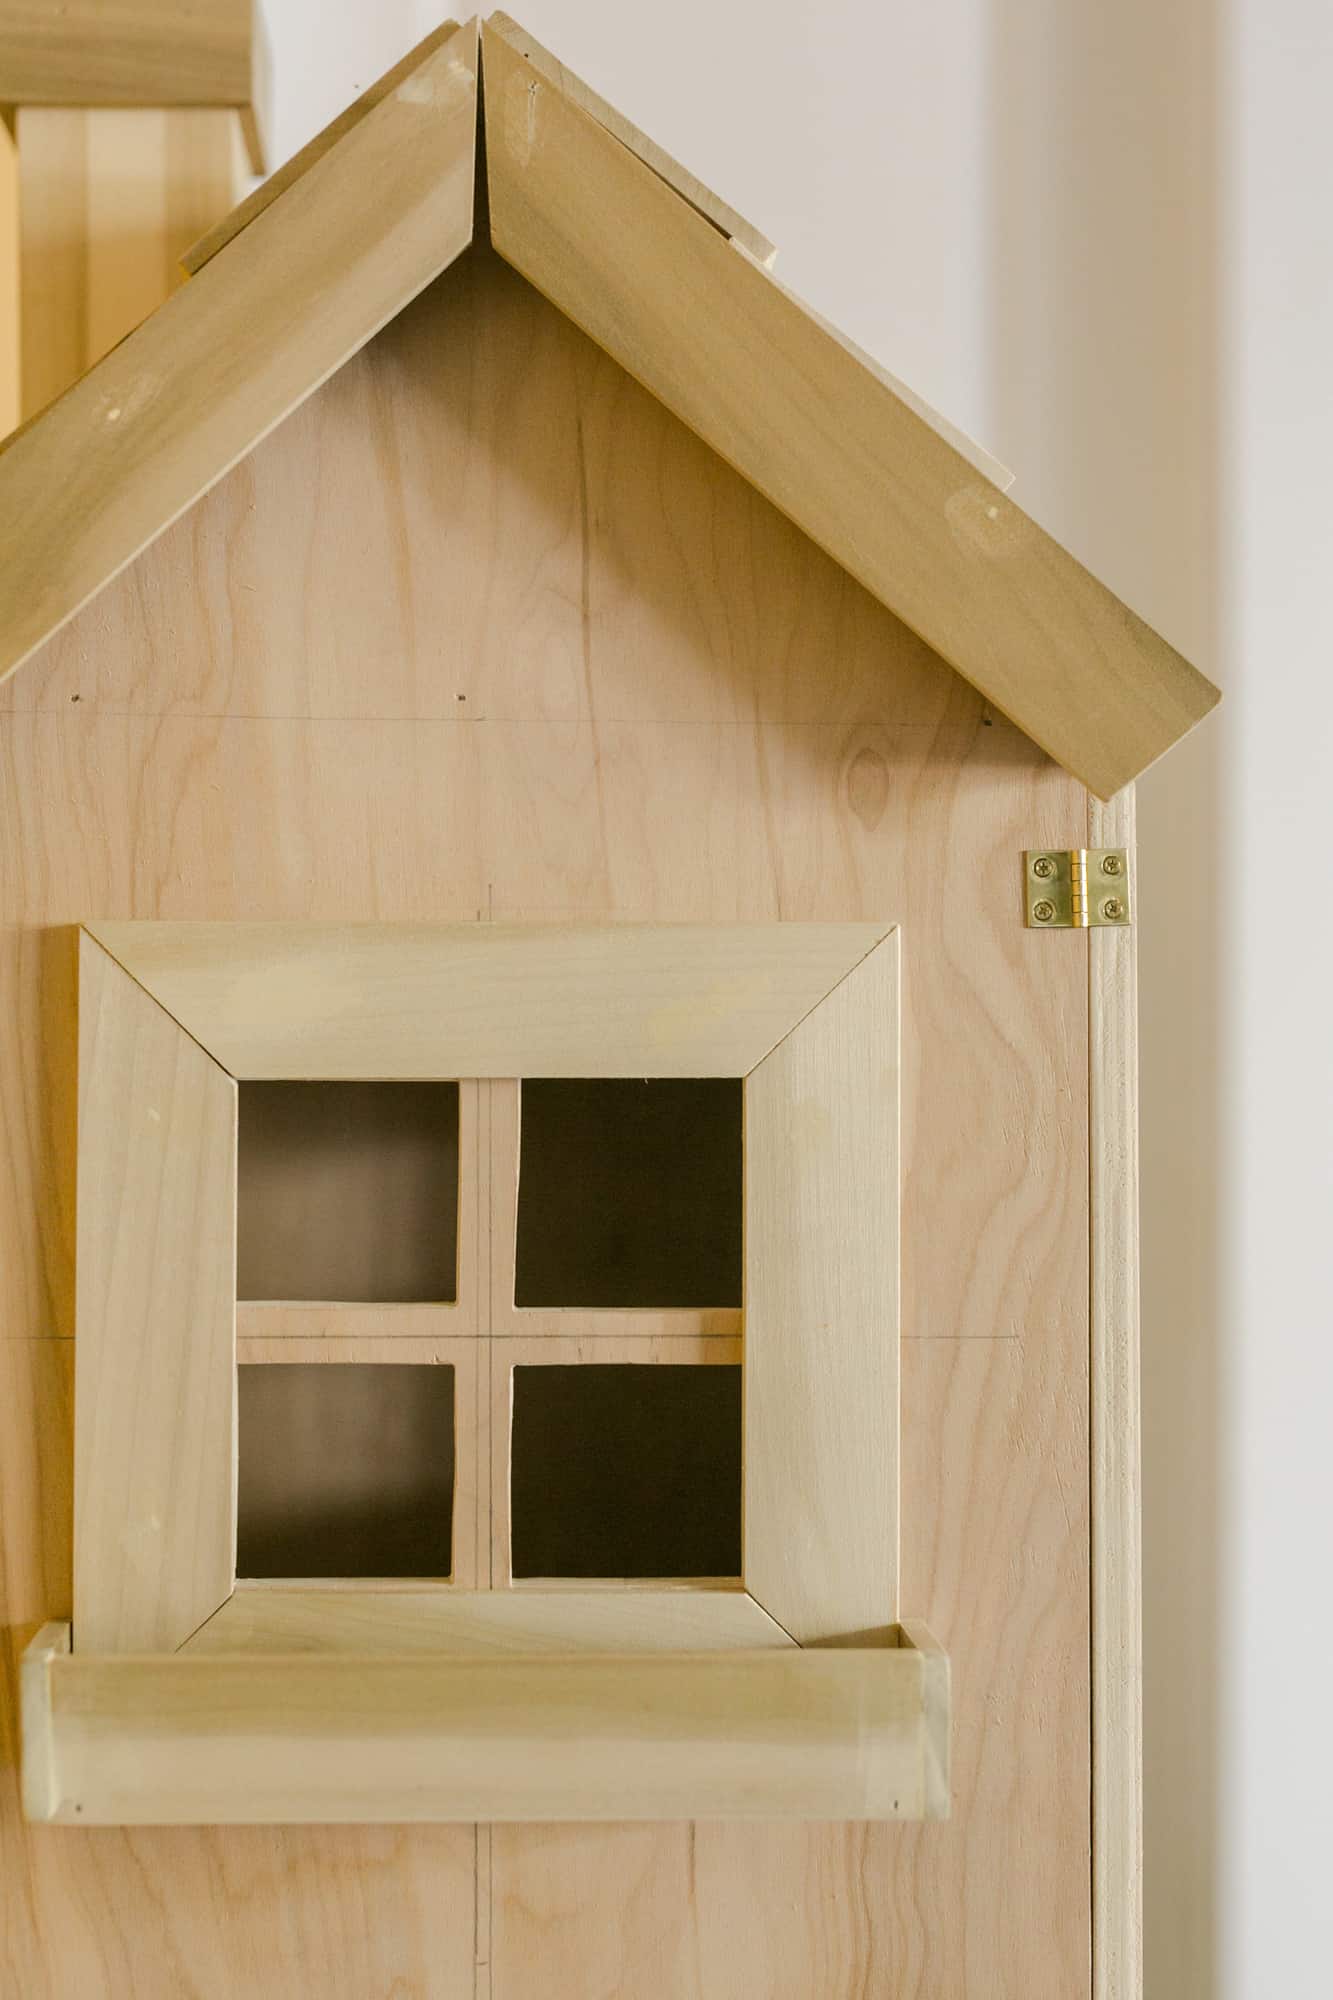 The outside of the house has trimmed out windows with window boxes. The doors have windows that are basically just four holes.
My assistant, Collin did an incredible job building this house based on a basic sketch I made. He added a lot of his own details, like the chimney. I’m turning it over to Collin now to walk you through the DIY steps of creating this house!
Supplies:
-six 1/2″ x 2′ x 4′ birch plywood
-fifteen 1/4″ x 2″ x 2′ poplar boards
-six 1/4″ x 4″ x 2′ poplar boards
-one 3″ x 3″ x 3′ poplar board
-small door hinges
-two cabinet door catches
–wood glue
–clear flex tape
–painters tape (optional)
Tools:
–circular saw
–miter saw
–jig saw
–pneumatic nail gun and finish nails
–tape measure
–12″ speed square (optional but very helpful)
–2 wood clamps
–400 grit sandpaper
–dust mask
–safety glasses
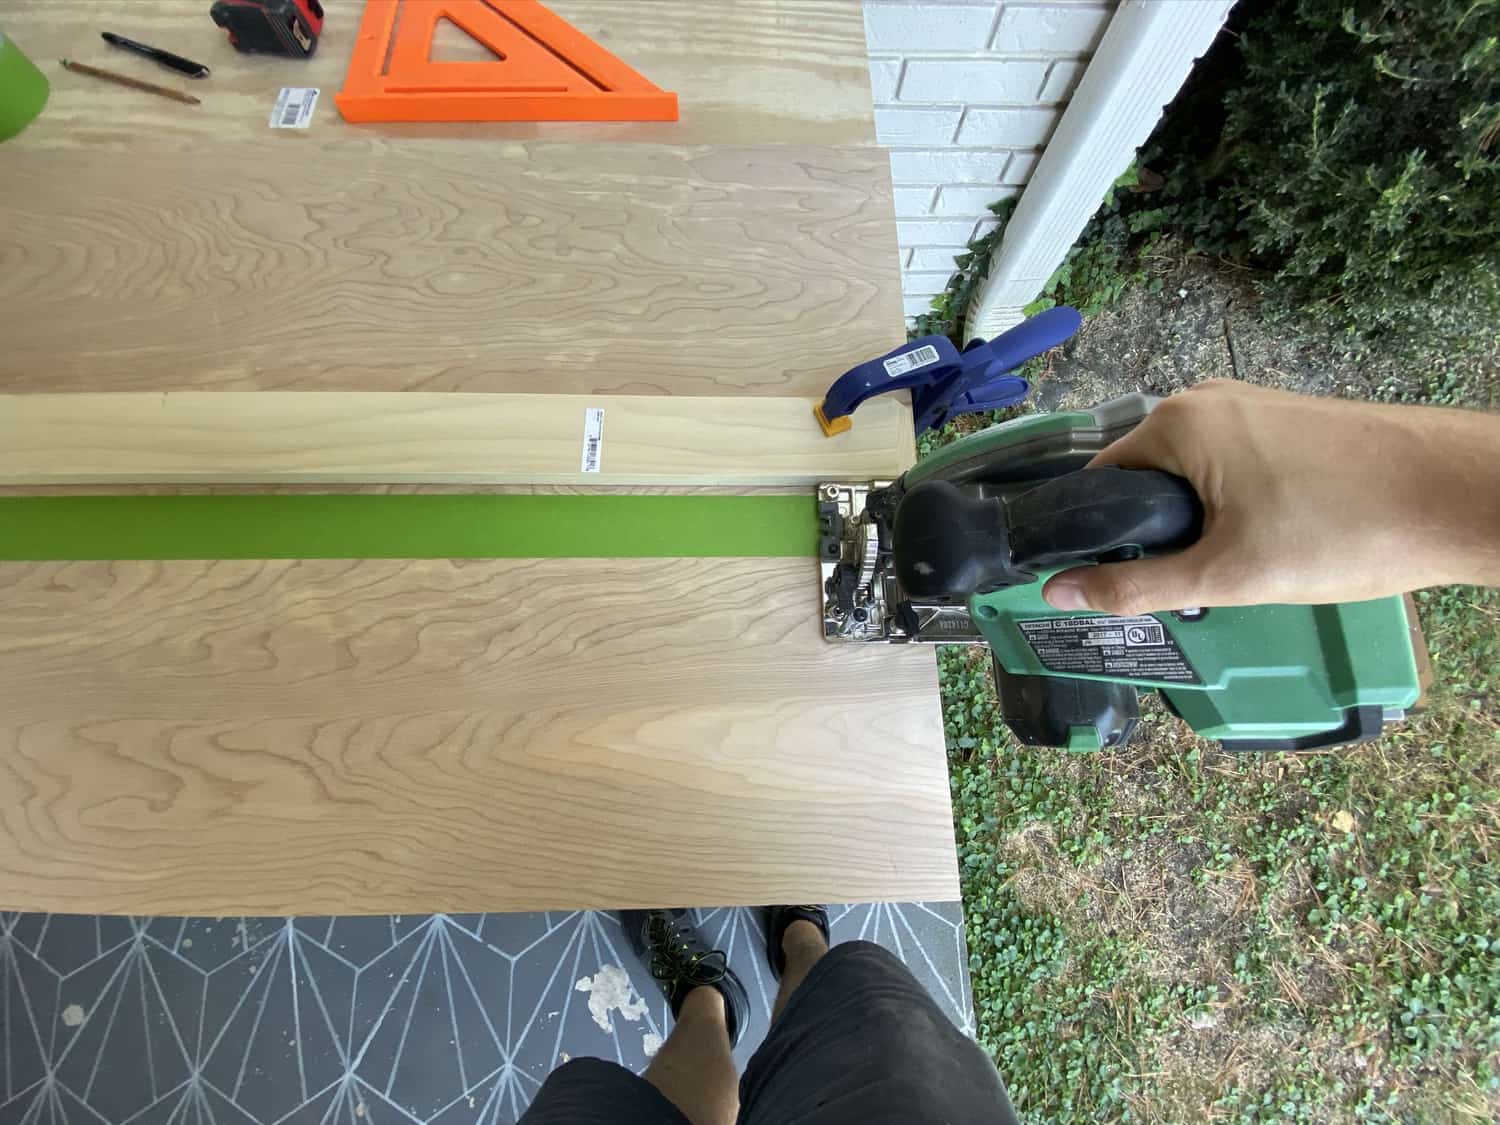 First, you’re going to want to cut all of pieces of plywood for the sides, back and bottom of the dollhouse. The overall dimensions are 30″ wide by 4′ tall x 12″ deep.
The easiest way to cut your plywood is to lay them on a table or work bench with part of it hanging off while using wood clamps to keep it in place. To make sure you get perfectly straight cuts, hold a speed square in place to guide your circular saw.
If you’re making cuts 12″ or shorter when making long rips in the plywood, clamp a scrap piece of wood on top of your board to guide your saw (as shown in picture above). This will make sure you get clean perfect cuts.
Pro tip! Put a piece of painters tape on your plywood where you’re making your cuts to prevent unwanted splintering and shredding.
 Cut the bottom piece of the dollhouse to cut to 29″ x 11″. The back two pieces at 40″ x 14.5″. The sides will be 4′ x 12″ with the top of each piece 45º angles as shown above.
 Assemble all the pieces together with wood glue, and a nail gun with the side and back pieces attaching to the side edge of the bottom piece as shown above.
I cut and added a scrap piece of wood to the top of the back pieces to hold them together, but it ended up not being entirely necessary (I found out later on), but you can add it if desired.
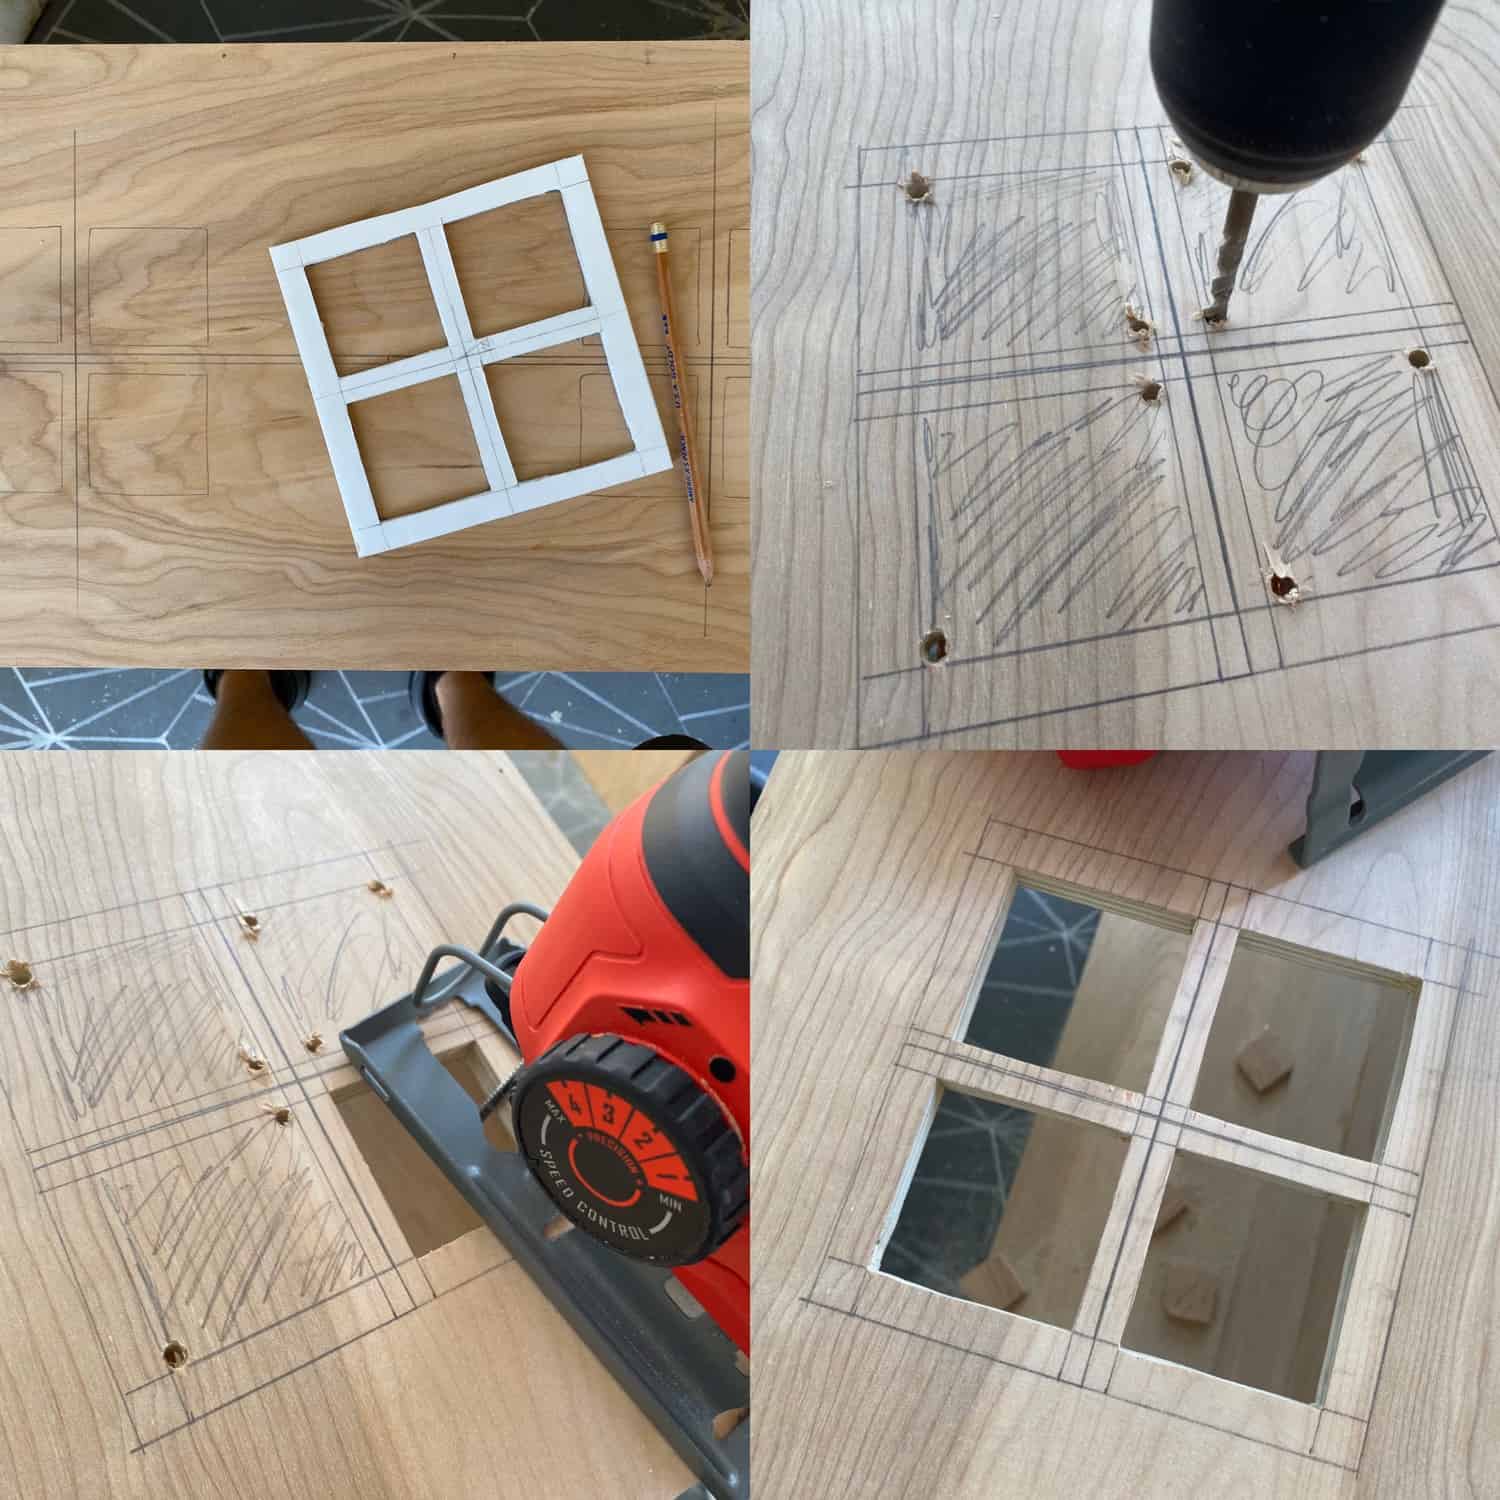 The next thing to do is to cut out the windows. I made a template out of foam board to speed things along in this process (cardboard would work too).
You can make the windows any size you want but ours are 2.5″ x 2.5″ with 1/2′ in between each square. Trace out 6 sets of windows, 3 on each side of the dollhouse.
It’s helpful to fill in the part of the window that is getting cut out with a pencil to make sure you don’t get your lines confused. Drill pilot holes in opposite corners of each window the same width as your jigsaw blade and cut out the windows.
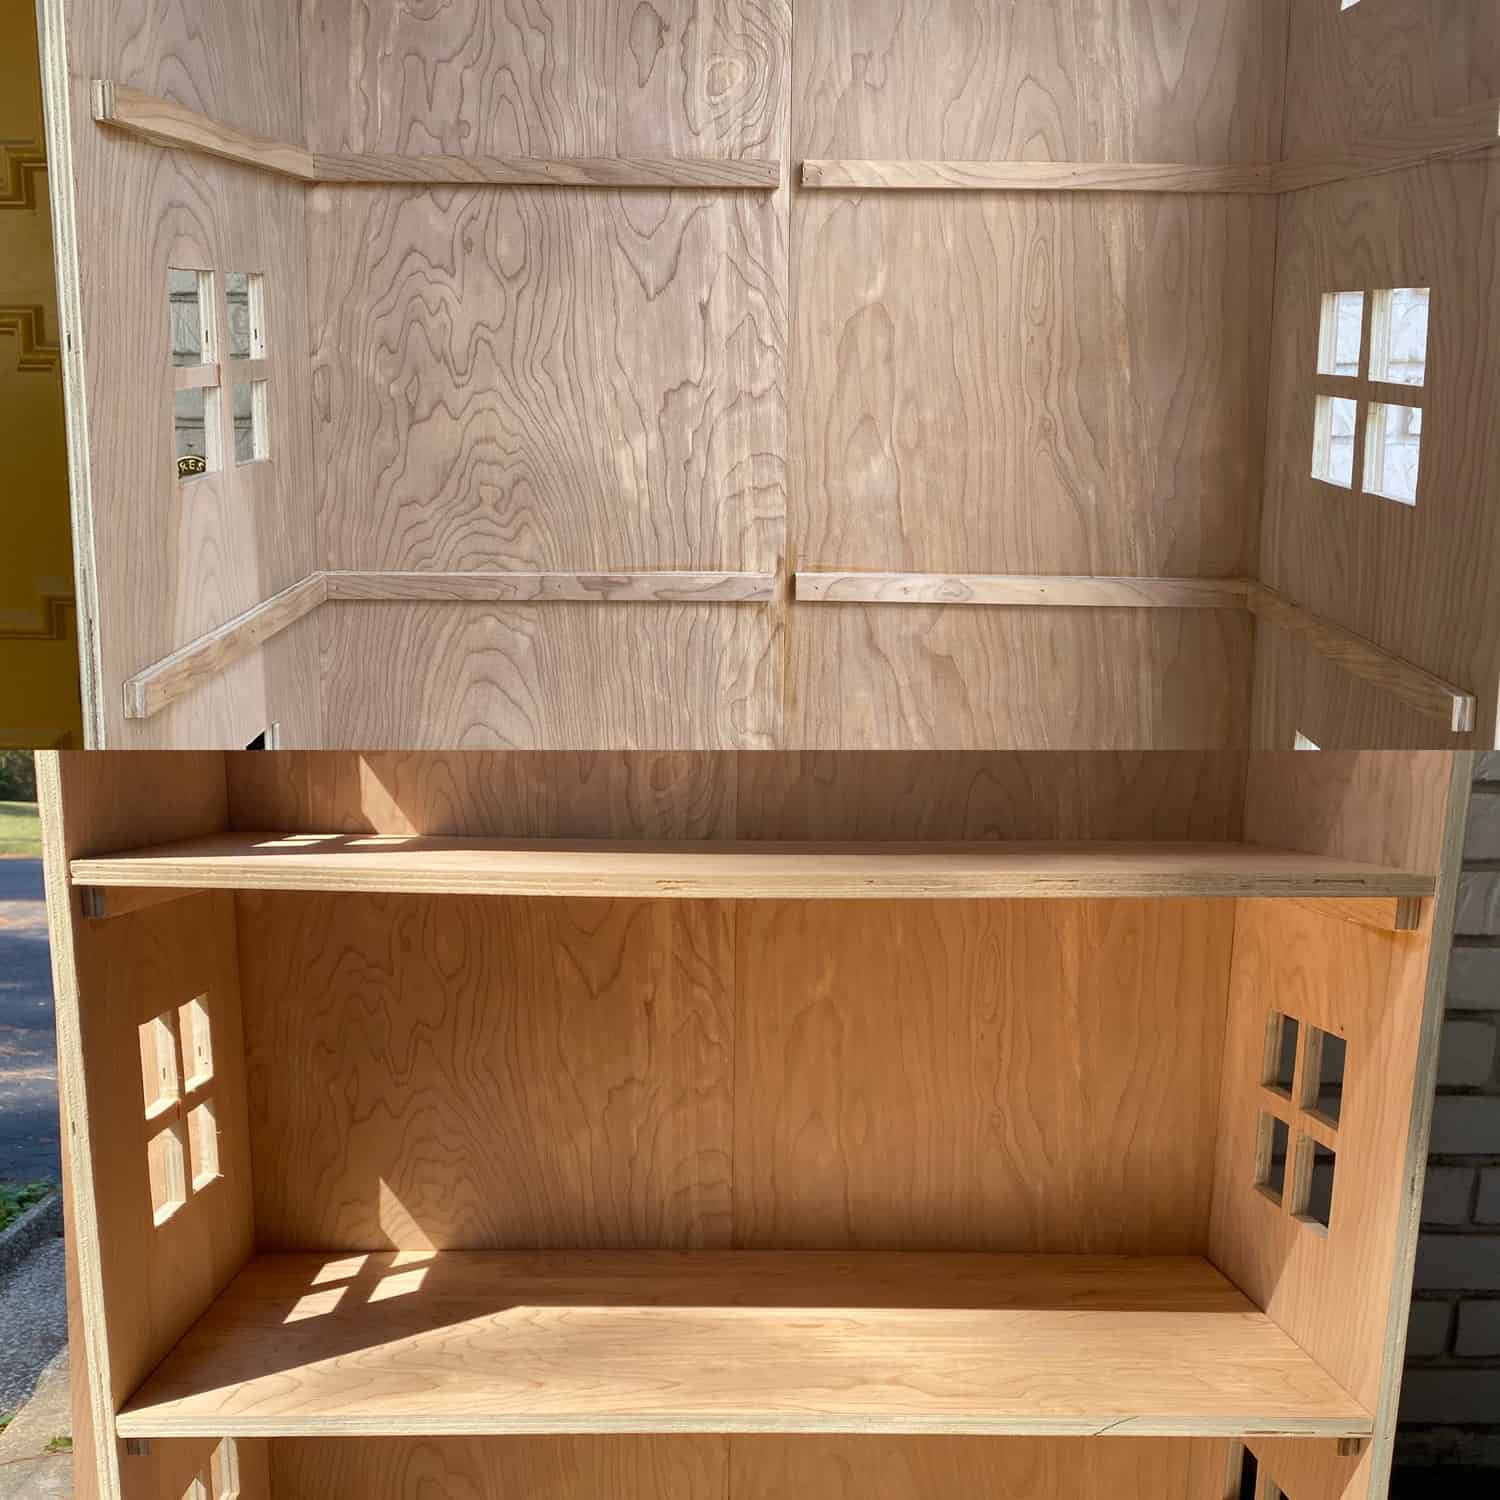 Grab some scrap pieces of plywood and cut some little 1″ strips for supports for the second and third “floors” and attach them to the walls with wood glue and a nail gun as shown above.
Cut two more pieces 29″ x 11.5″ boards (same size as bottom piece) and place onto support boards and secure with wood glue and a nail gun.
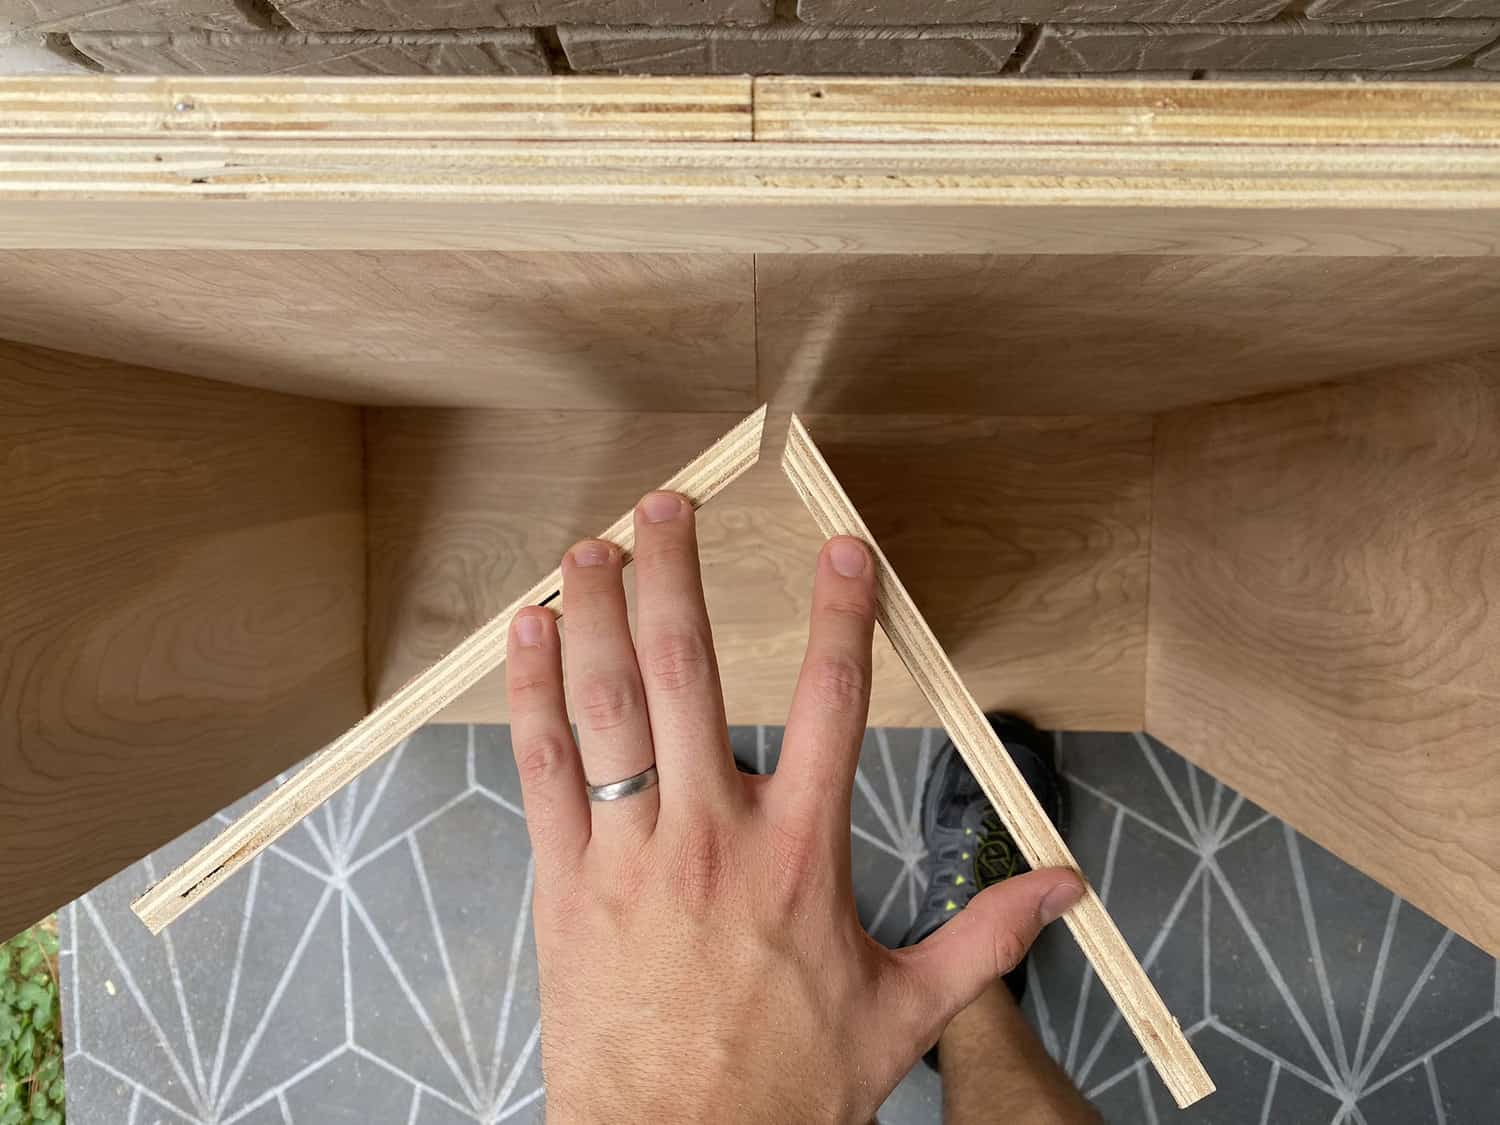 For the roof, cut two pieces of plywood to 32″ x 10″ with 45º angles so that when you put them together they meet in the middle like in the picture shown above.
To make these long 45º cuts, just use the same method I explained earlier, but set your circular saw at a 45º angle when you cut.
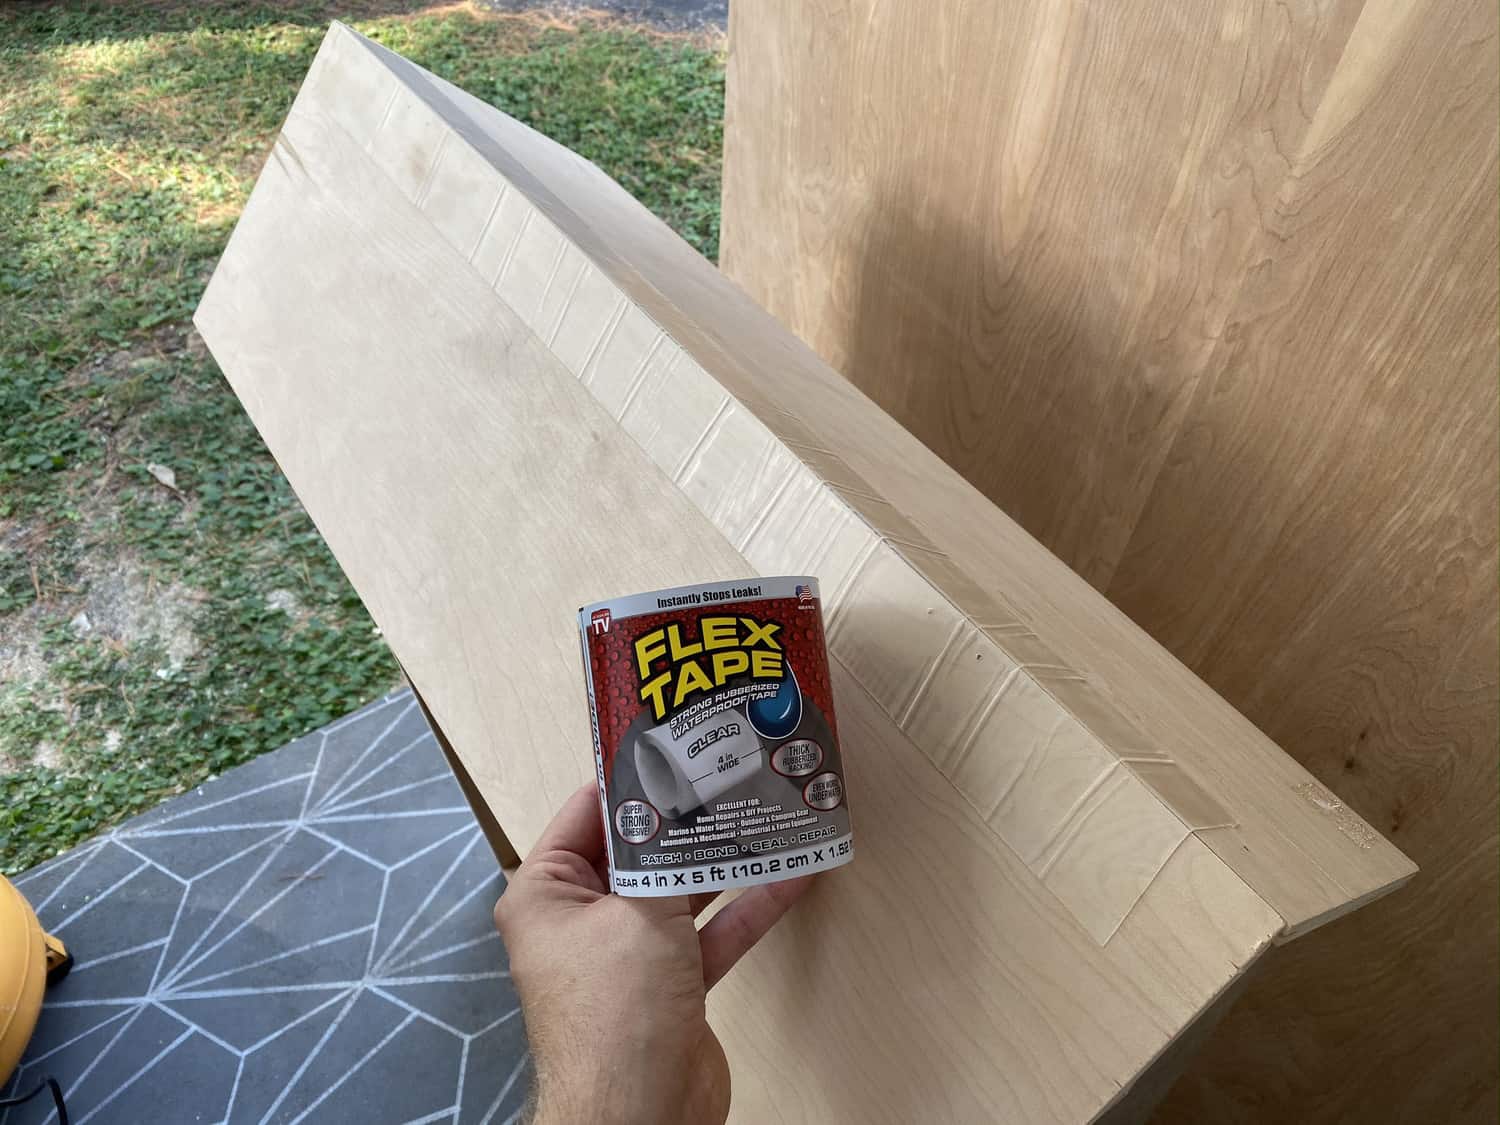 Place the two roof pieces on top of your dollhouse and place a strip of clear flex tape along the top.
You might be wondering why flex tape and not hinges. Well, if I used hinges they would be very visible and stick out from the top of the roof and I really didn’t want that.I wanted it to appear as the roof didn’t open at all so it was an extra fun surprise when it does!
Glue and nail gun the back roof piece to the dollhouse, leaving the front piece free to swing open and shut.
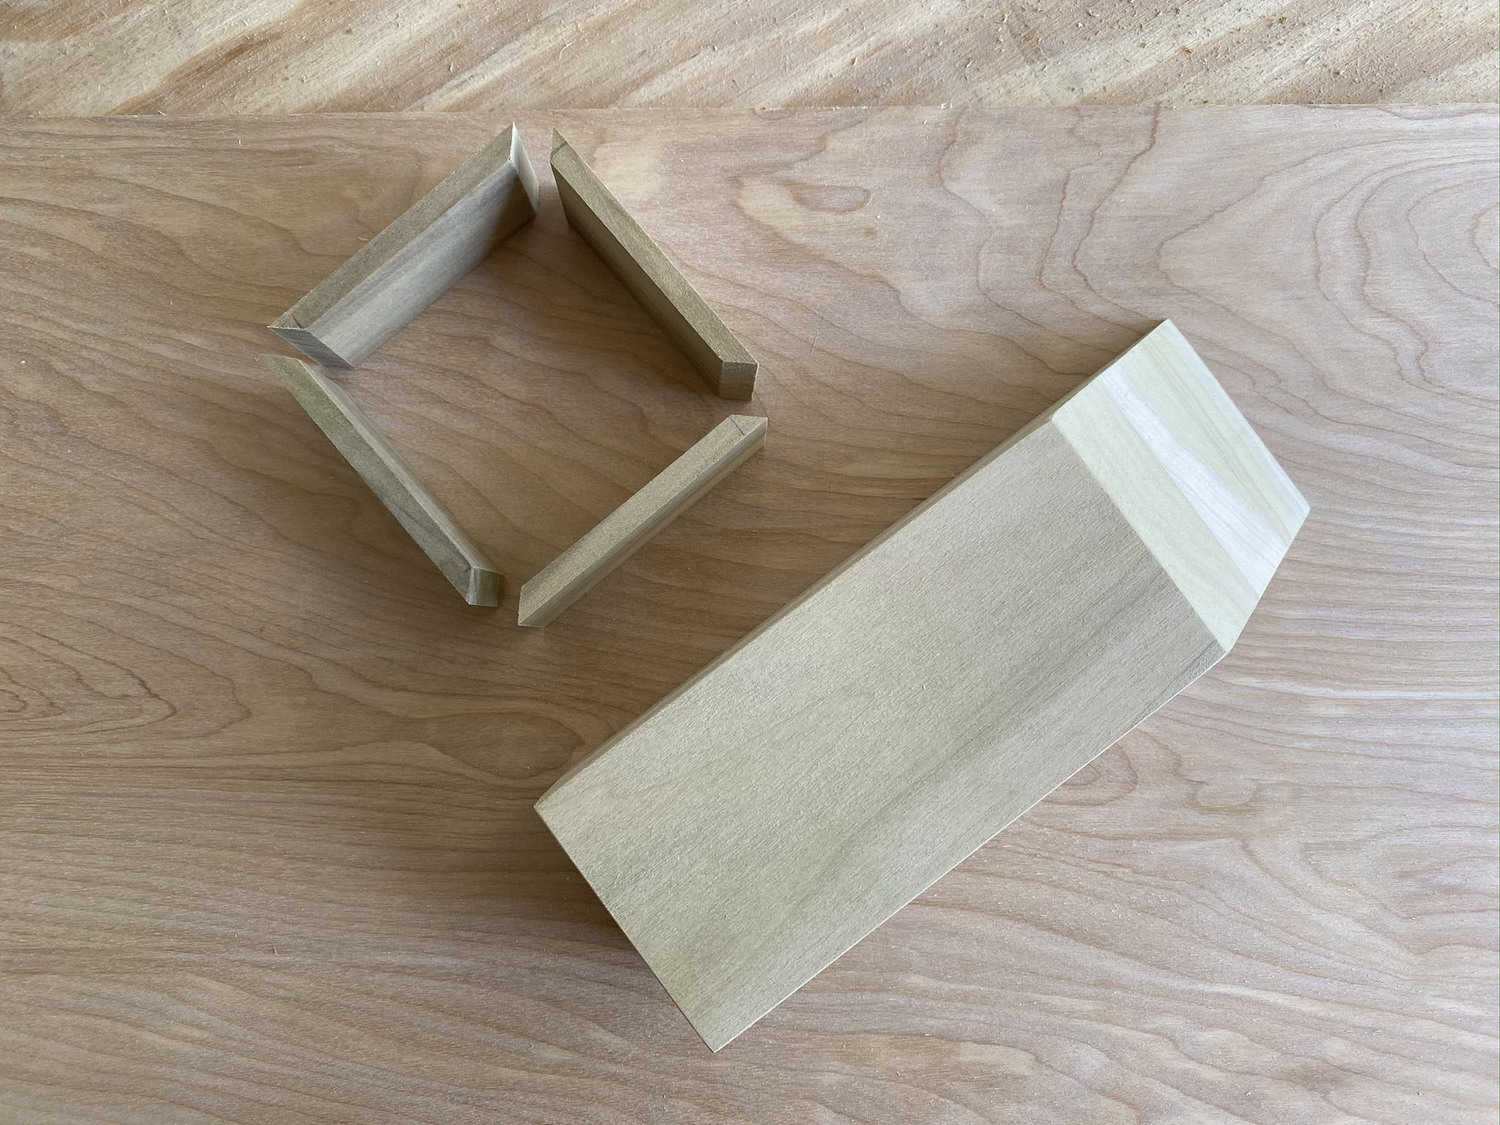 For the chimney base, take your 3″ x 3″ x 3′ board and cut a 5″ piece with a 45º angle on one side. Then, cut one of your 1/4″ x 2″ x 2′ boards into four 3″ pieces with 45º angles on each side as shown above for the chimney top.
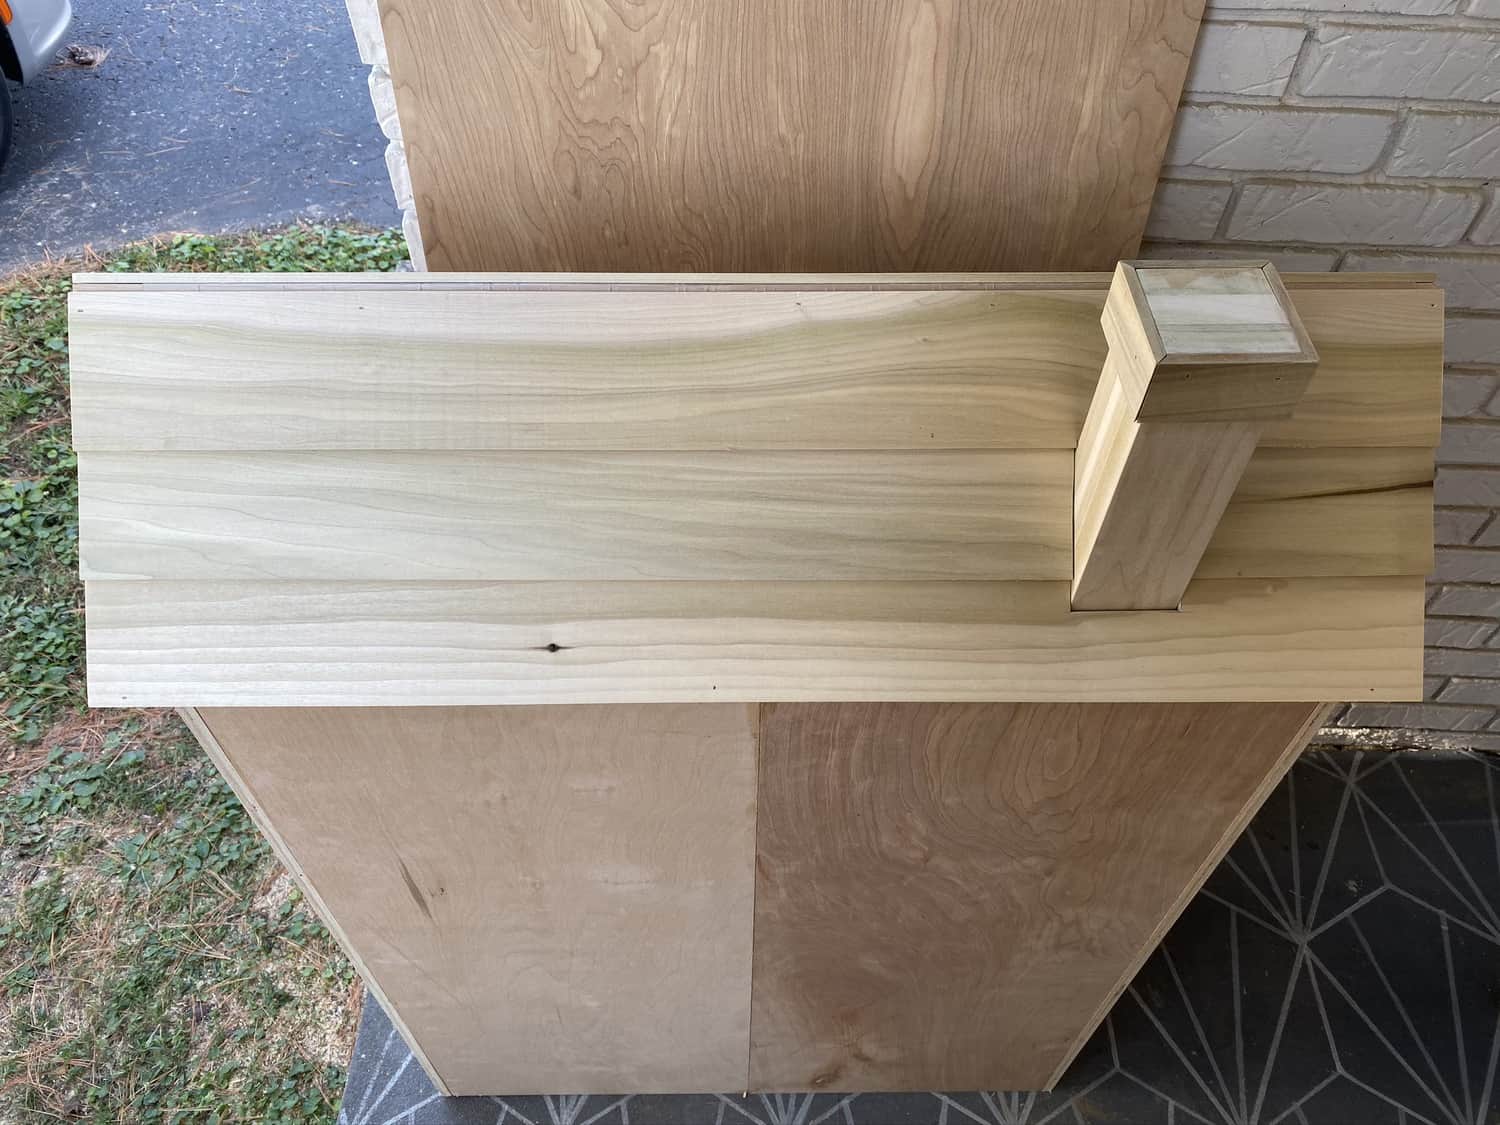 Attach the little 3″ pieces to the top of the of your chimney base, then glue and nail gun the chimney anywhere you want to the back side of the dollhouse.
Next, for the roof (shingles), take your six 1/4″ x 4″ x 2′ boards and cut them to the length of the roof (32″) and attach them to the roof starting from the bottom up.
On the back side, you’ll need to cut the pieces to fit around the chimney. To do this, hold up each piece of 1/4″ x 4″ x 2′ to the chimney and mark where you’ll need to cut.
Use the same cutting method as I explained to cut out the windows, drill pilot holes in the corners and jigsaw out the pieces.
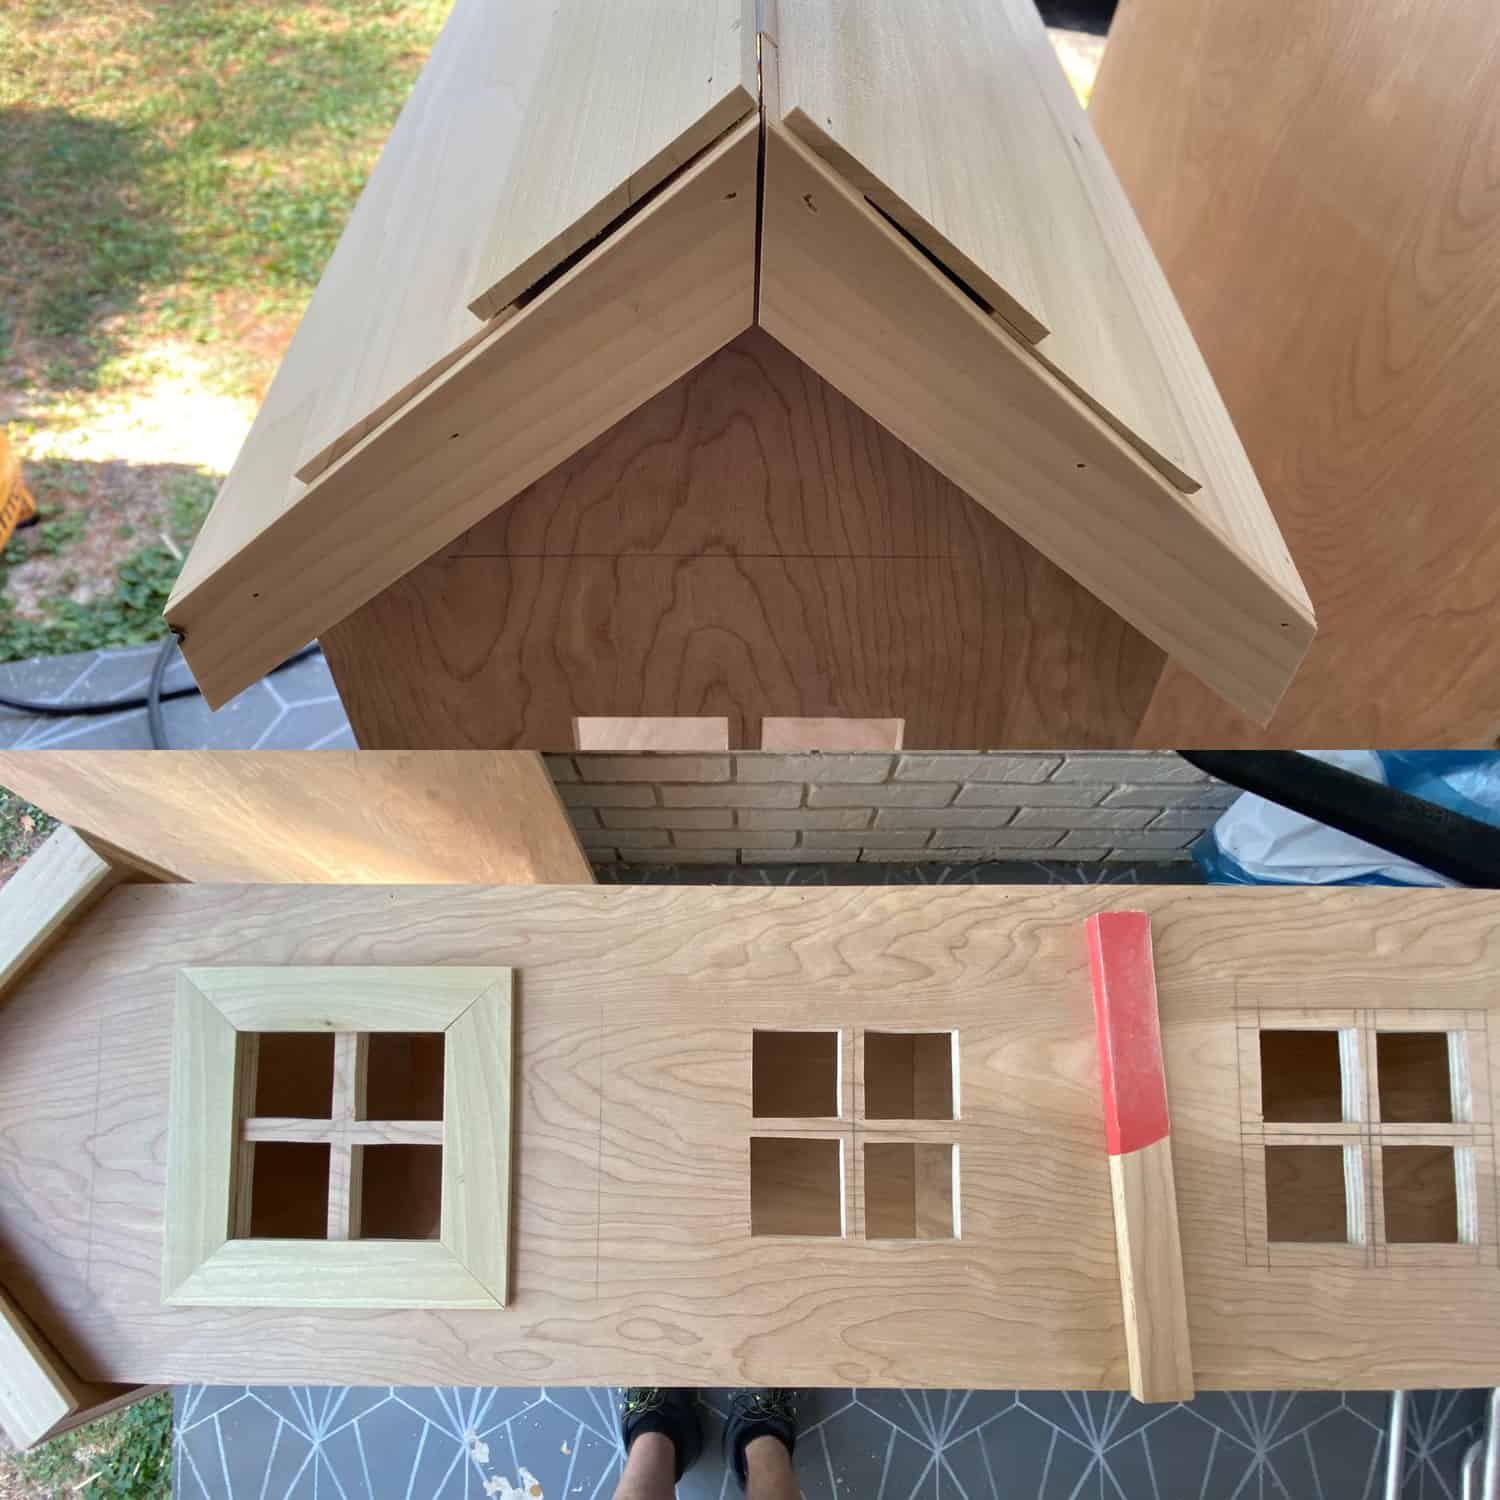 Take your 1/4″ x 2″ x 2′ boards and with a miter saw cut a bunch of 6″ pieces with 45º angles on them to be the trim for your windows. Glue and attach all trim pieces to all 6 windows.
Then, cut some 10″ pieces with 45º cuts on one end for trim pieces for the roof as shown above.
Pro tip! You can get some 400 grit sandpaper and stick it to a scrap piece of wood to sand the inside of the windows.
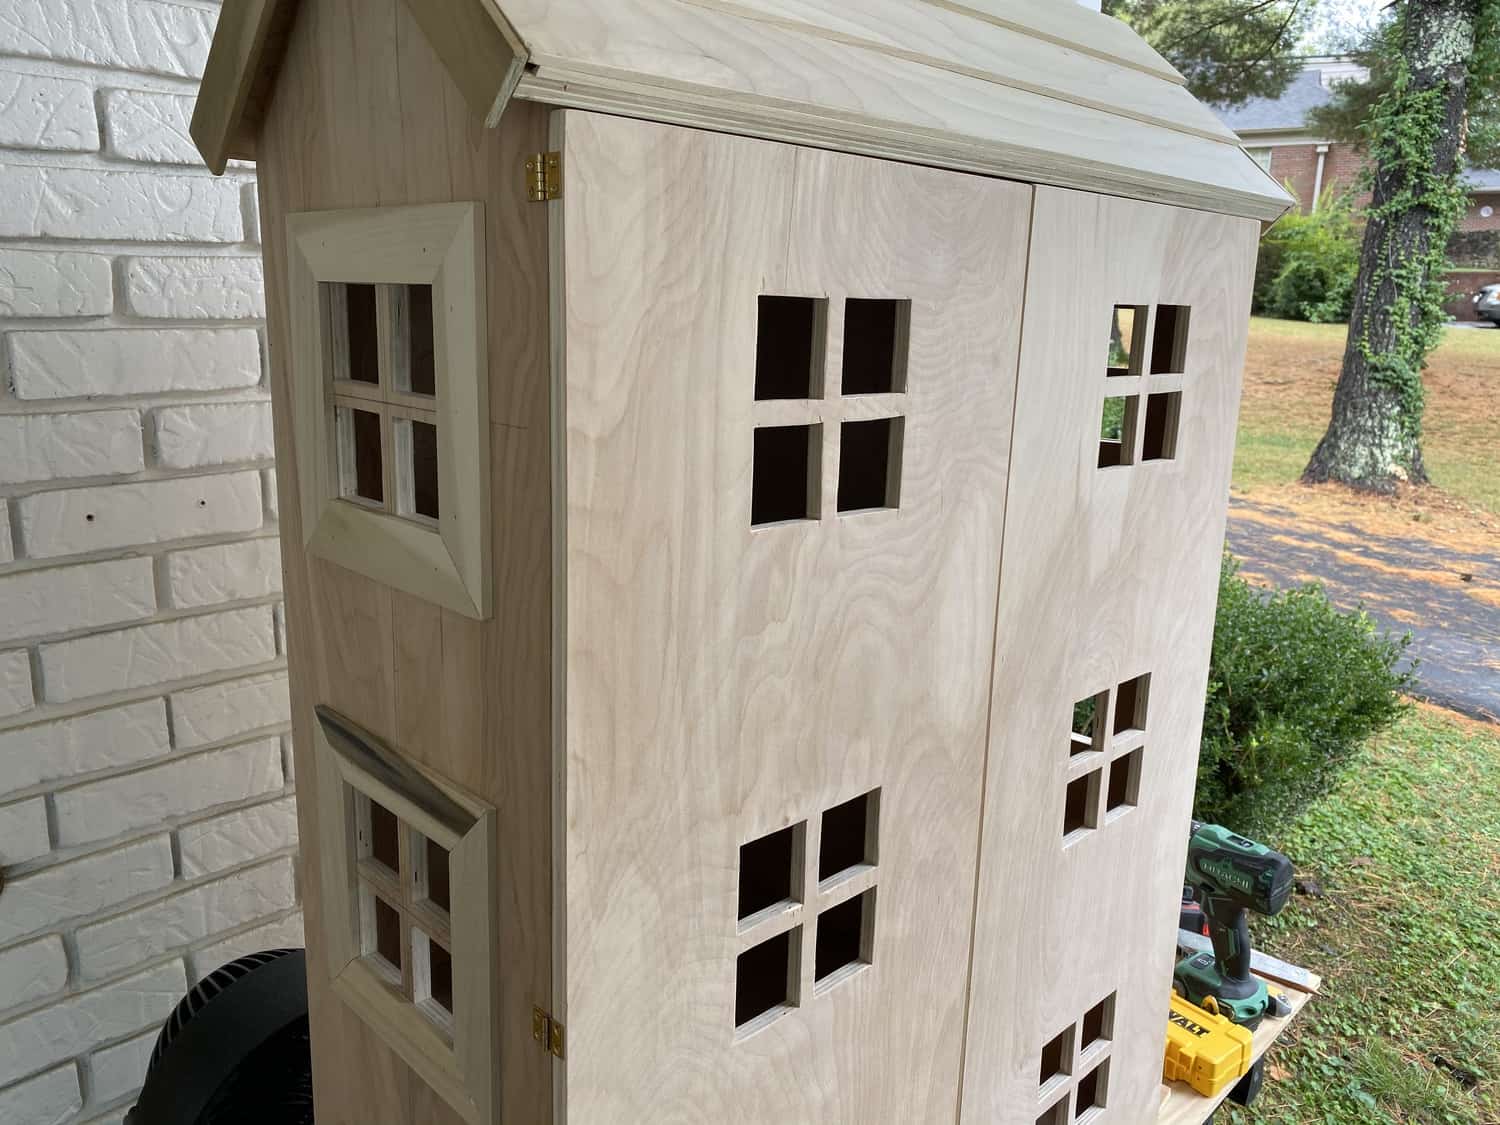 For the doors, cut two pieces of plywood to 40″ x 15″ and trace and cut out 6 windows same way as before and attach with hinges. You can add some trim to these windows as well, but we decided to leave them plain.
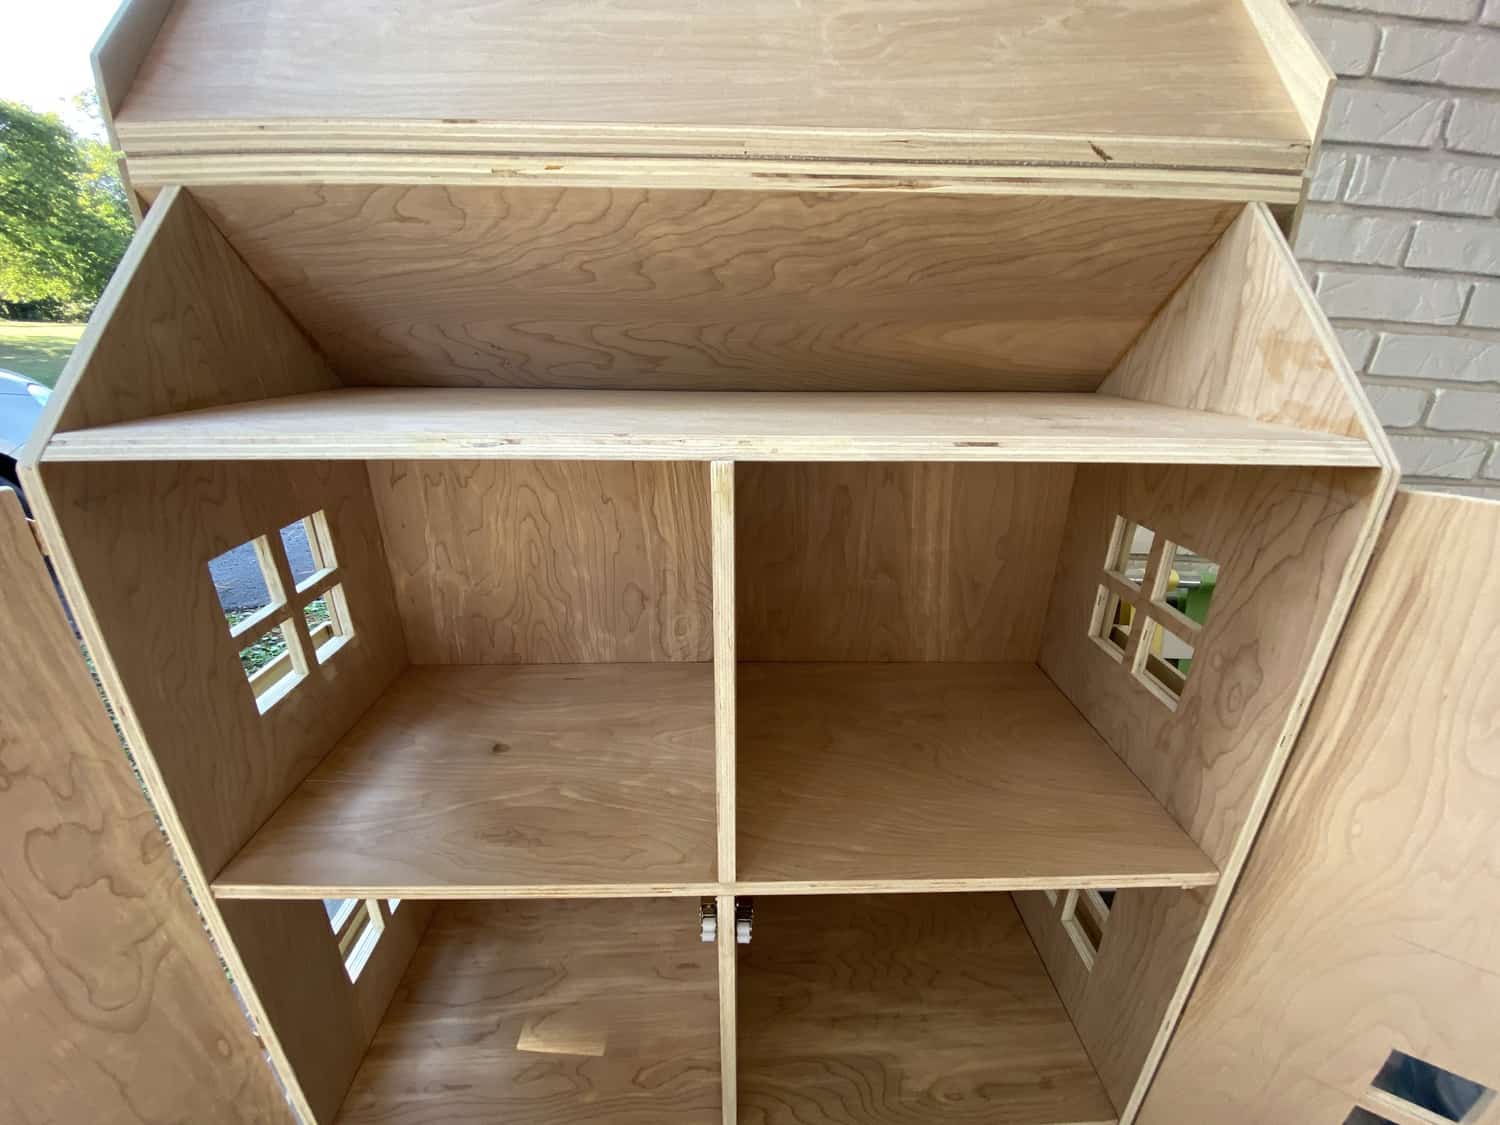 Cut 3 pieces of plywood at 12″x 13 1/4″ to be room dividers and glue and nail gun them in the middle of each floor to make 6 separate rooms.
Then, cut one more 29″ x 11.5″ floor piece, but this time with a 45º cut on one side to match the angle of the room for the top floor and “hidden room.”
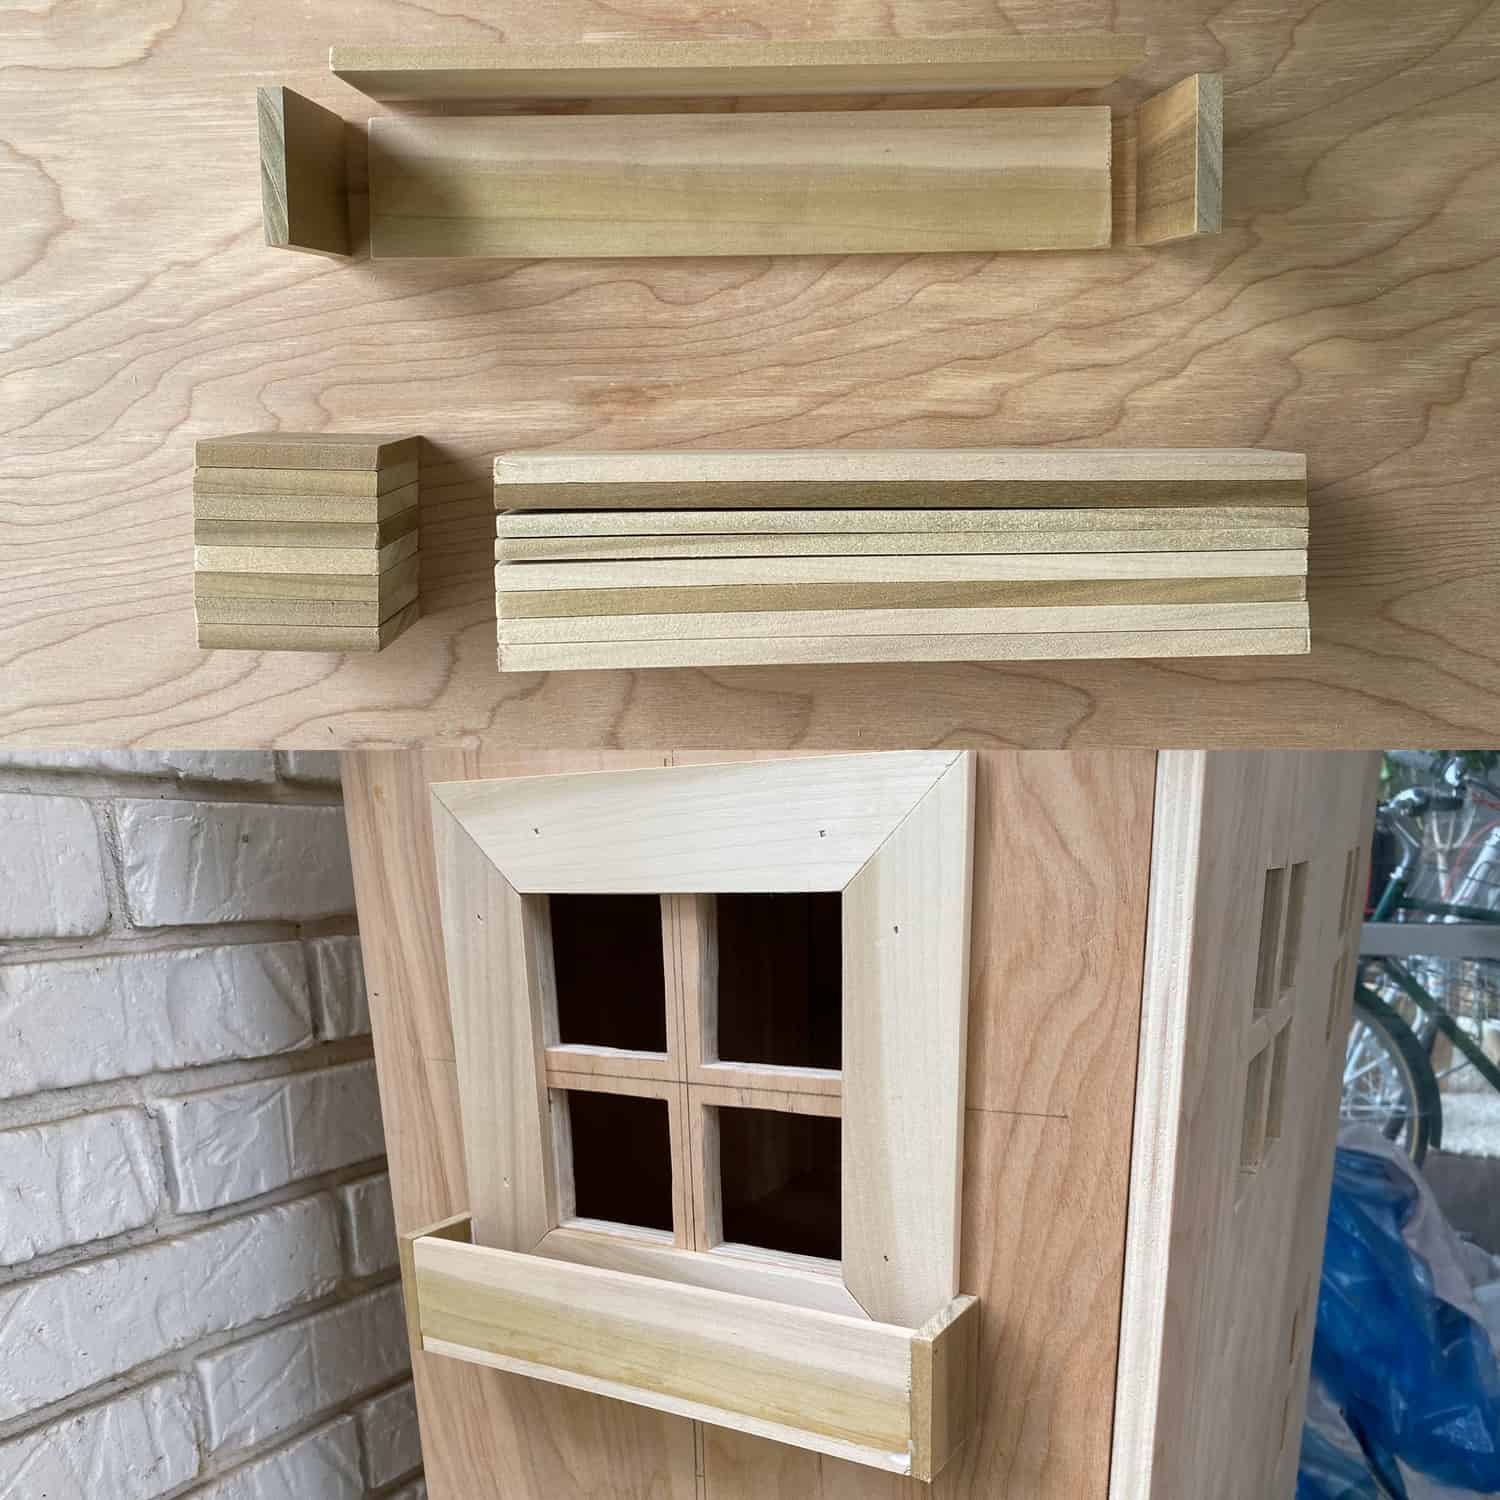 Last, grab your 1/4″ x 2″ x 2′ boards and cut a bunch of 2 1/4″ length pieces and 6 1/2″ length pieces to make little window boxes on each of the windows on the sides of the dollhouse.
Glue and nail gun them together as shown above.
You can see my full dollhouse reveal here!
You can also buy a dollhouse kit or an epic ready-made one. I love that this one is a fold-and-go set up!
Shop more dollhouse kits below:
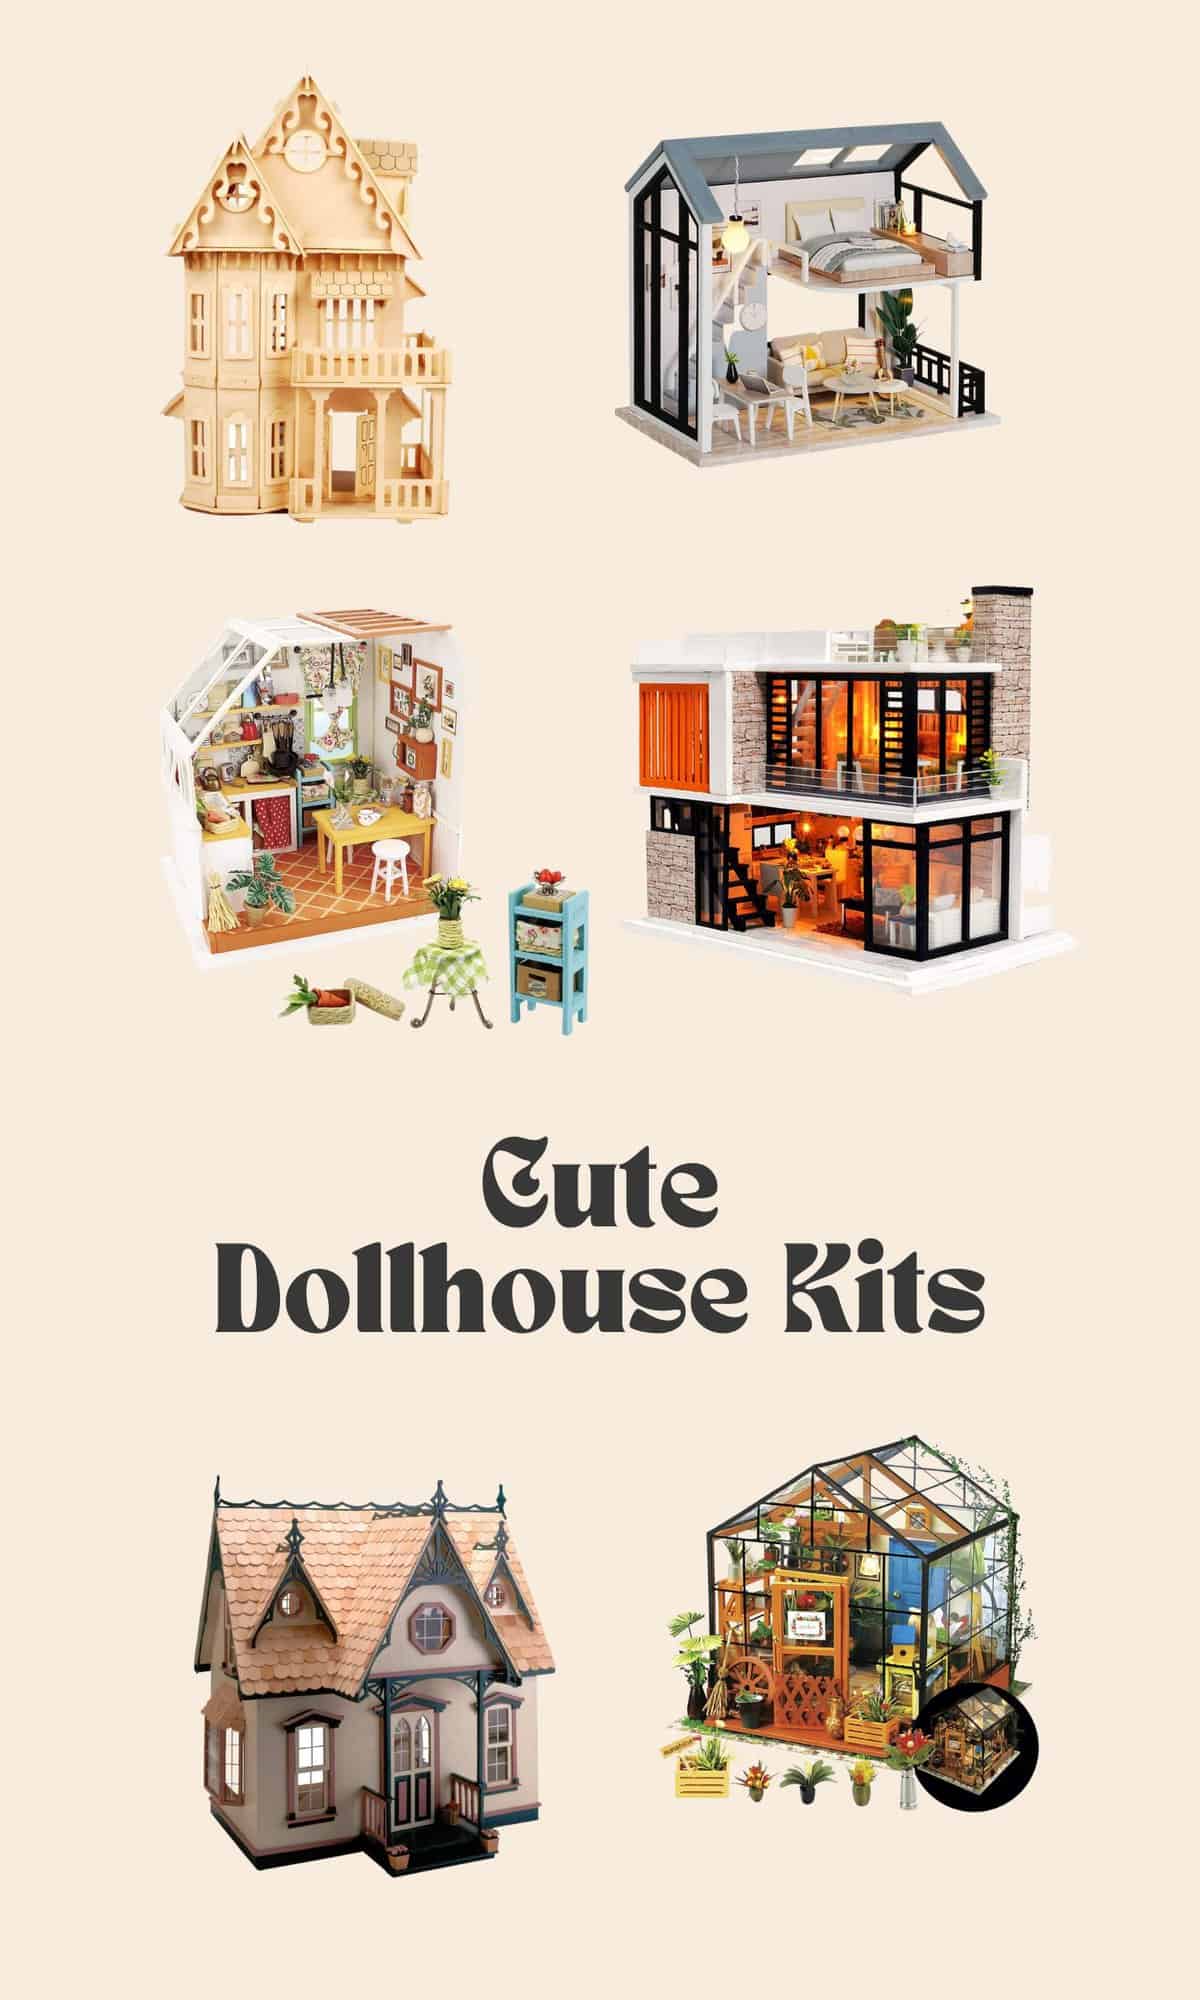
Links: 3D Puzzle Dollhouse / Loft Dollhouse / Kitchen Dollhouse / Modern Dollhouse / Victorian Dollhouse / Greenhouse Dollhouse
P.S. Check out these related posts!
Love this post? Sign up for our newsletter for more ideas!

Get creative ideas for recipes, crafts, decor, and more in your inbox!
 Get the How-To

Supplies
Supplies
- 6 1/2″ x 2′ x 4′ birch plywood
- 15 1/4″ x 2″ x 2′ poplar boards
- 6 1/4″ x 4″ x 2′ poplar boards
- 1 3″ x 3″ x 3′ poplar board
- small door hinges
- 2 cabinet door catch
- wood glue
- clear flex tape
- painters tape (optional)
Tools
- circular saw
- miter saw
- jig saw
- pneumatic nail gun and finish nails
- tape measurer
- 12″ speed square ((optional but very helpful))
- 2 wood clamps
- 400 grit sandpaper
- dust mask
- safety glasses
Instructions
- First, you’re going to want to cut all of pieces of plywood for the sides, back and bottom of the dollhouse. The overall dimensions are 30″ wide by 4′ tall x 12″ deep. The easiest way to cut your plywood is to lay them on a table or work bench with part of it hanging off while using wood clamps to keep it in place and make sure where the blade is going to be cutting the wood is also off the edge of the table so you don’t go sawing your table in half. To make sure you get perfectly straight cuts, hold a speed square in place to guide your circular saw (if you’re making cuts 12″ or shorter) or when making long rips in the plywood, clamp a scrap piece of wood on top of your board to guide your saw (as shown in picture above). This will make sure you get clean perfect cuts. Pro tip! Put a piece of painters tape on your plywood where you’re making your cuts to prevent unwanted splintering and shredding.
- Cut the bottom piece of the dollhouse to cut to 29″ x 11″. The back two pieces at 40″ x 14.5″. The sides will be 4′ x 12″ with the top of each piece 45º angles as shown above.
- Assemble all pieces together with wood glue and a nail gun with the side and back pieces attaching to the side edge of the bottom piece as shown above! I cut and added a scrap piece of wood to the top of the back pieces to hold them together, but it ended up not being entirely necessary (I found out later on), but you can add it if desired.
- Next thing to do is to cut out the windows! I made a template out of foam board to speed things along in this process (cardboard would work too). You can make the windows any size you want but ours are 2.5″ x 2.5″ with 1/2′ in between each square. Trace out 6 sets of windows, 3 on each side of the dollhouse. It’s helpful to fill in the part of the window that is getting cut out with a pencil to make sure you don’t get your lines confused. Drill pilot holes in opposite corners of each window the same width as your jigsaw blade and cut out the windows.
- Grab some scrap pieces of plywood that you probably have by now and cut some little 1″ strips for supports for the second and third “floors” and attach them to the walls with wood glue and a nail gun as shown above. Cut two more pieces 29″ x 11.5″ boards (same size as bottom piece) and place onto support boards and secure with wood glue and a nail gun.
- For the roof, cut two pieces of plywood to 32″ x 10″ with 45º angles so that when you put them together they meet in the middle like in the picture shown above. To make these long 45º cuts, just use the same method I explained earlier, but set your circular saw at a 45º angle when you cut.
- lace the two roof pieces on top of your dollhouse and place a strip of clear flex tape along the top. You might be wondering why flex tape and not hinges. … Well, if I used hinges they would be very visible and stick out from the top of the roof and I really didn’t want that. I wanted it to appear as the roof didn’t open at all so it was an extra fun surprise when it does! So, I opted to use this stuff. Random, I know, but It is extremely strong and flexible so it can allow the top of the dollhouse to open and close really easily. Glue and nail gun the back roof piece to the dollhouse, leaving the front piece free to swing open and shut.
- For the chimney base, take your 3″ x 3″ x 3′ board and cut a 5″ piece with a 45º angle on one side. Also cut one of your 1/4″ x 2″ x 2′ boards into four 3″ pieces with 45º angles on each side as shown above for the chimney top.
- Attach the little 3″ pieces to the top of the of your chimney base, then glue and nail gun the chimney anywhere you want to the back side of the dollhouse. Next for the roof (shingles), take your six 1/4″ x 4″ x 2′ boards and cut them to the length of the roof (32″) and attach them to the roof starting from the bottom up. On the back side, you’ll need to cut the pieces to fit around the chimney. To do this, hold up each piece of 1/4″ x 4″ x 2′ to the chimney and mark where you’ll need to cut. Use the same cutting method as I explained to cut out the windows, drill pilot holes in the corners and jigsaw out the pieces.
- Take your 1/4″ x 2″ x 2′ boards and with a miter saw cut a bunch of 6″ pieces with 45º angles on them to be the trim for your windows. Glue and attach all trim pieces to all 6 windows. Also cut some 10″ pieces with 45º cuts on one end for trim pieces for the roof as shown above. Pro tip! You can get some 400 grit sandpaper and stick it to a scrap piece of wood to sand the inside of the windows.
- For the doors, cut two pieces of plywood to 40″ x 15″ and trace and cut out 6 windows same way as before and attach with hinges. You can add some trim to these windows as well, but we decided to leave them plain.
- Cut 3 pieces of plywood at 12″x 13 1/4″ to be room dividers and glue and nail gun them in the middle of each floor to make 6 separate rooms. Also cut one more 29″ x 11.5″ floor piece, but this time with a 45º cut on one side to match the angle of the room for the top floor and “hidden room.”
- Lastly, grab your 1/4″ x 2″ x 2′ boards and cut a bunch of 2 1/4″ length pieces and 6 1/2″ length pieces to make little window boxes on each of the windows on the sides of the dollhouse. Glue and nail gun them together as shown above!
I love this idea and would love to do one for my children, by any chance do you have a autocad version with the layout and dimensions of this dollhouse? That I could possibly download and use?
Thank you
BEWARE!!!!! Do not use the dimensions provided in this unless they update it!!
There are many dimensions that are off but an example is that if the depth of the house is 12” front to back, you can’t cut a 45° angle for the roof and have 8” of storage. A 45° angle has the same rise/run so it would only be 6” of storage. I have fought w these plans for over a month now and I’d rather go buy a $400 dollhouse than try to decipher what’s right and wrong in this. And that’s just one example. Beware! You’re on your own but these plans are just an example of what you could build.
thanks for sharing this! Is the plywood 1/2″ thick or 1/4″? The materials list has 1/2″ but the link is to 1/4″ thick.
I’m going to try and make this for my daughter! Roughly how much did it cost for all the materials?
Please take this only in the most helpful way possible… but my brother and I used these plans to make this dollhouse for his daughter for Christmas, and I have a few things to say for people who are trying to use these plans:
1. Overall, we are appreciative that these plans are made available for free. Our goal was to build something personal and sturdy rather than just buying a Barbie dollhouse which may break more easily. So having these plans as a starting point took a lot of planning out of the process (sort of).
2. For those asking… Cost of materials is over $240. We purchased almost everything at Lowe’s/Home Depot, so if you already have boards, nails, hinges, etc… which are similar enough, you may be able to cut costs.
3. It seems we succeeded in making this dollhouse in spite of these plans, not because of them…. For anyone using these plans, you need to review EVERY DETAIL and MODIFY the materials list BEFORE going to the store (or going back to the store three times like I had to do after initially purchasing exactly what was on the list). Call it poor planning on my part, but I had made an assumption that the materials list was accurate.
3a. Materials list: Many items are completely incorrect. —– We had to buy an entire extra piece of the sheet plywood. —– The ¼” thick x 3” wide roof shingle pieces say to cut to 24” long … but the roof is 30” wide and those 3” boards come in 4’ lengths! So why did we cut them down to 24”?? And it looks like in the photos there are no “seams” in those pieces. —- Quantity of 2” wide window trim boards was way too low. We had to go back to the store to buy more of them just to dress the windows. Didn’t end up making window boxes, but would have had to buy EVEN MORE of these pieces.
3b. Dimensions: Careful! —- The large wall/floor/roof boards called for are not actually a perfect 24” wide, so the 12” dimensions aren’t cutting the board exactly in half, but rather one side will be 12” and one will be 11.25” or something like that. —— The window trim pieces say cut to 6”, but this doesn’t specify if 6” is the long or short side considering the 45 degree angles. Ours were about 5.5” on the short side, which makes the CENTER POINT at about 6”… but if you go and cut a bunch of 6” trim boards before cutting the angles you will have wasted all those pieces (luckily we thought this through first). —- Roof angles of 45 degrees and the dimension of 8” is not correct even if it was pointing to the right location. 45 degrees is what we want, 12” wide wall piece is what we have, so that makes the DIAGONAL dimension 8.5” with two 6” short sides.
“Well, did you write down a corrected materials list and dimensions?” No. We just needed to get this thing done for Christmas so we bought the missing materials and improvised as needed. These are the items I recall with some amount of detail.
Hopefully this small venting session can help people in the future. Once finished, it looks great. We used hinges on the top rather than flex tape (won’t flex tape get stale and crack eventually?). If doing it again, we would make the base larger so it’s not so top-heavy.
Above comment should say how to build your own diy dolls house
Don’t you just love auto correct
Sorry?
Greetings to you
I’ve always wanted a doll house and I’m going to give this how to. Hildebrand your own diy doll house a try.
Can you tell me what scale it is ?
For example is it 1:12 scale ?
I’m going to try making the furniture as well and having a scale to work to helps.
This is awesome! Can you give me an idea of how much the supplies cost?
Is it possible to get a printable version of these emailed to me?
Hi Lori! I’m adding a printable card at the bottom of the post now. 🙂
Hi! I am making this!! I did have a question about the windows that might be silly haha but how far apart are the windows from the sides and from each other? And the same question for the doors with windows!
Also where should the pieces that hold up the floors be?
Thank you so much! I’m excited to finish this with my daughter! ?
– Katie
I asked Collin and he said:
Okay so the windows are just spaced evenly in the middle and about 6” – 8” apart from each other I think. For the floor supports, they need to be evenly spaced to make each level of the dollhouse the same size
I am wondering how a right triangle with sides of 8” and 6” has 45 degree angles. I have put the sides and back together already, so will be difficult to recut.
Hi l uses Popsicle Sticks and Cardboard boxes to make little houses with
This is so great! I can’t wait to see it finished.
I “commissioned” my dad to make a dollhouse for me to gift my daughter this year for Christmas, and we plan to give it to her together. He will build it, I will paint/decorate it. Getting a dollhouse for Christmas is a long standing joke in my family, as my mom and dad bought a dollhouse kit for me when I was 5. It was our plan to build it together. Unfortunately, the kit itself wasn’t great (bad pop out pieces that splintered and broke), and I was a bit too energetic at that age to sit still and calm. It ended up never getting finished. I’m so happy that 30 years later my dad can finally give the gift he planned all those years ago.
Also, isn’t it great how people with different talents can come together and build something great?!?. Great job standing up for yourself Elsie.
p.s. Also loving the Podcast, I’ve been looking forward to my drive to work on the days I see a new one posted.
I know this isn’t a new post but just commenting to say, I am also commissioning my dad to make a dollhouse for my daughter. We will be working on it together. BUT he was an electrician for many many years (so he will be wiring the dollhouse for me so there will be lighting), he’s also an engineer, he’s retired plus he has all sorts of saws, clamps, the space, etc to build something like this. He has all of the tools needed and the skills to use the tools that I do not have. However, I will be designing it, painting it, etc.
My dad & I were building a doll house together when I was a kid. Our basement flooded & it was ruined. We never ended up starting over. So now fast forward 25 years, I have a 4 year old daughter & my dad & I can now make a dollhouse for her that she will go crazy over and hopefully pass down. My dad is so excited to be doing this & so am I.
All that to say, there’s no shame in getting some help for DIY projects & not sure why or how there could possibly any sort of negative comment on a post like this.
I have two things to say one is Michelle was wrong to speak to you that way. Not every blogger does what they print. Some are guests. But this doll house is what I want for Christmas but I can not print the directions with out alot of gibberish one the pages.
Is there a printable version of the plans or how can I get it to print right. Can’t wait to see rest of the plans.
Ps by the way I am 63 and this is what I asked my husband for Christmas
LOVE this dollhouse, can’t wait to have someone to make this for myself!
This is so adorable! Would you suggest priming the dollhouse before painting it? Thanks for sharing!
Super cool! Can’t wait to see all the dollhouse decor!
Also- it is very clearly written in the post that while Colin built the dollhouse, Elsie designed it and there will be another post showing how she decorated it. I think it is great that Elsie gave credit to Colin.
If for some reason you don’t like these type of posts, don’t read them!!! There is a whole internet out there!
I love this and can’t wait to see it come to life!
I noticed the windows were cut after assembling the frame instead of before- is this because it’s easier to do with a sturdy frame supporting it? Super novice with a jigsaw here and I don’t want to mess up such an important feature, ha!
Here! Here! Excellent response to Michelle, Elsie.
As a little girl, I dreamed of a wooden dollhouse to play with and decorate. I loved spending the night with a friend who had one. So now I’m grown with one teenage son – but man, I want to do this for myself for Christmas! And I’ll ask my neighbor – a man – to help because he’s good at woodworking, too.
How cute…. I hope you video her seeing it for the first time. 🙂
Bad day Michelle? 😮