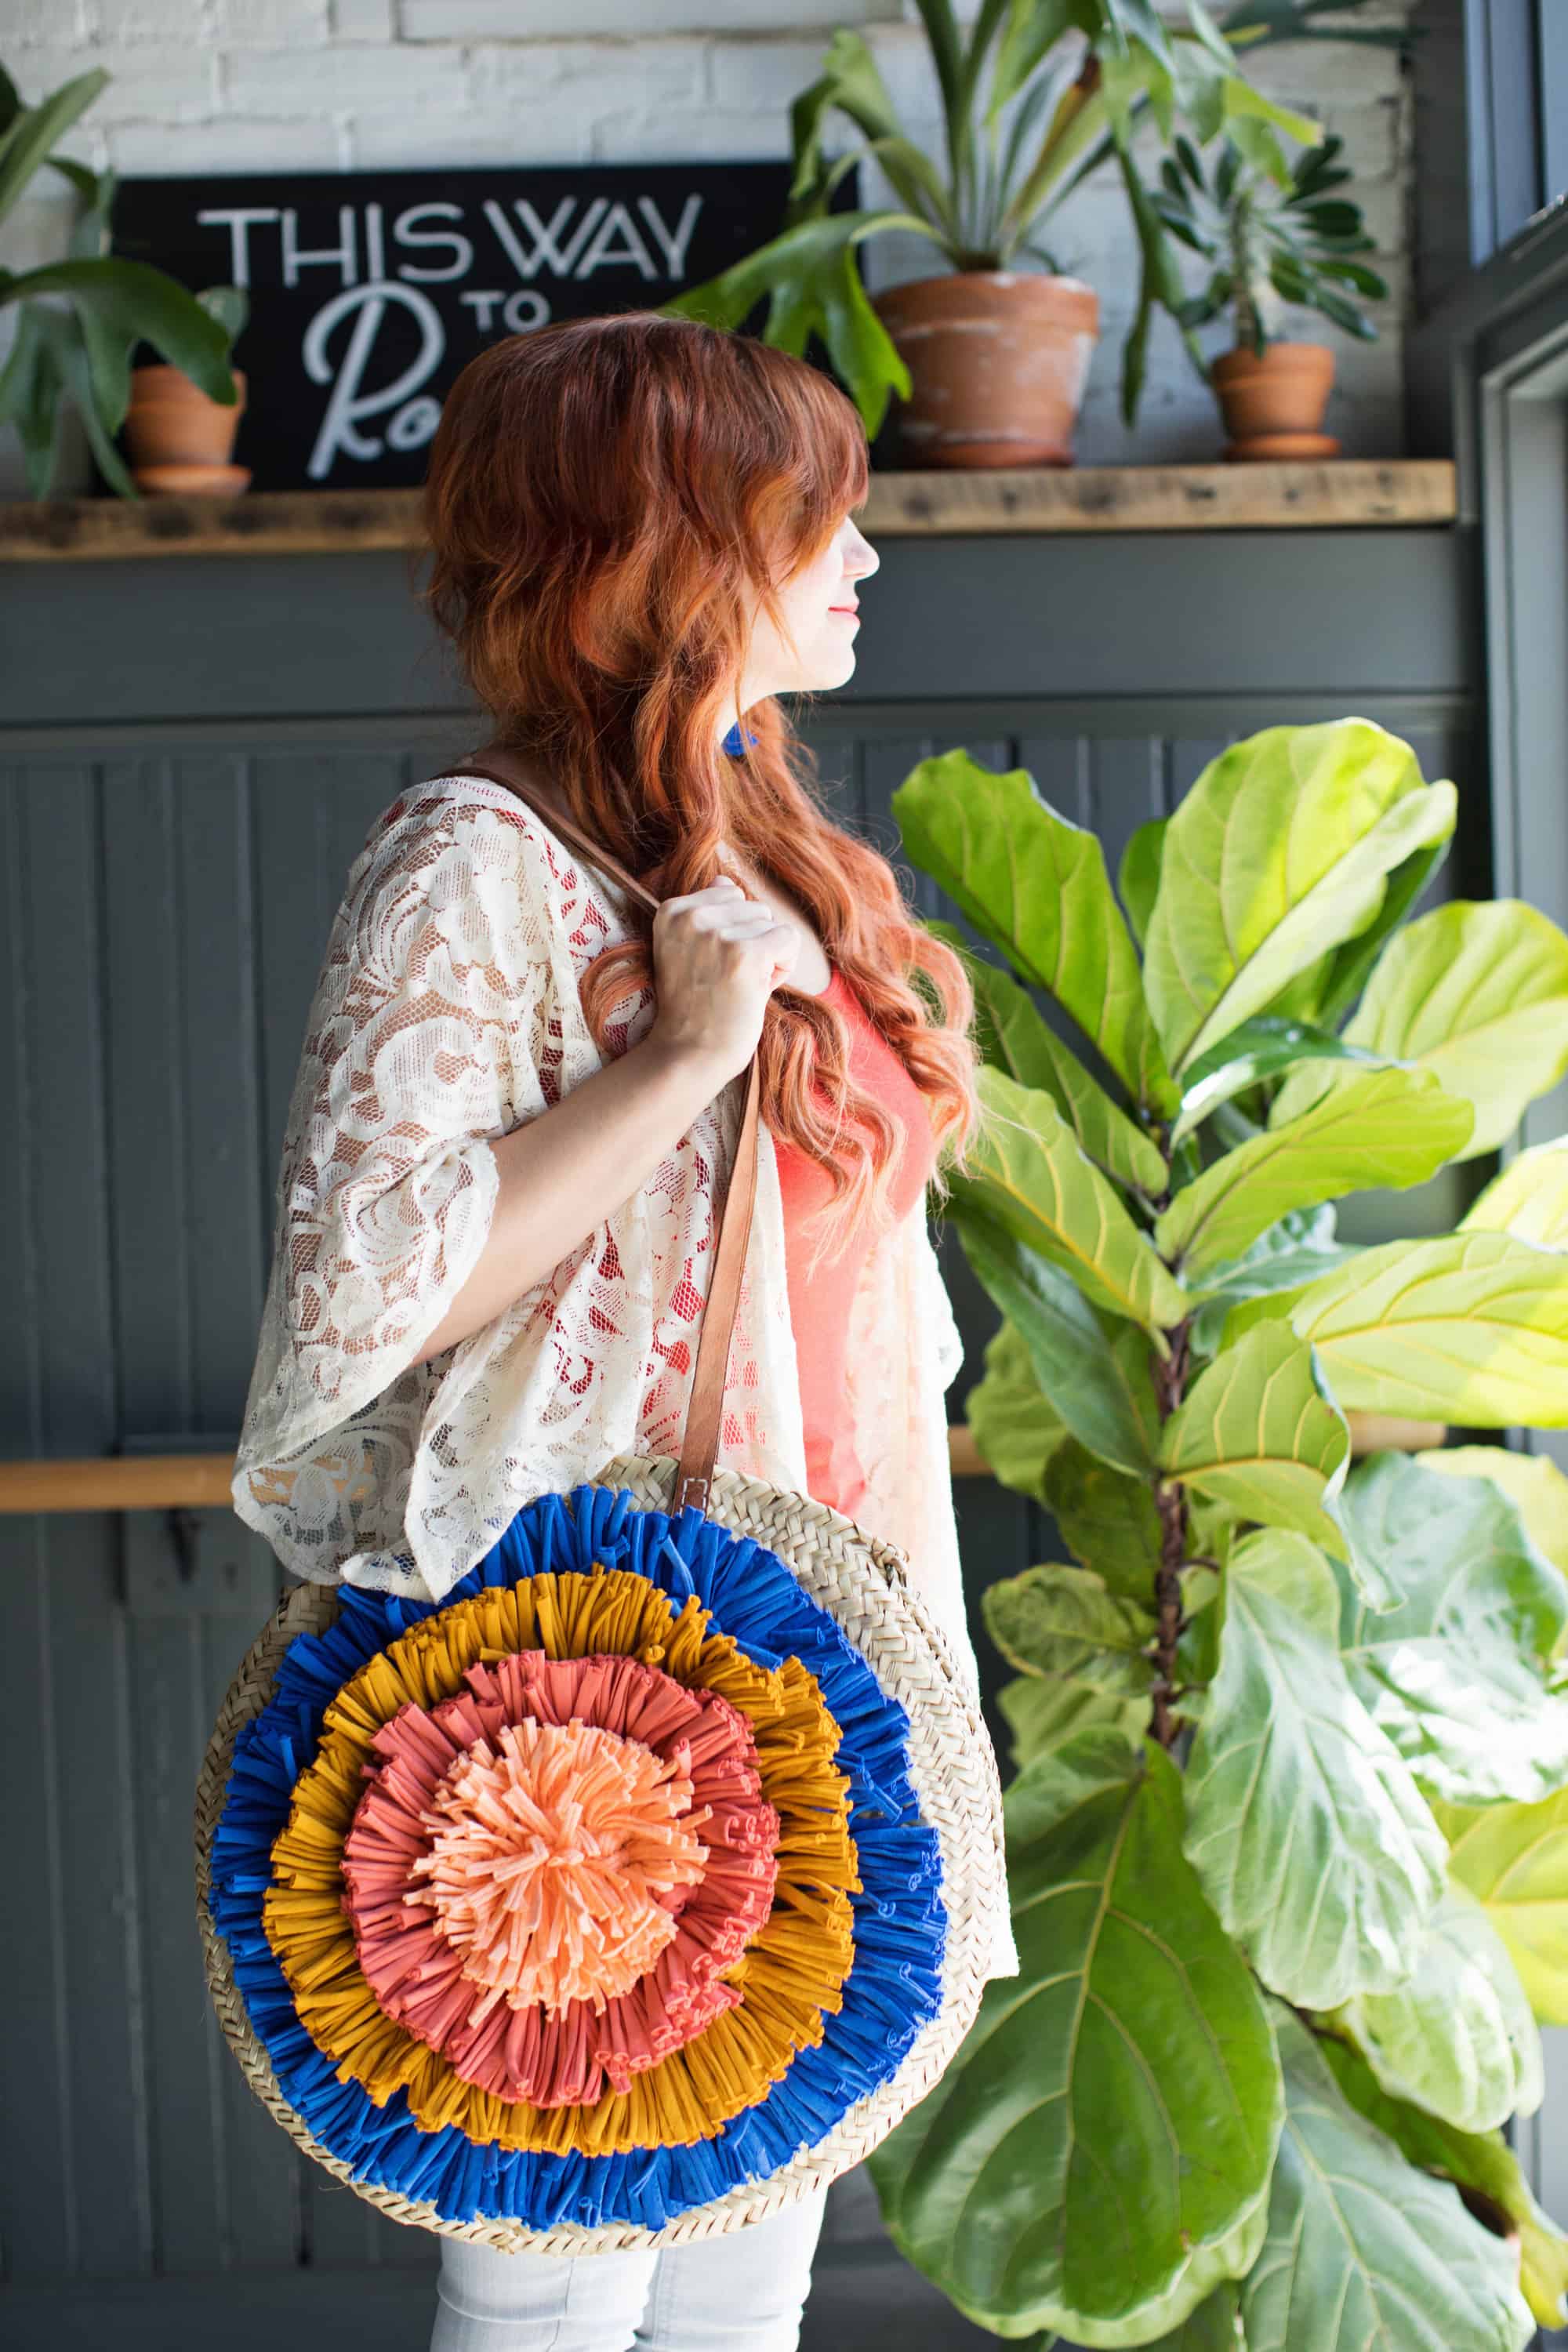
 I love a well-made seagrass tote, but sometimes a girl needs more excitement in her wardrobe! With a beach vacation on the horizon, I’ve been dreaming in tropical colors, so I channeled that warm-weather energy into giving my basic market tote a splashy facelift. It’s just the thing I needed to power through the end of winter with a good attitude, knowing it wouldn’t be long before I’d be dipping my toes into the clear, blue, Gulf Coast waters!
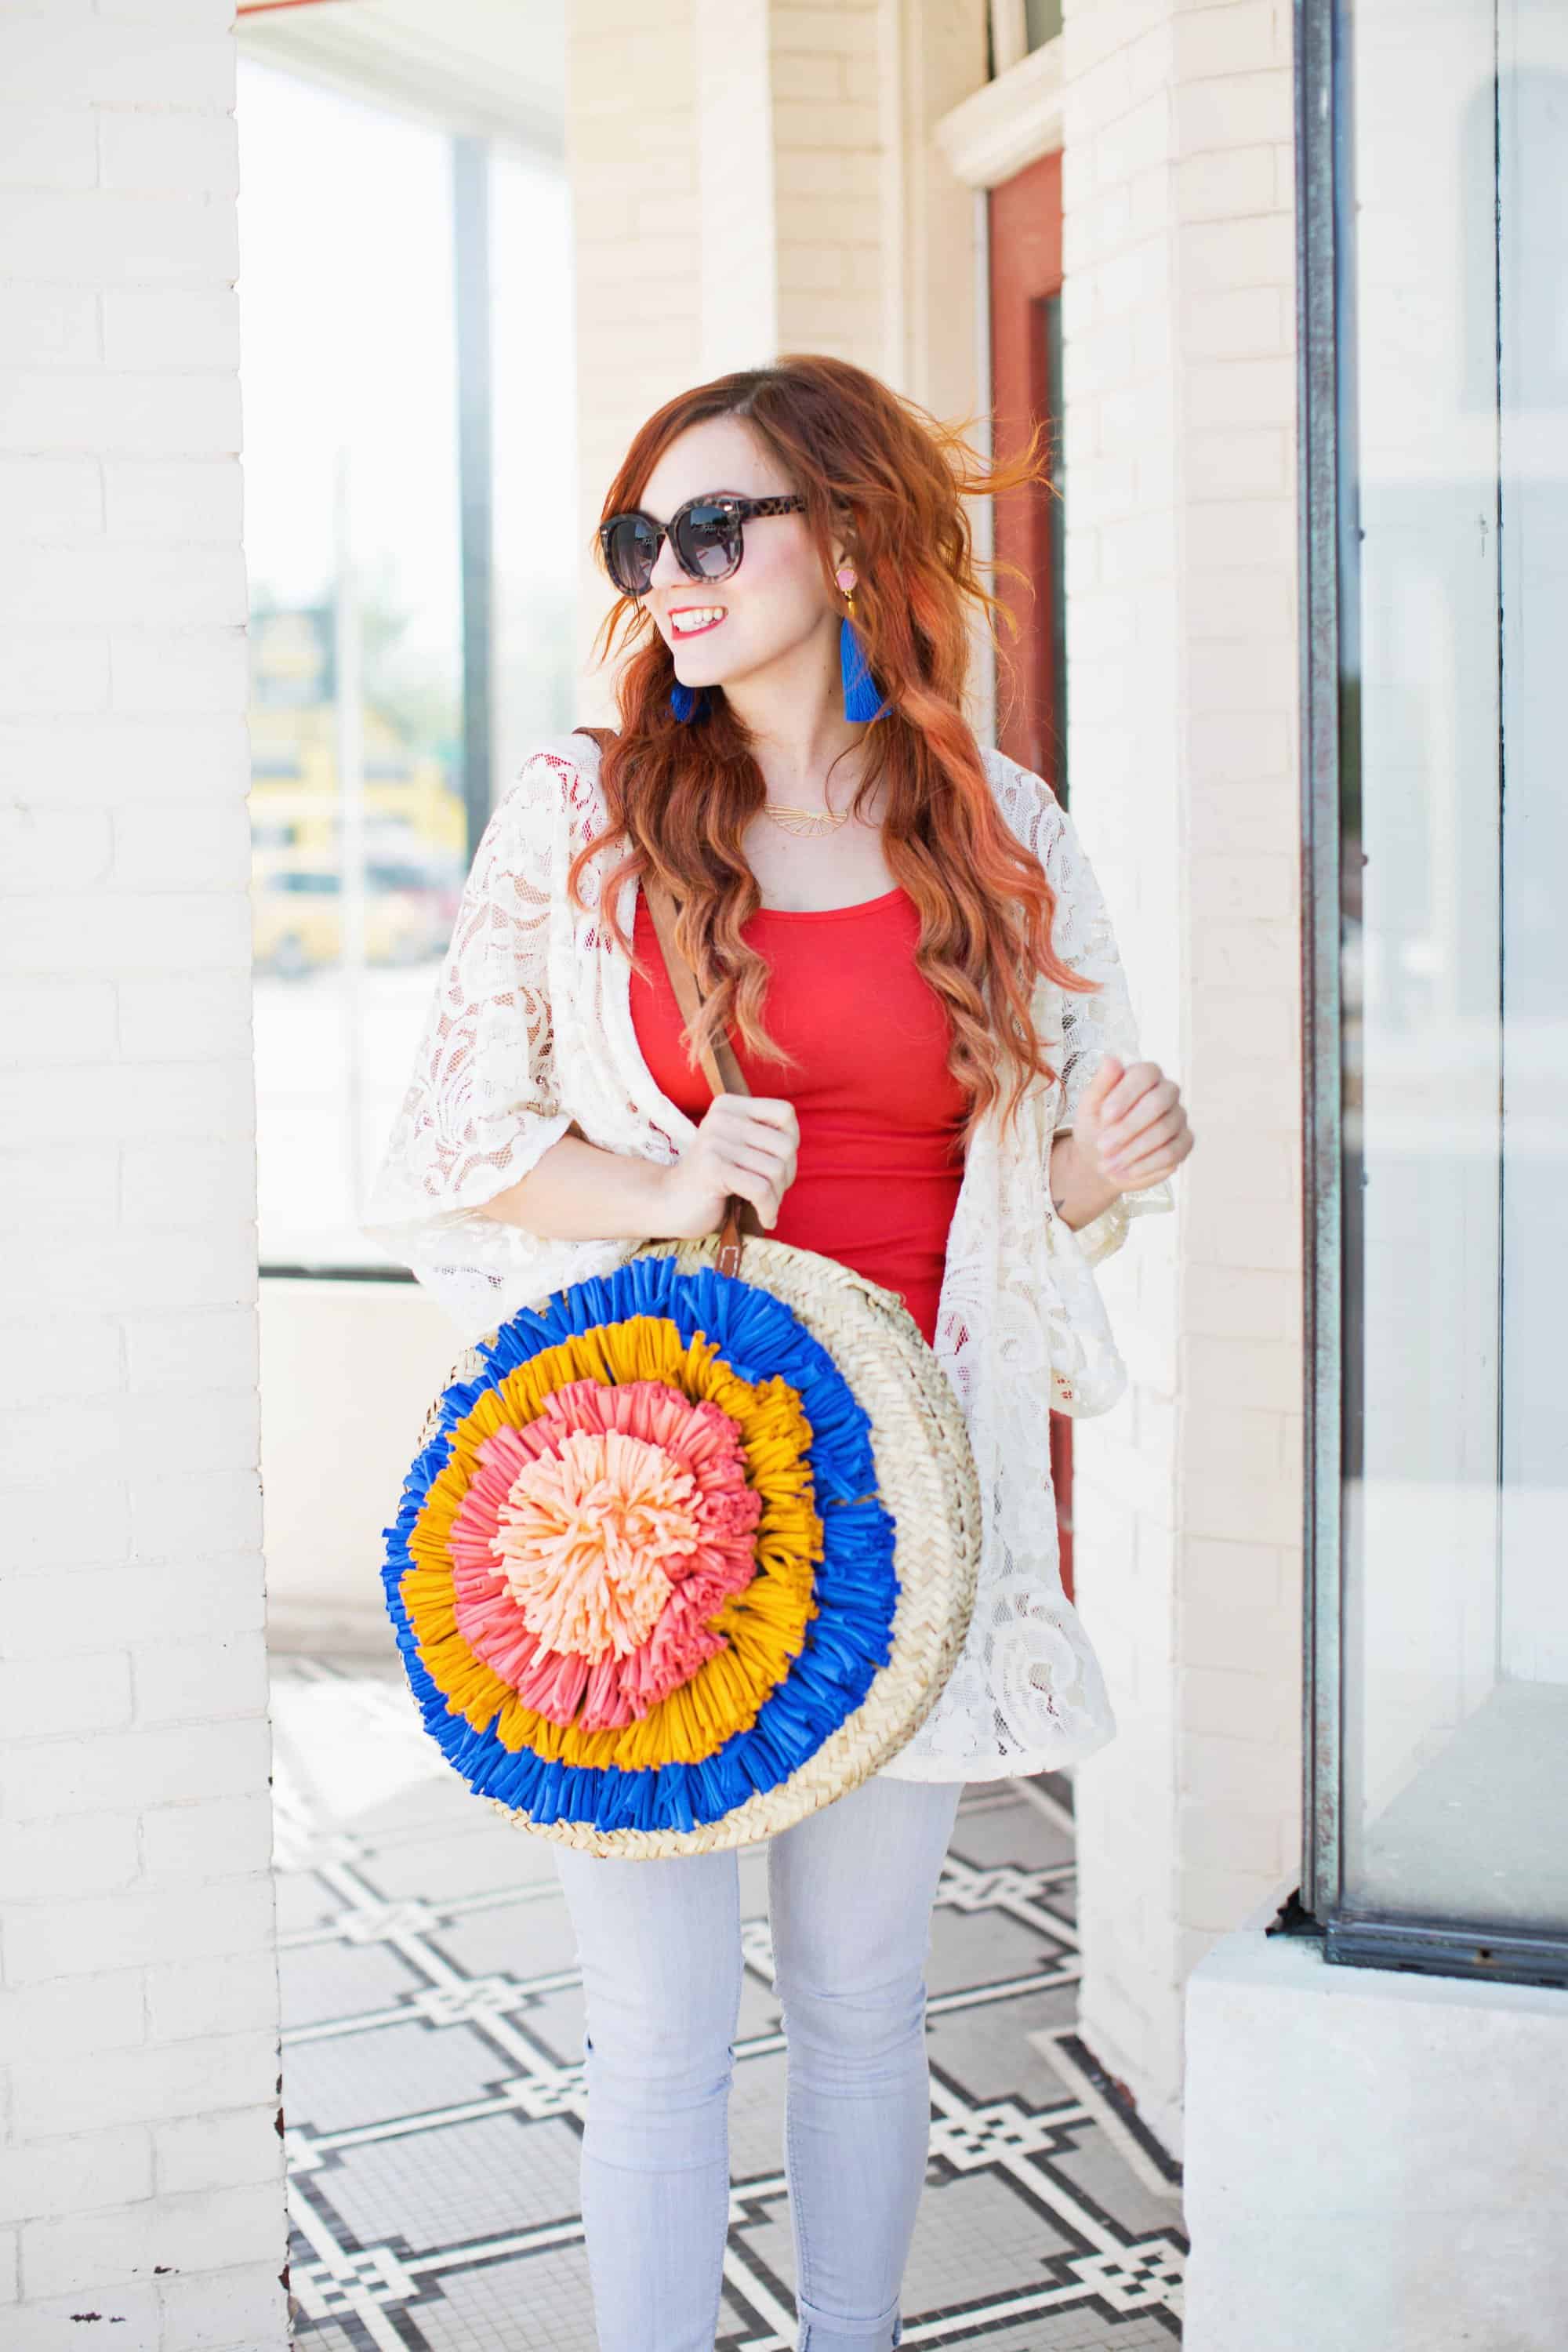 Tassels continue to have their moment in fun new ways, and this circular design is just one of the possibilities for adding them in layers to your favorite bag or backpack to get that boutique-type look. All it takes is some fabric yarn, cotton thread, and an evening in for a beautiful bag that will get you stopped on the street!
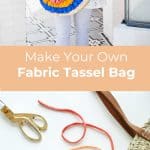
 Supplies:
–one round seagrass tote bag
-3-4 colors of fabric yarn (or cut up a colorful jersey tee). You need about 1/2 a skein for the outer two colors but much less for the inner two. You’ll likely have some leftovers that you can use for other fun projects.
-coordinating cotton yarn
-one 3″ metal tapestry needle
-scissors
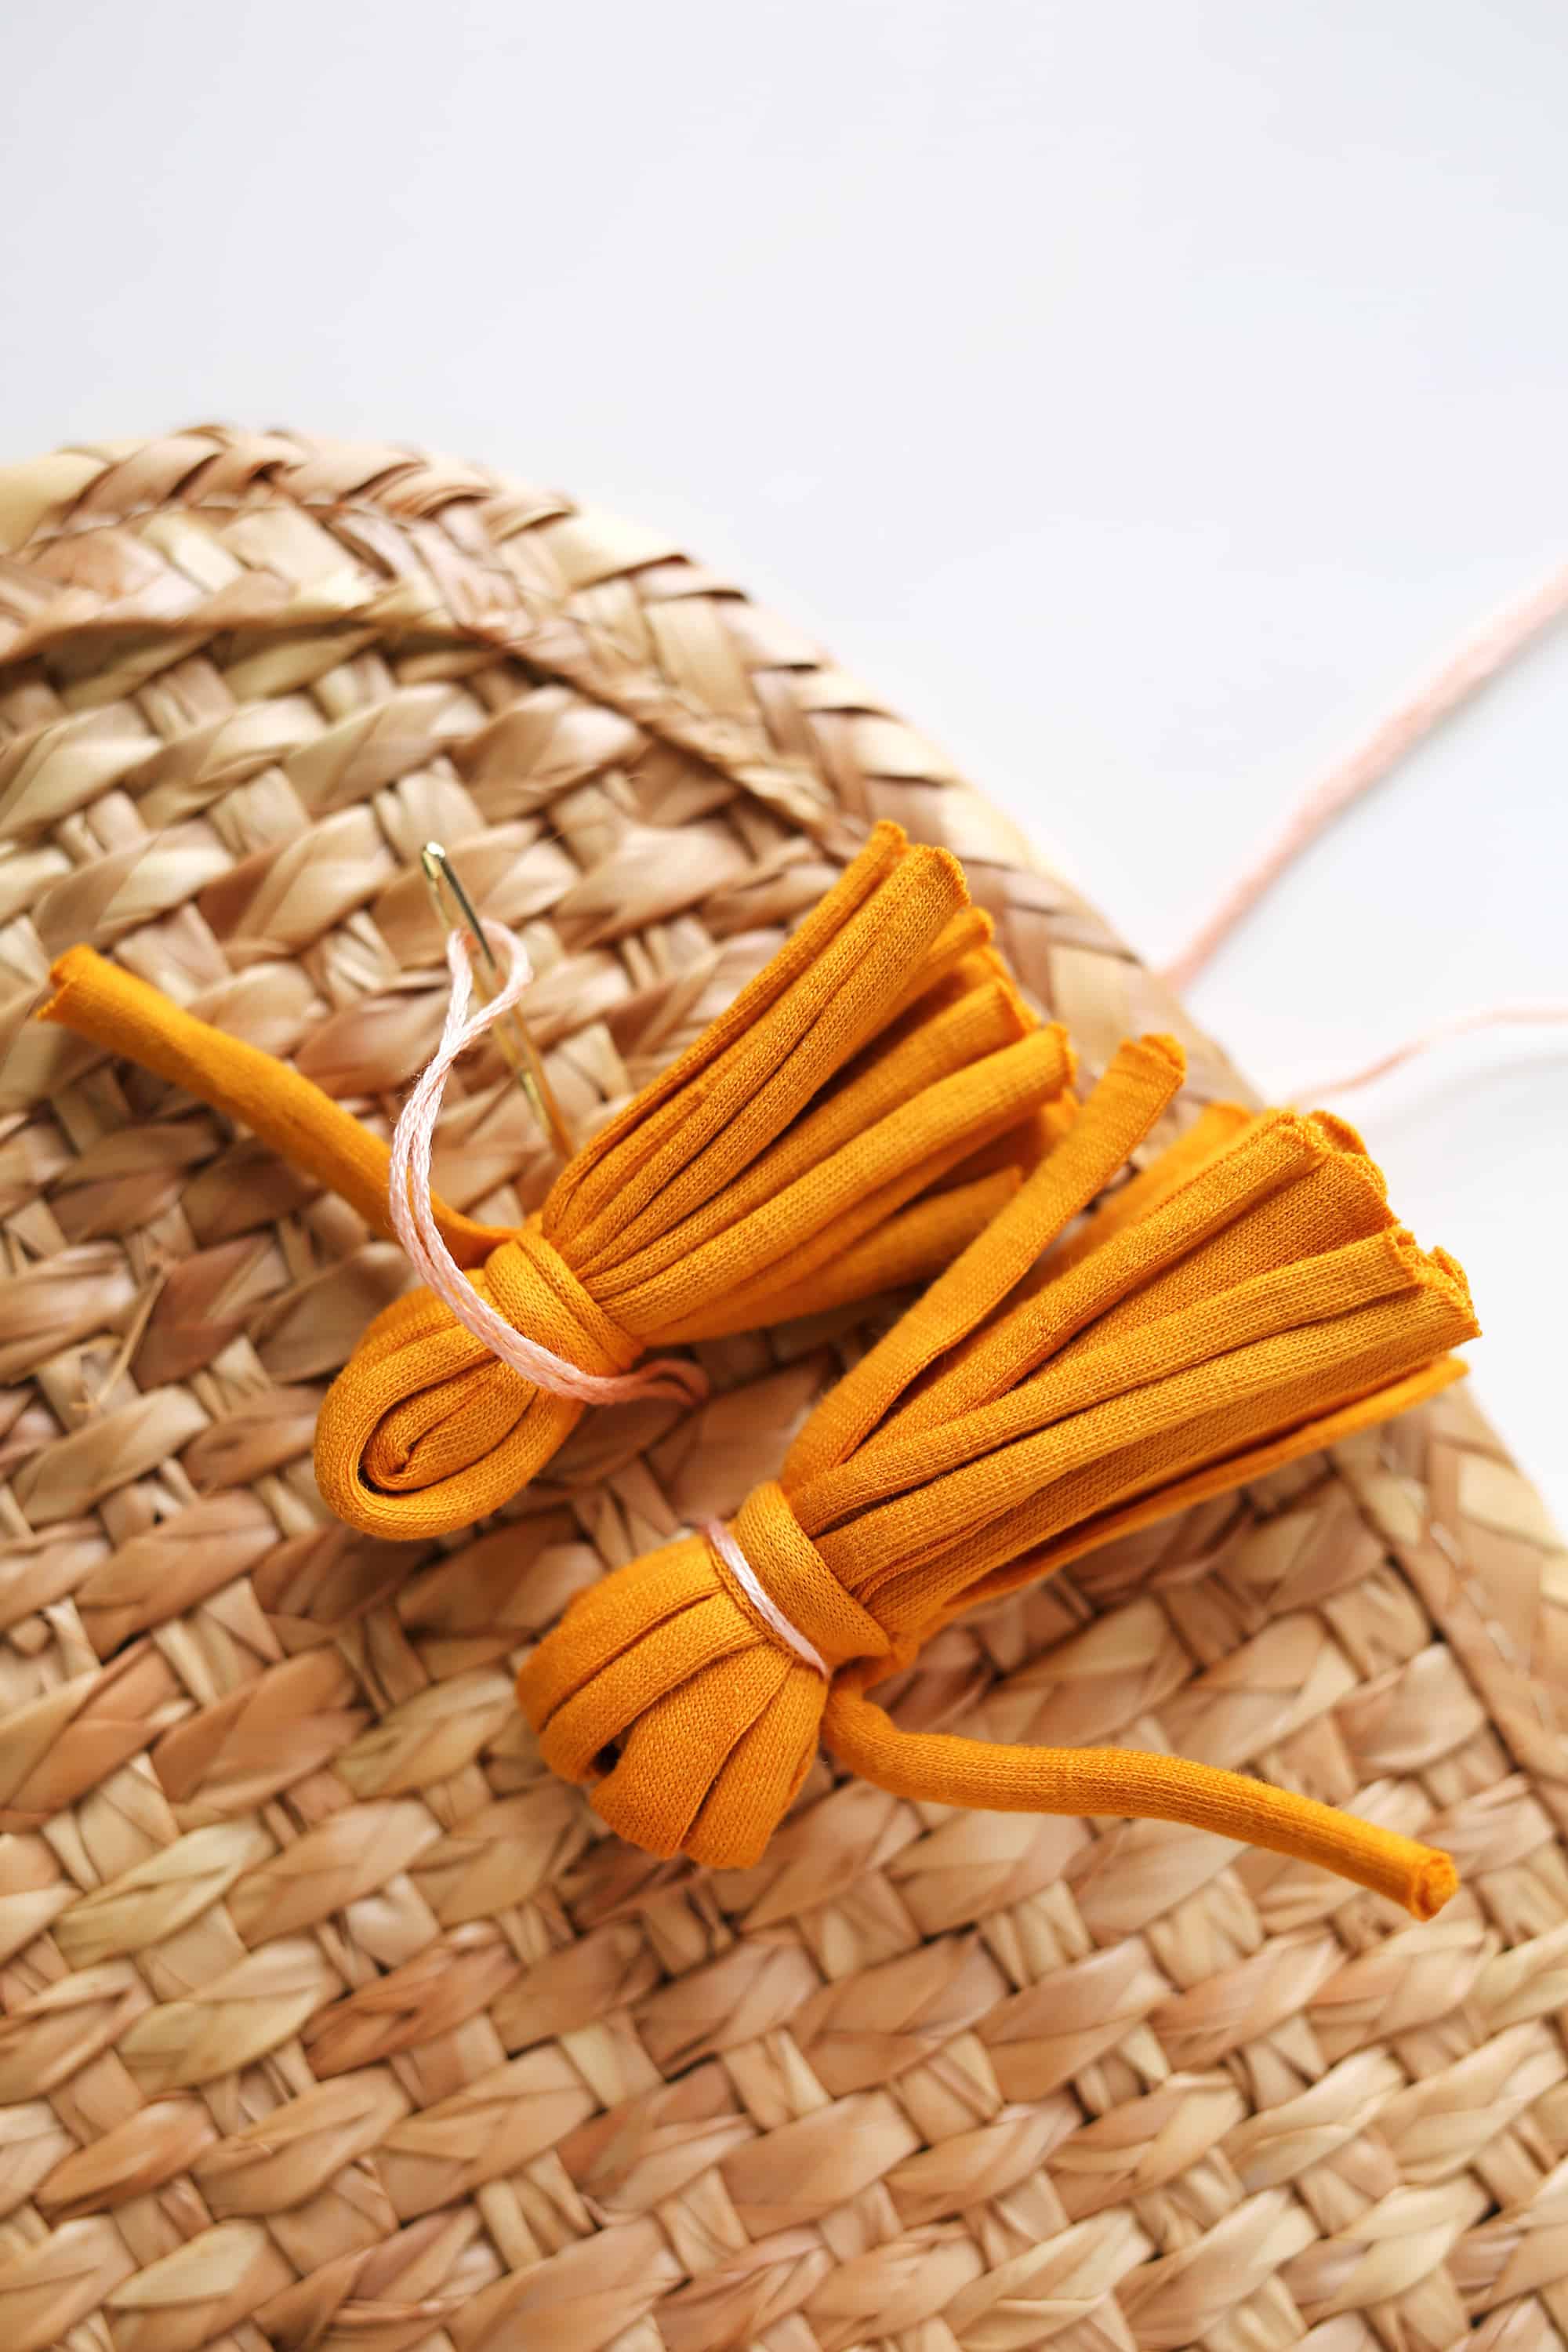
 You’re going to be making A LOT of tassels, so I suggest getting comfortable with a good podcast, binge watching some Netflix, or setting up a craft night so you can enjoy this mindless part a bit more! For each regular-sized tassel, you’ll want six strands of yarn that measure about 7″ long and an 8″ strand to tie around the top. To do this quickly, just gently wrap your yarn around the width of your four fingers six times, and then cut your yarn near the end where you started for six (mostly equal) strands. Continue to do this until you have a pile of strands, and then cut some slightly longer ones to tie them up in. If you do most of the cutting all at once, it’ll make for an easier time than counting and measuring out each strand individually before making a tassel.
To make your tassel, fold six strands in half and then tie a longer strand tightly near the top so you get a double-knot.

Then fold the two ends of your longer strand down and trim off your ends so that they are all generally equal. Repeat, repeat, repeat.
 To know how many tassels you’ll need, finish making them based on the outer color first and place them where you’d like them as you go. This way you won’t end up with more than you really need. But really, is it possible to have too many cute tassels? It’s really not.
 Place your outer row of tassels in position so you know about how far from the edge of the bag you’d like them and to also give you an idea of how much spacing you want between them. Then thread your needle with an arm’s span of cotton yarn. Start from inside the bag at the top and poke through to the outside so that you aren’t splitting any seagrass.
 Place your tassel to the left of your yarn. Wrap your yarn over the top of the tassel (where your long strand wraps around) to the left and then stitch down through your bag and tie a double knot to secure the end of your yarn. Then stitch up again about 2″ to the right so that your yarn is now on the left side of your second tassel. Wrap your yarn again over the tassel to the left and stitch down through your bag and up again 2″ to the right so that your yarn is now on the left side of the third tassel. There’s no need to tie any more knots until you reach the end of your yarn.
You’ll be working to add tassels in a clockwise motion as you stitch over them to the left. This will secure the tassels to your bag so that they aren’t flopping around everywhere and losing their shape. Once you run out of yarn, tie a firm knot on the inside of your bag and then begin again.
 When you’re ready to start your second row of tassels, be sure to place them about 1″-1.5″ inside the outer row. You’ll need fewer tassels since you won’t be covering as much space. Continue in the same manner of stitching your tassels to your bag as before.

 Once you get to your fourth row of tassels, you won’t be able to fill them in in the same way. I suggest adding your tassels together so that the tops of them meet and stitching those in. Then fill in the gaps with slightly thinner tassels made of only 3 or 4 strands of yarn and trimming them down about 1/2″ shorter than the regular tassels so that you can place them in the gaps and still have their ends all looking equal.
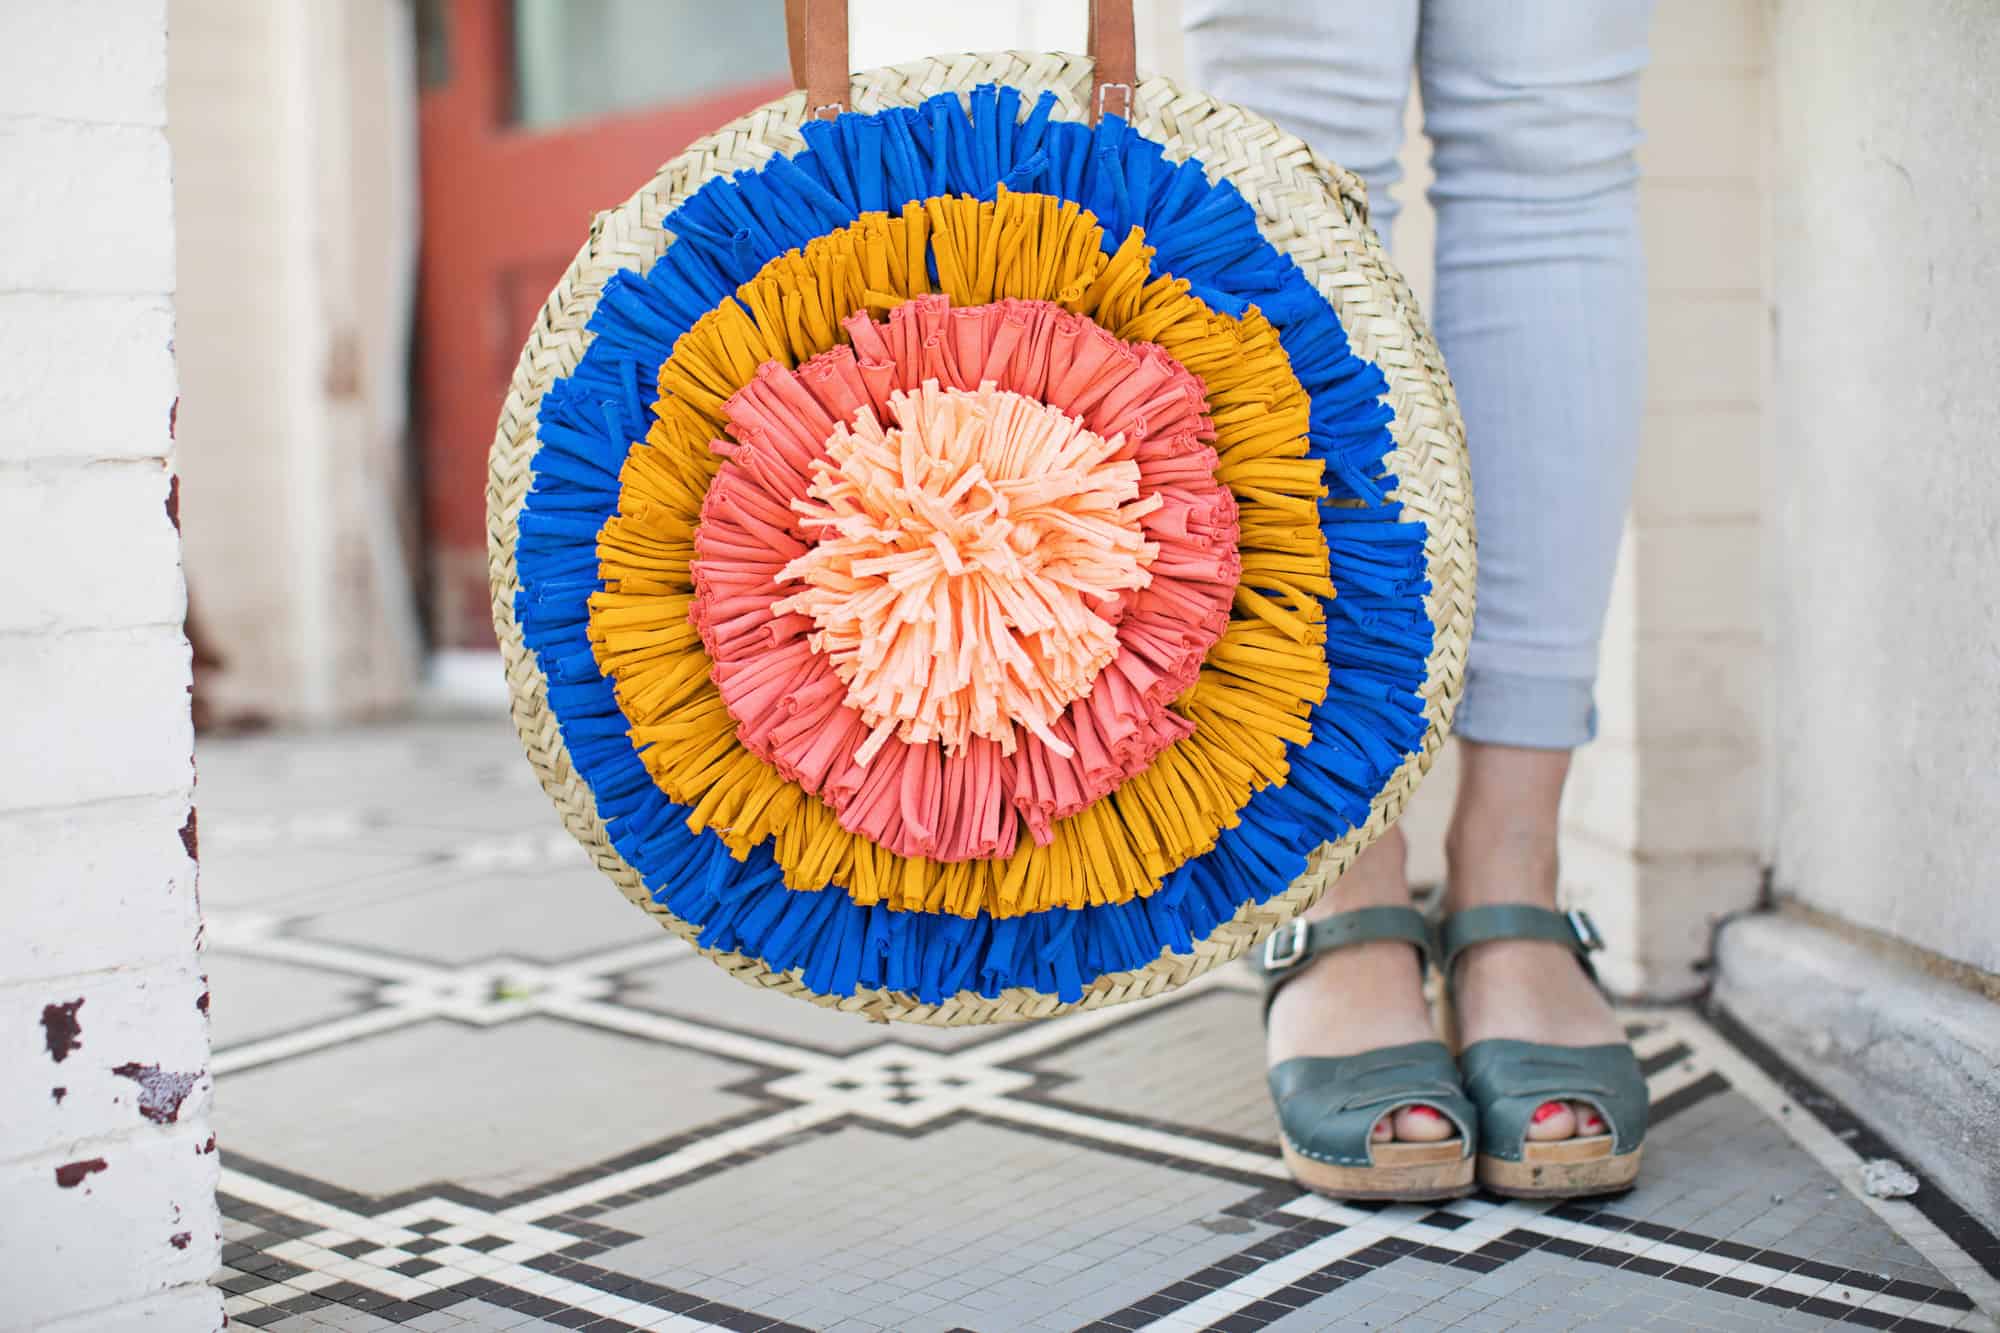 To avoid having any sort of hole in the center, cut about 14-18 strands of your inner color (unless you want to add a fifth) and tie them as tightly as you can with a single knot of the same color right in the center (like you would with a pom-pom). Then fold the top half of the tassels on both ends towards each other above and below that knot and use the loose ends to tie another knot. This will create more of a pom-pom effect. Trim your ends and stitch this piece down tightly in the center. Then take your gorgeous new bag out on the town and test it out!
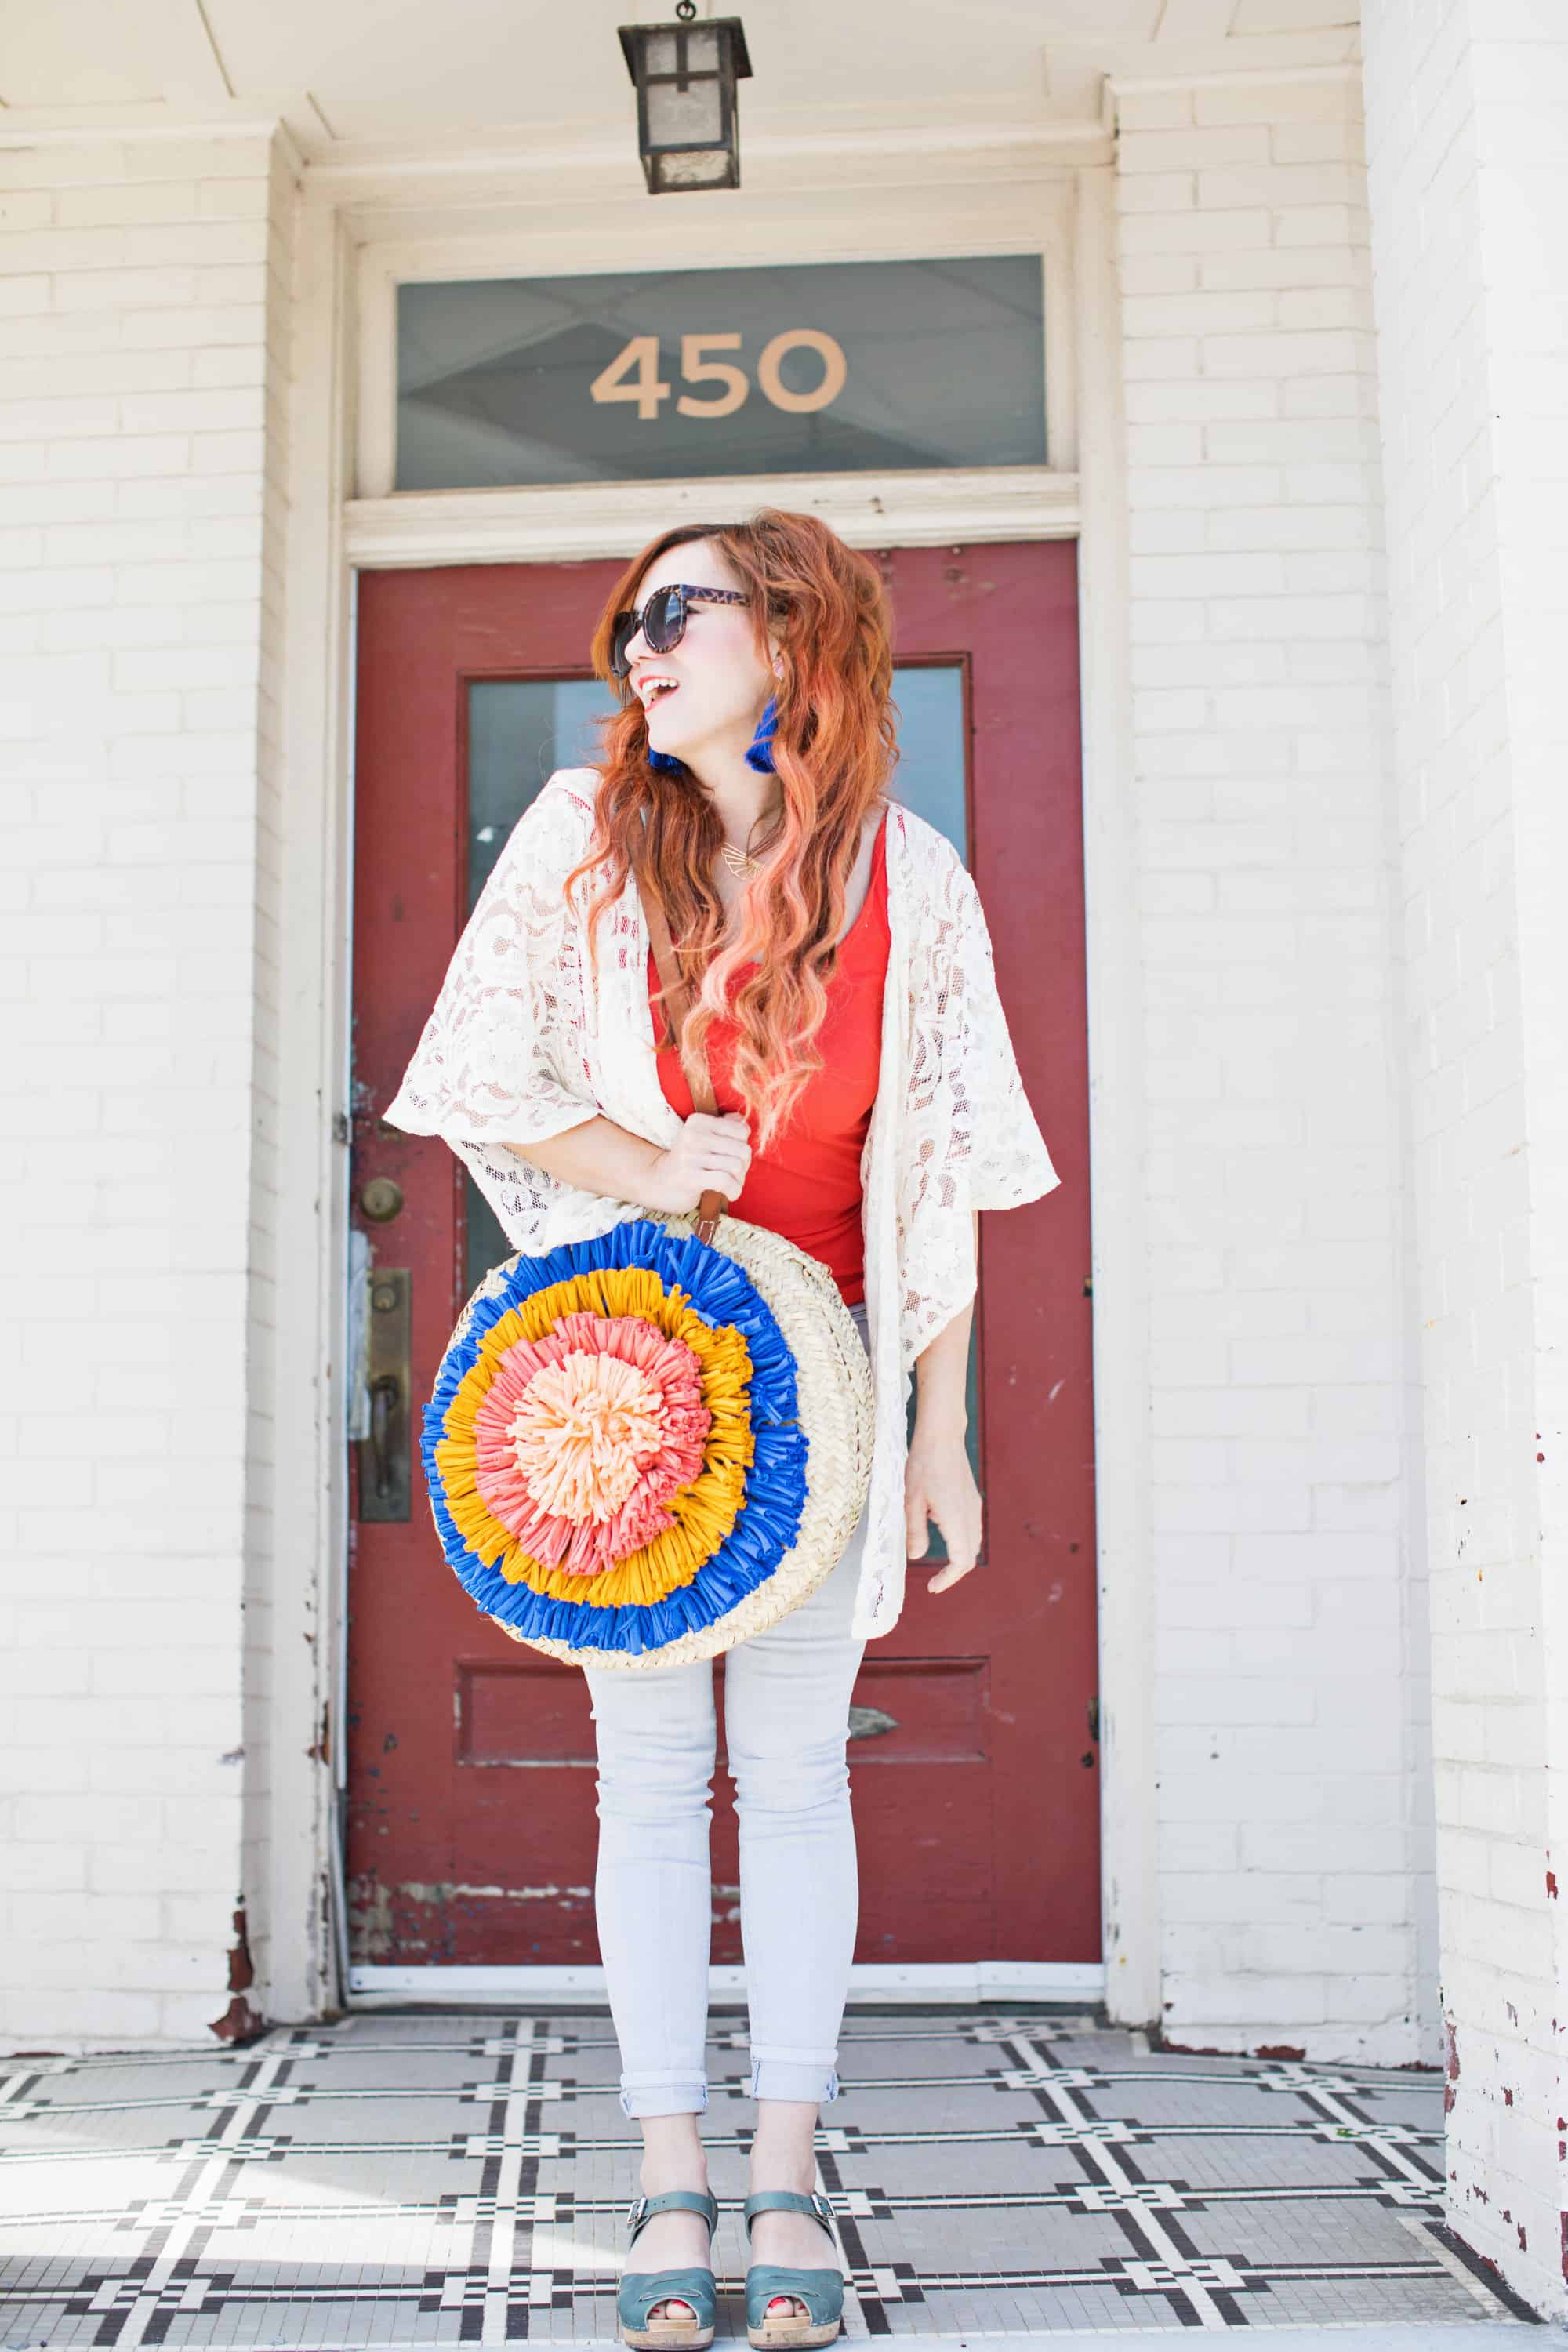 You could just as easily make your tassels out of colored raffia or yarn depending on the texture you want it to have, but this fabric yarn has just the right amount of sturdiness to it to create this fun, circular shape. This particular bag is large enough to fill with a beach towel, snacks, and a good book that I’ll likely not read because I’ll be chasing after a toddler instead, but I’ll still put the book in there just in case. Now, to find the perfect swimsuit to match! –Rachel
P.S. With your leftover fabric yarn, you can make this cushy woven bath mat, this textured pillow, this woven rug, or this statement woven wall hanging.
What a fantastic idea! So effective and I love that colour scheme too 🙂
Adore this! <3 the idea of making one side for fall/winter and the opposite for spring/summer.
Katie | www.sunshinestyleblog.com
Lovely bag. It is so original. Thank you
I will try do.!!!
Solange
www.puertaalsur.com
Cute! So wanting to do this design on a circular pillow. Adding to my crafting to do list!
Looking amazing, this is astonishing.
Target offering Upto 30% off outdoor living
Such a beautiful bag! It would be great for a vacation by the beach <3
https://www.myblackcloset.com/
This is so fun! The perfect summer bag, and a really nice way to integrate colour and texture into an outfit!
– Natalie
www.workovereasy.com
LOVE your shoes … where are they from?!
This turned out so great! Awesome job Rachel!
Emmy
http://www.candlejunkies.com
Love love love this. Definitely going to try to recreate this! What a cool idea
I love how colorful this is, so cute!
https://www.makeandmess.com/
This bag is a stunner! I think it would also be a perfect “firework” bag for Independence Day!
OMG I love this! One of the cutest DIYs I have seen in a while! I will totally be doing this! <3
Such high praise! Thanks so much!
Oh this is so gorgeous! Rachel, I just love it. You’re a genius.
haha! I’ll take that! Thanks, lady. 😉
This looks so good!!
This is something I’ve never seen before – reminds me of the ribbons they win from horseriding competitions! Tassels are so versatile for DIY!
Charmaine Ng | Architecture & Lifestyle Blog
http://charmainenyw.com
When in doubt, add some tassels, right? Ha!
Haha! Love tassels.
-Greta
www.mintyfrosting.com
I’m loving the tassel look these days! It’s so fun and easy to incorporate into any outfit! And depending what type of fabric and color you use, the look can be so different. Cute!